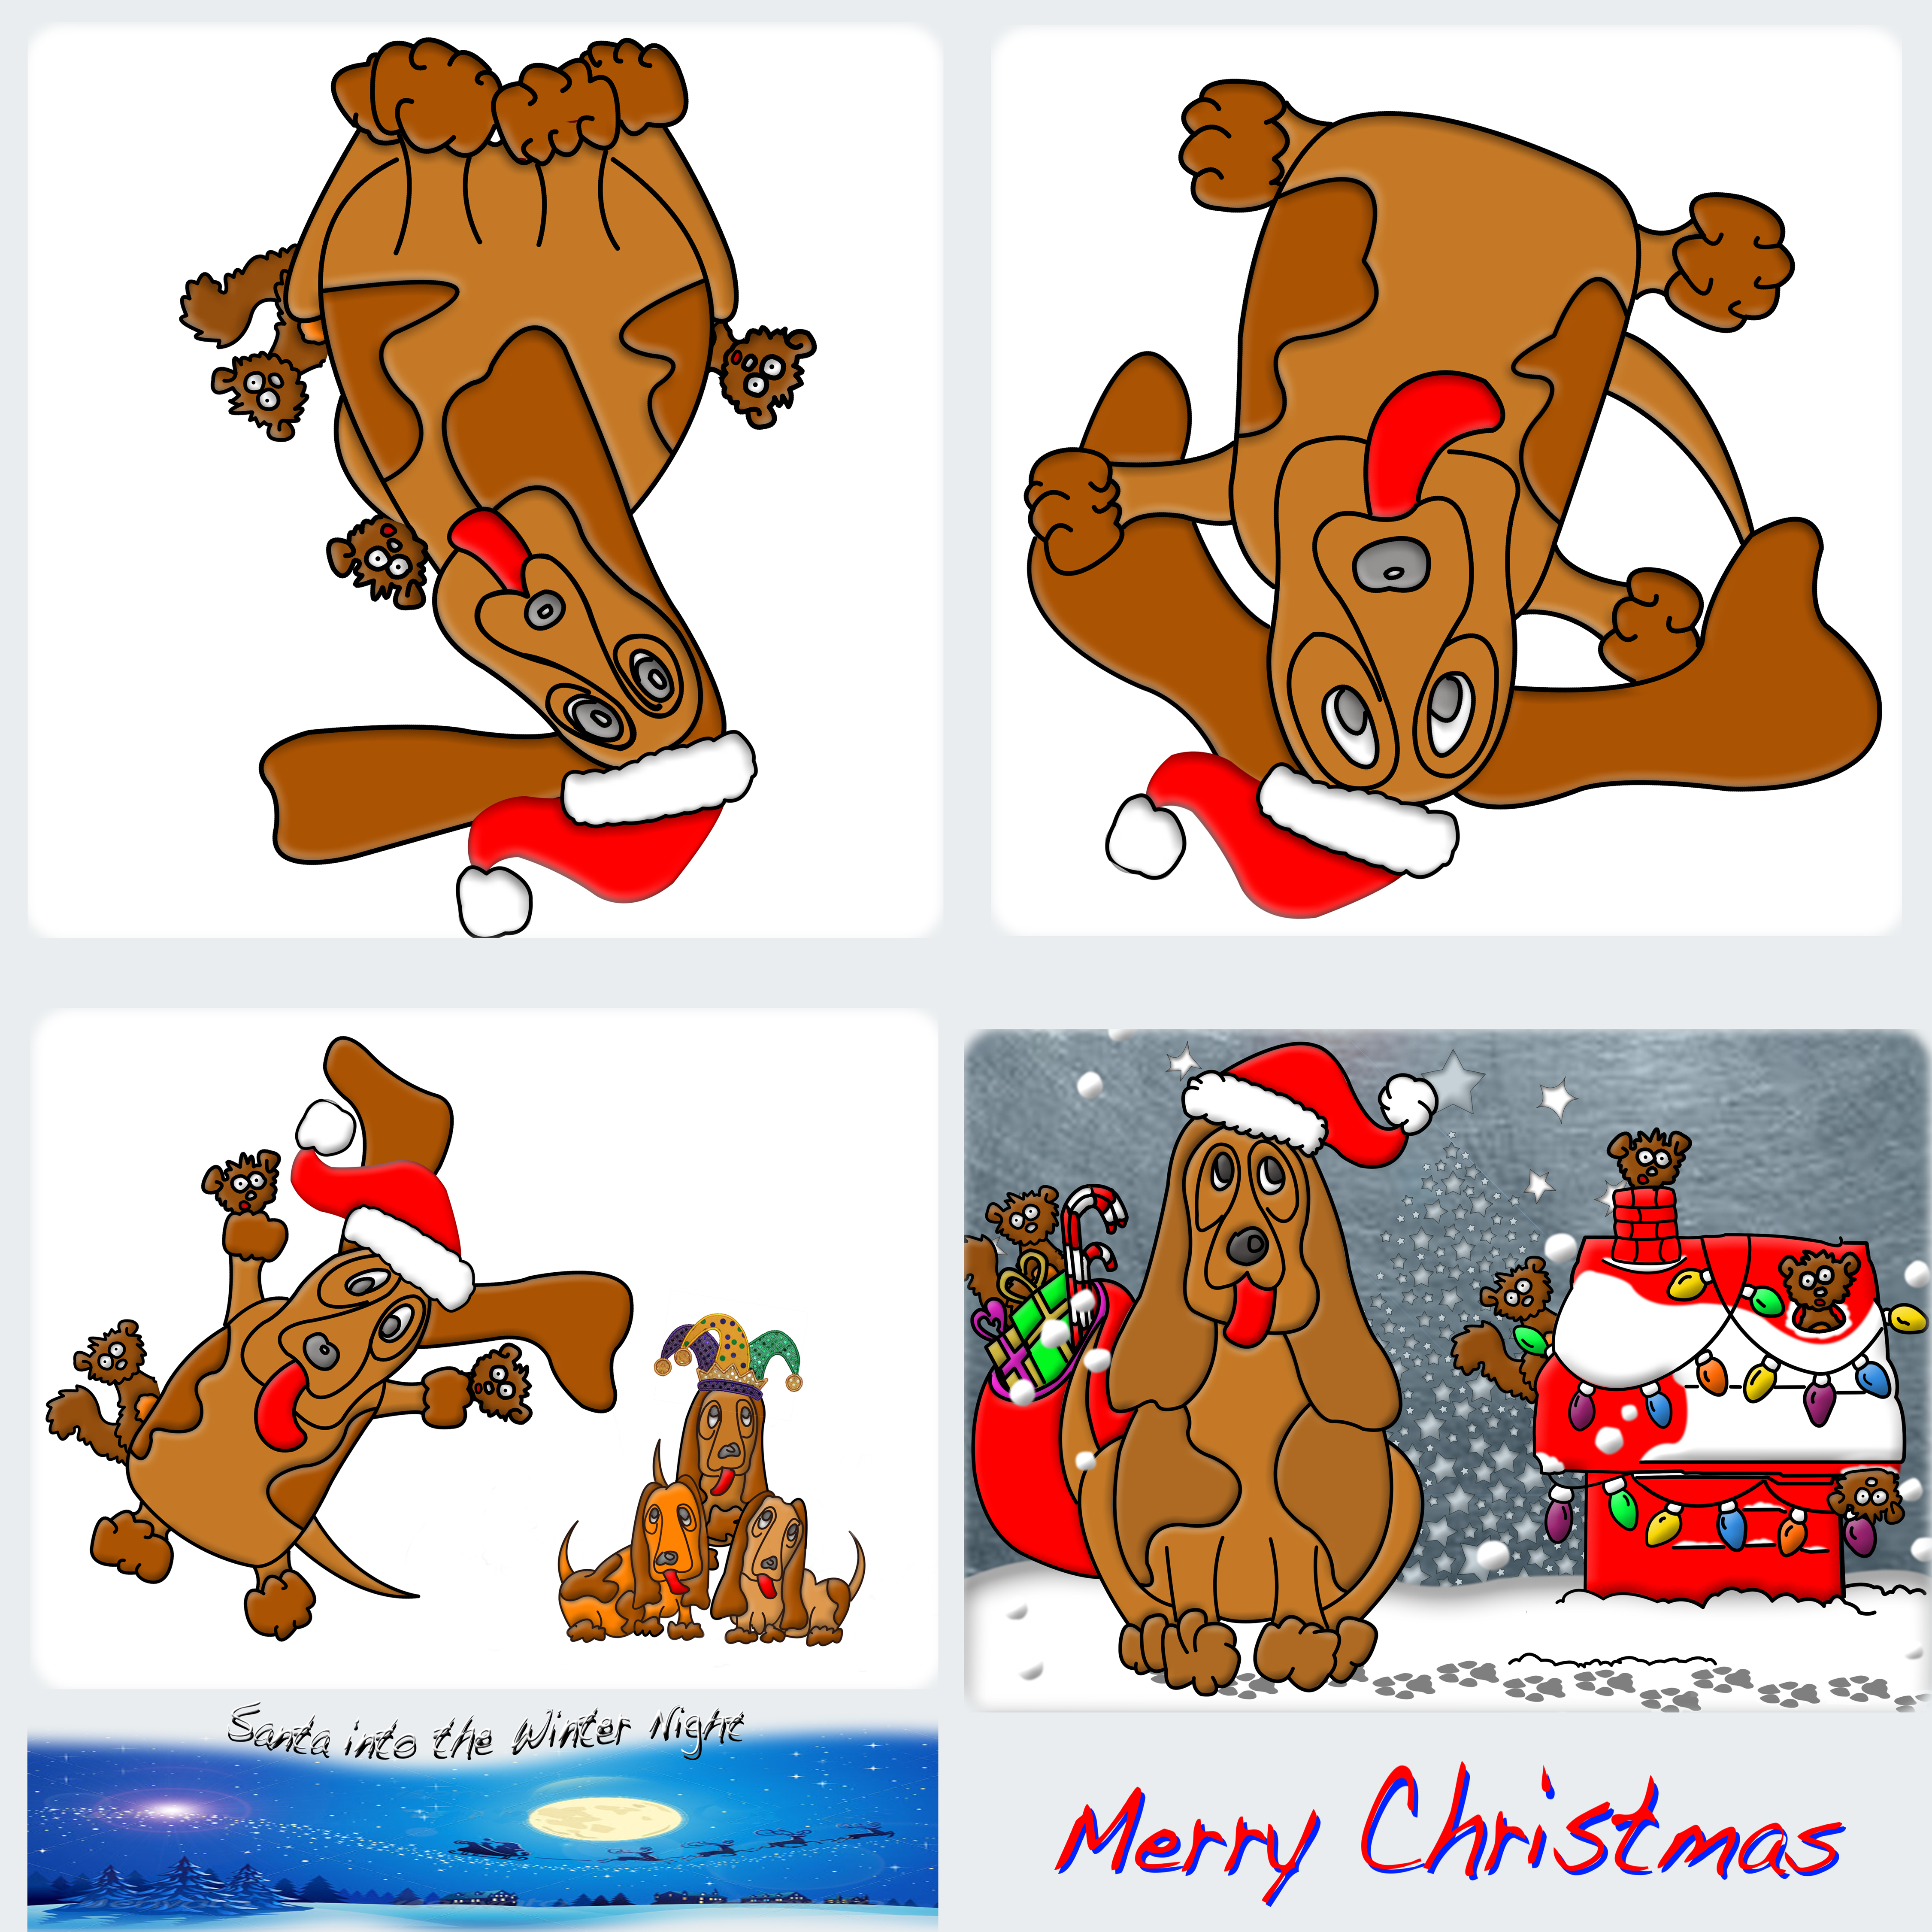
Why are the drawings and photos upside down? To make this a one pass printed card, the paper is folded top to bottom, then left to right. The two bottom images are the front and back, and the two top images are the inside left and right.
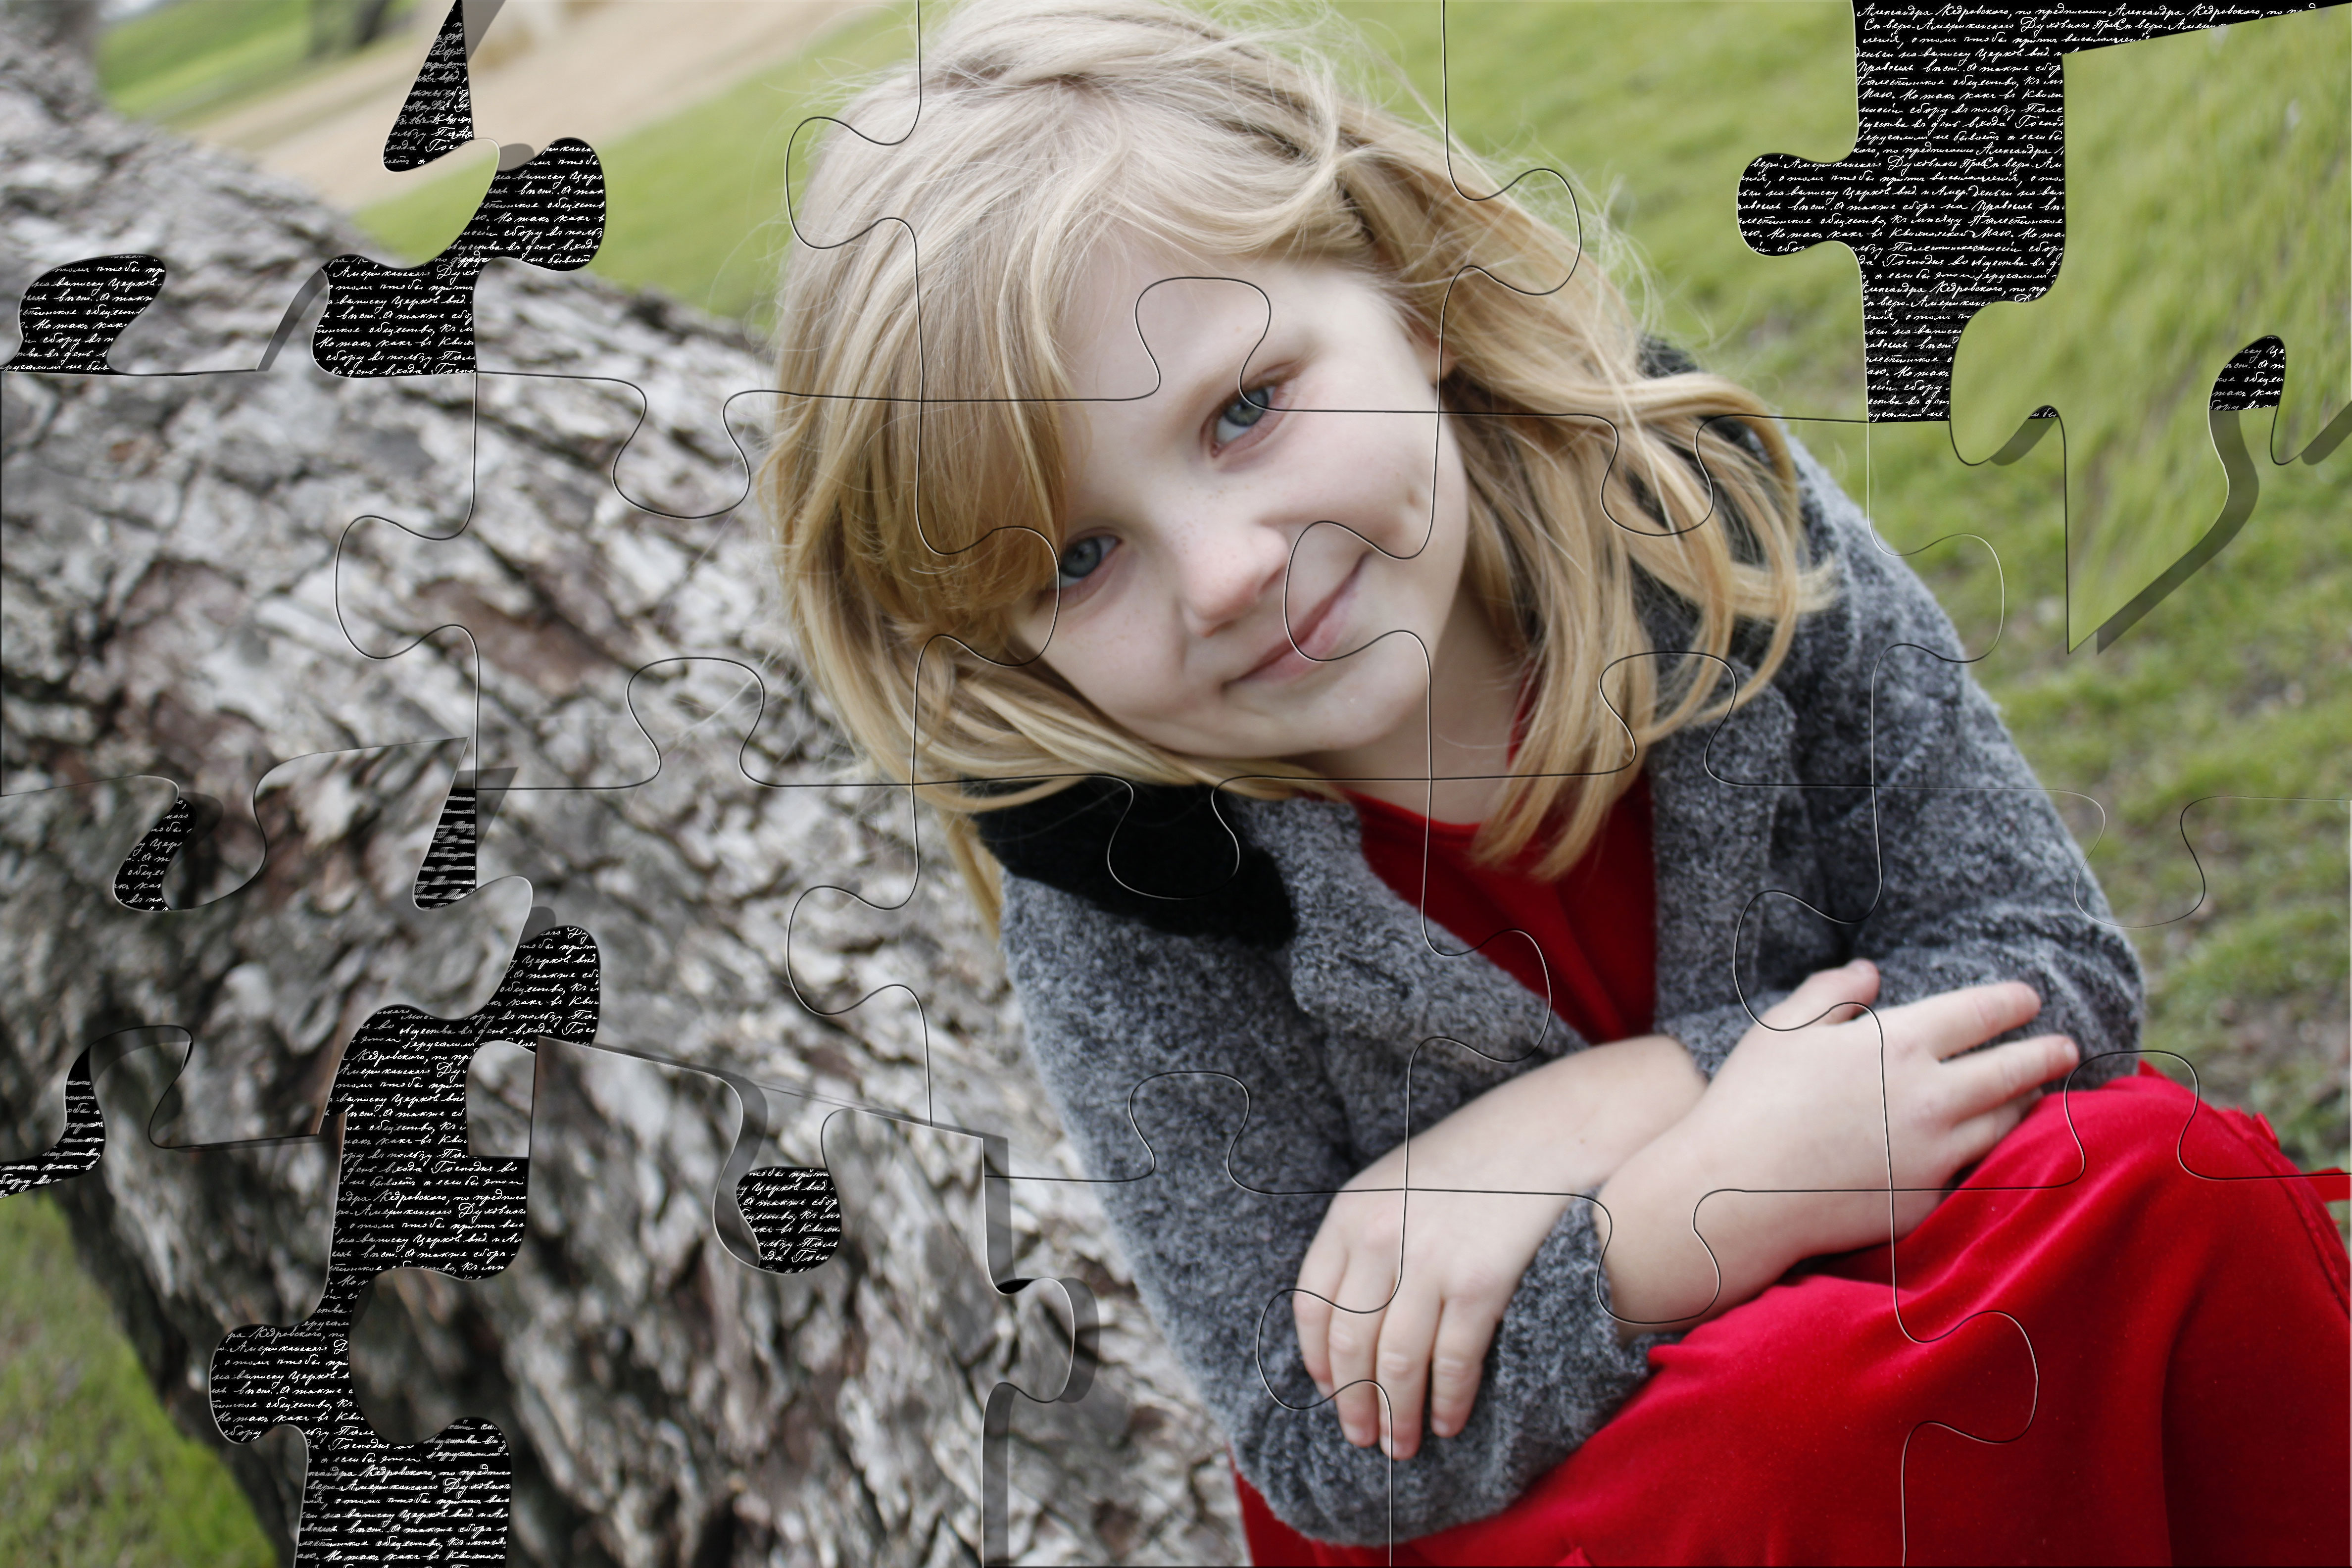
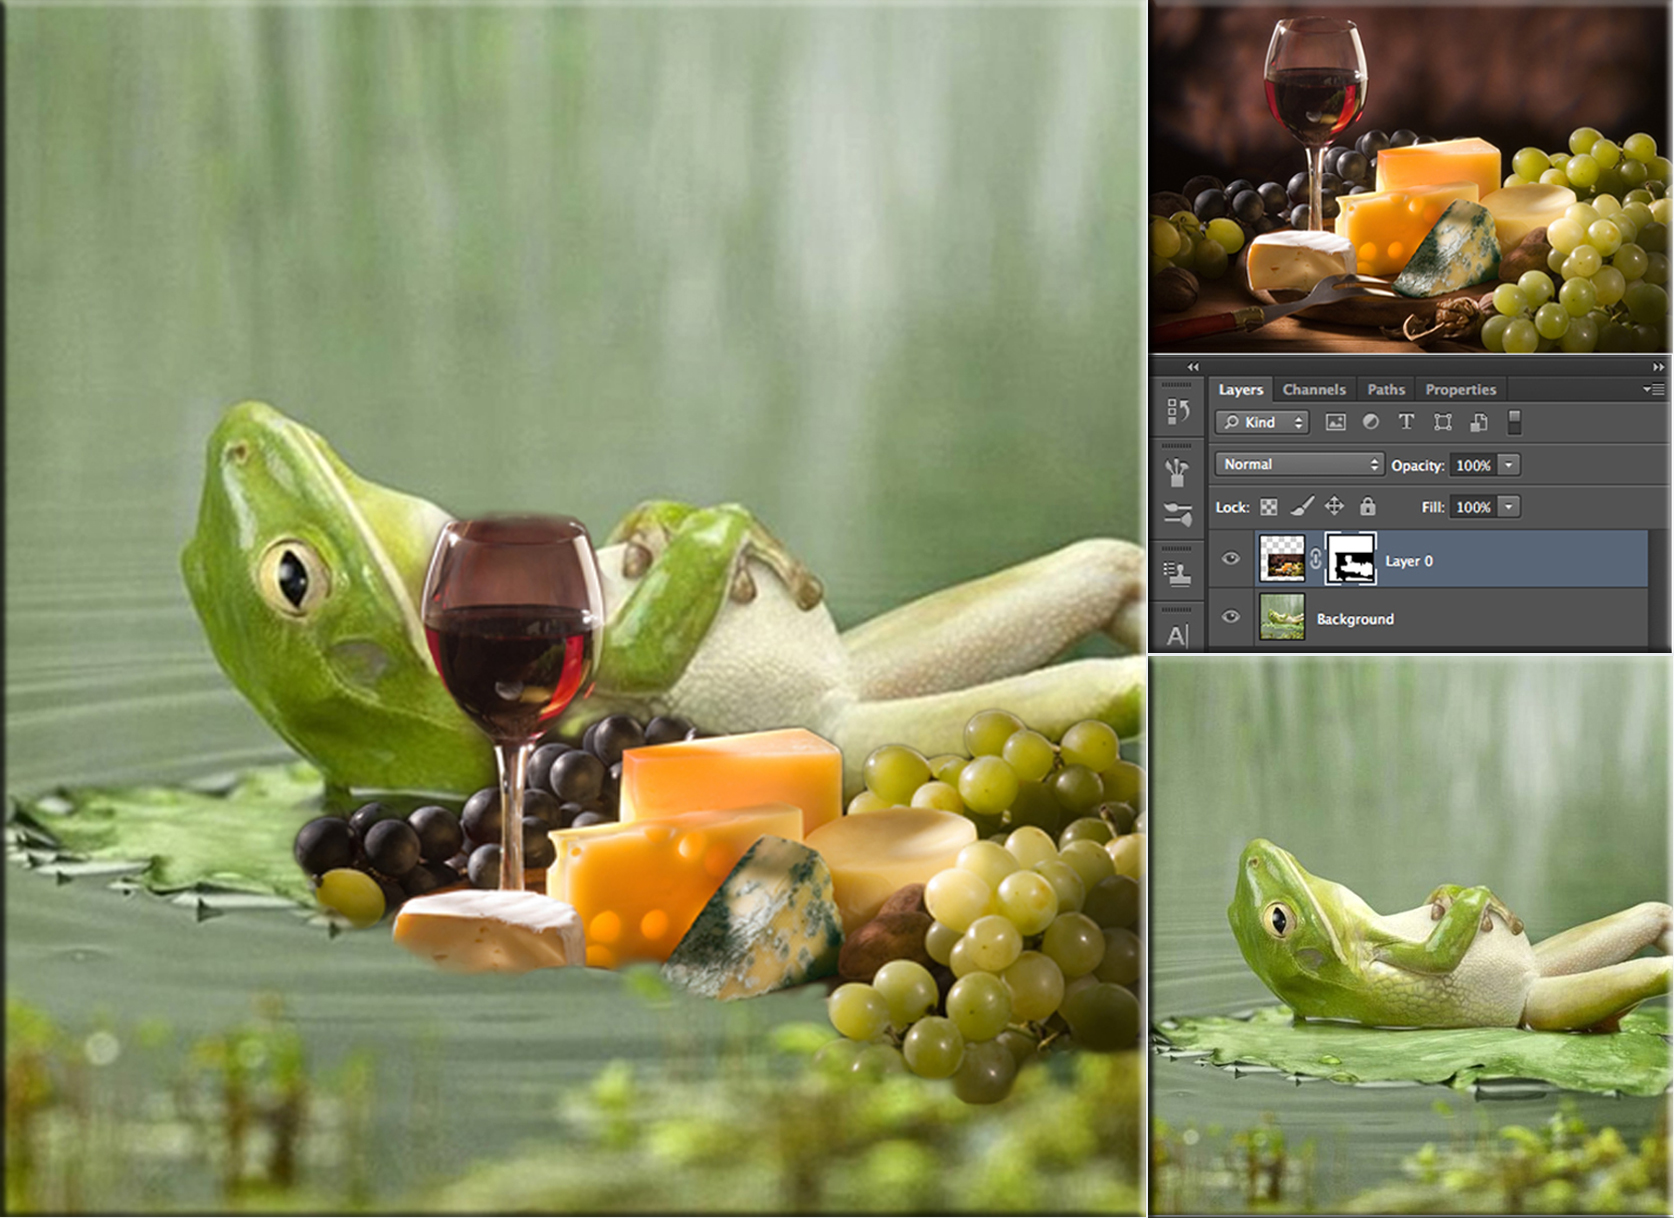
The PUZZLE EFFECTS actions allow you to turn your images into impressive jigsaws. In this example, I used the free version creates puzzles with 20 or 6 pieces.
Using photoshop actions from this download, warp and move pieces out of place to reveal an underlayer making the photo appear as a 3D puzzle.
A favotite photo I took of Nate, my granddaughter at the park, black and white cursive writing as the under layer, and one click runs the puzzle script.
To make the cursive writing, select a cursive letter from the Internet (Command + I Mac or Control + I PC shortcut - to Invert black letters / white background to wite letters / black background.
Note: To add a drop shadow - Double click on the layer for Layer Style, check Bevel & Emboss (choose Depth (100), Size (8) and Soften (4)). On that same layer, right click and choose Create Layers. You will get a message: Some aspects of the Effects cannot be reproduced with layers - click OK.
A new layer(s) will be generated, and with that layer you may change the opacity and warp the shadow into position that looks real.
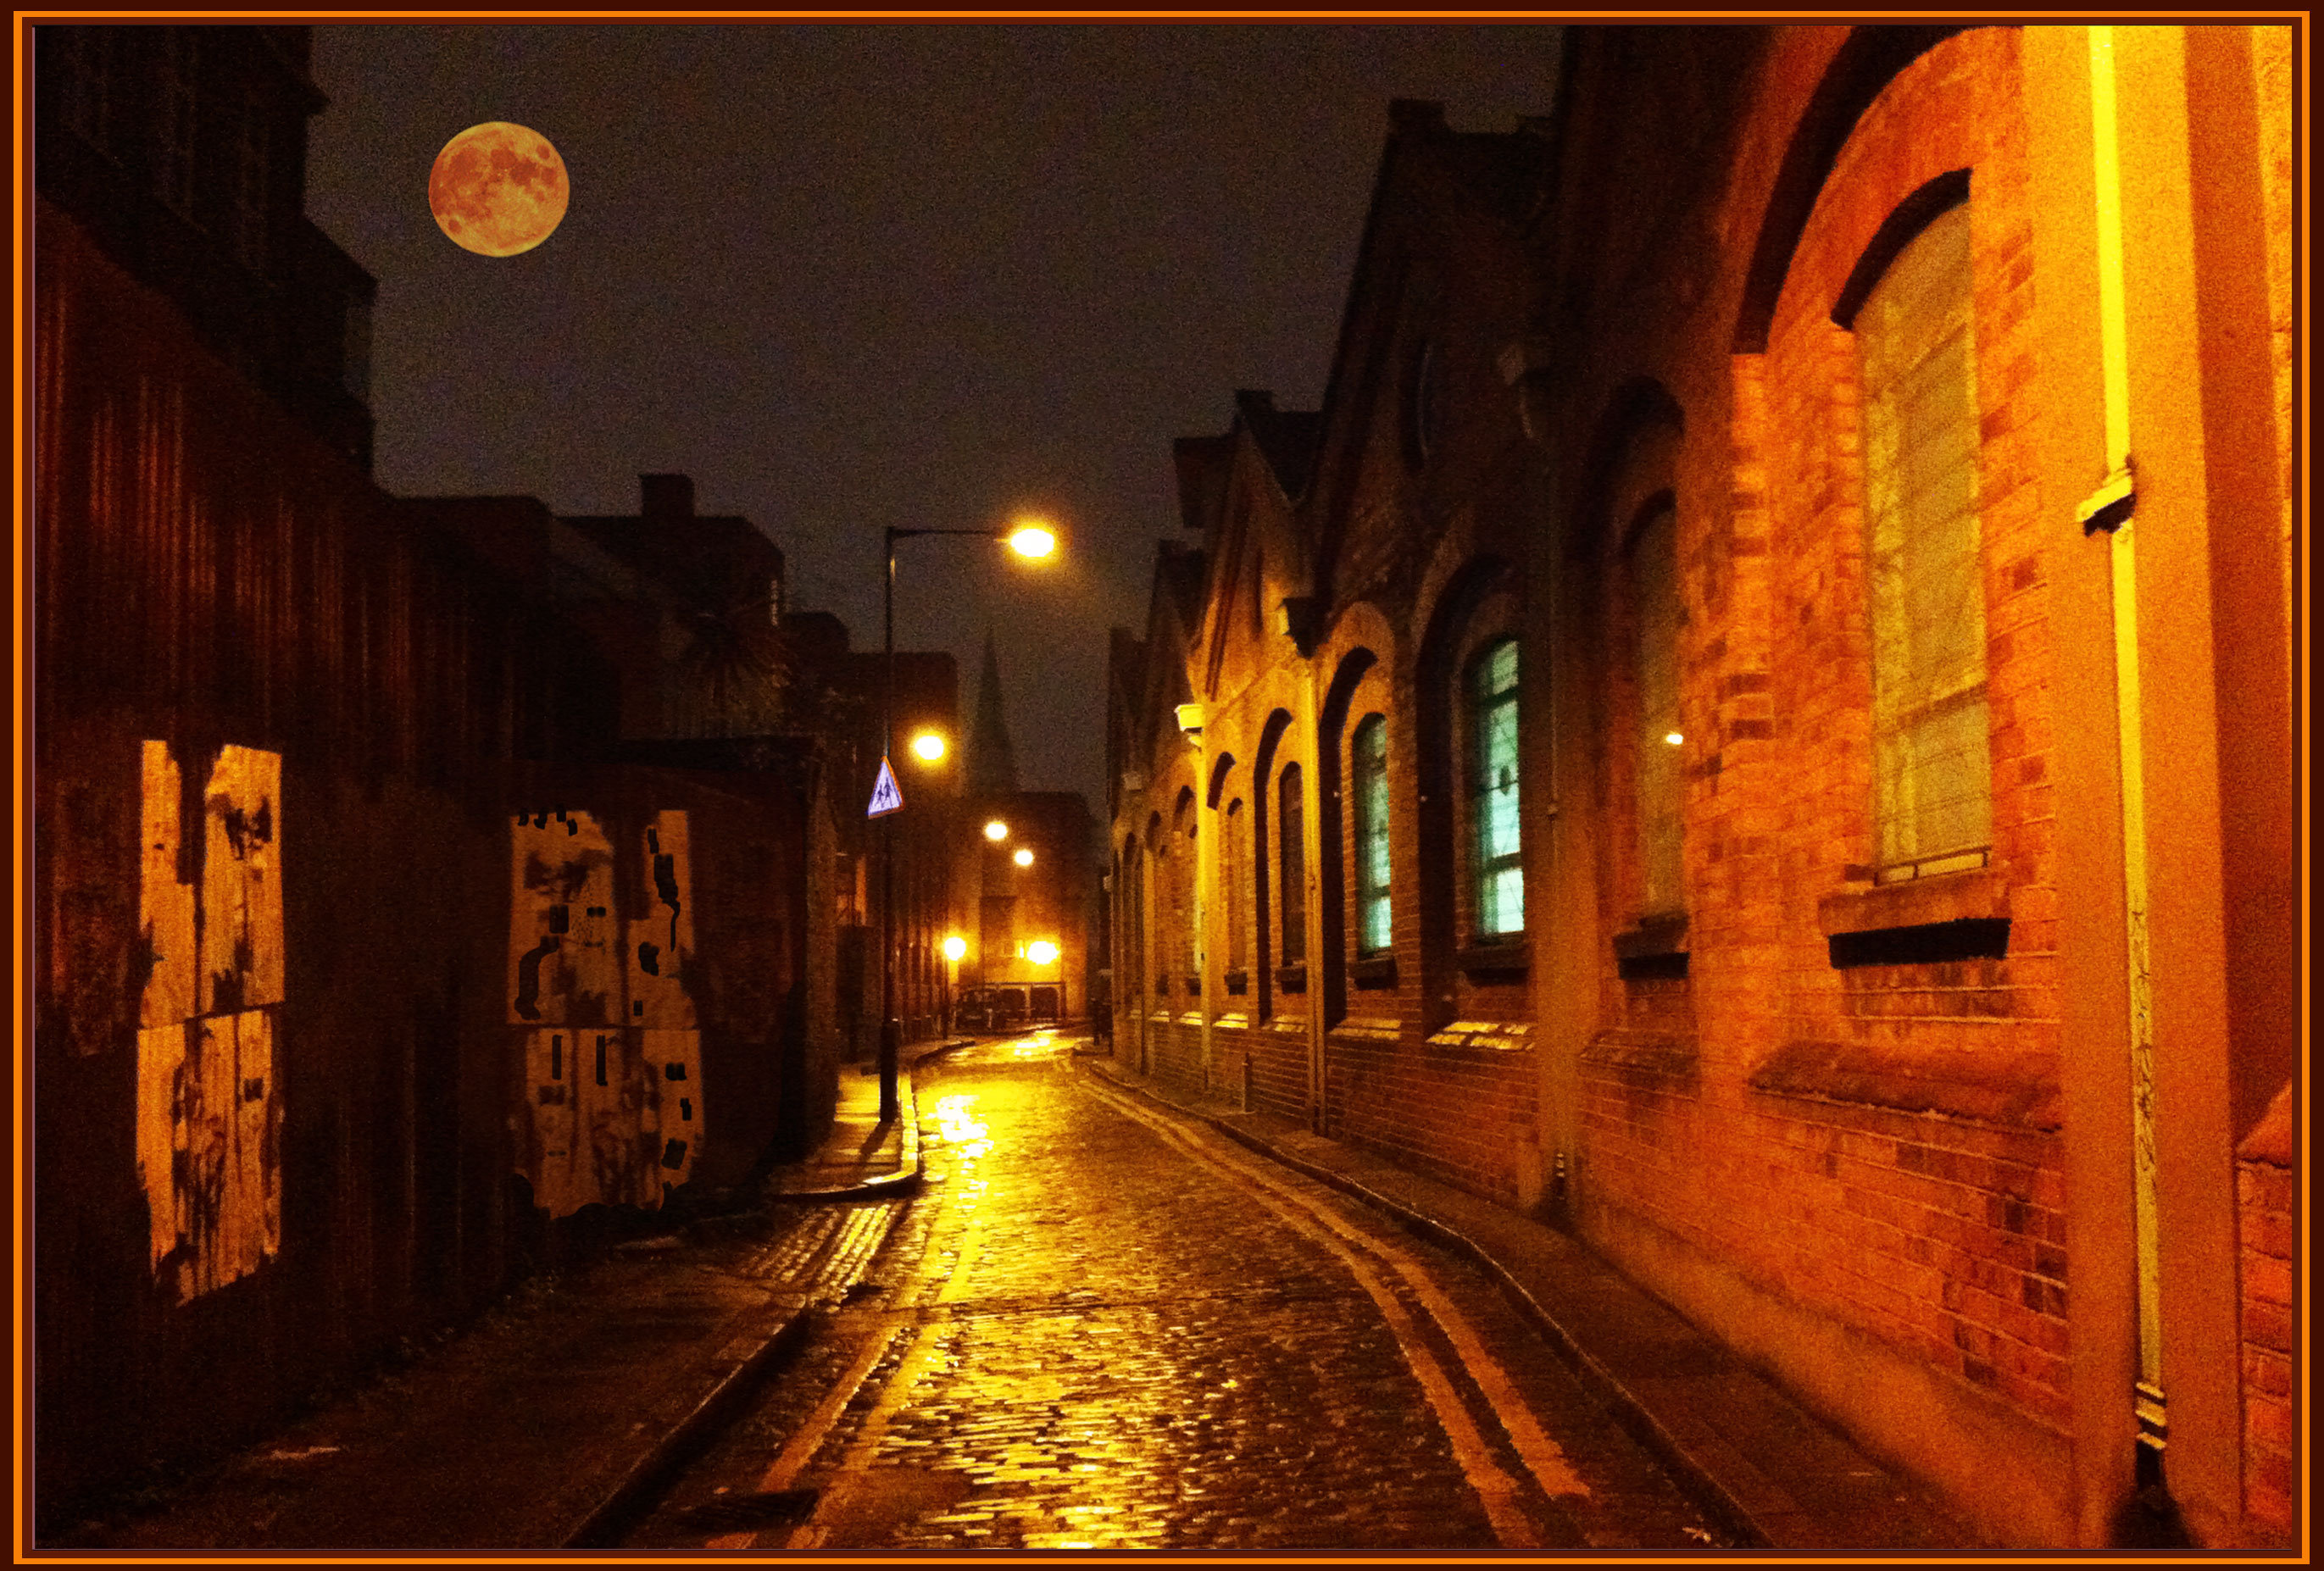
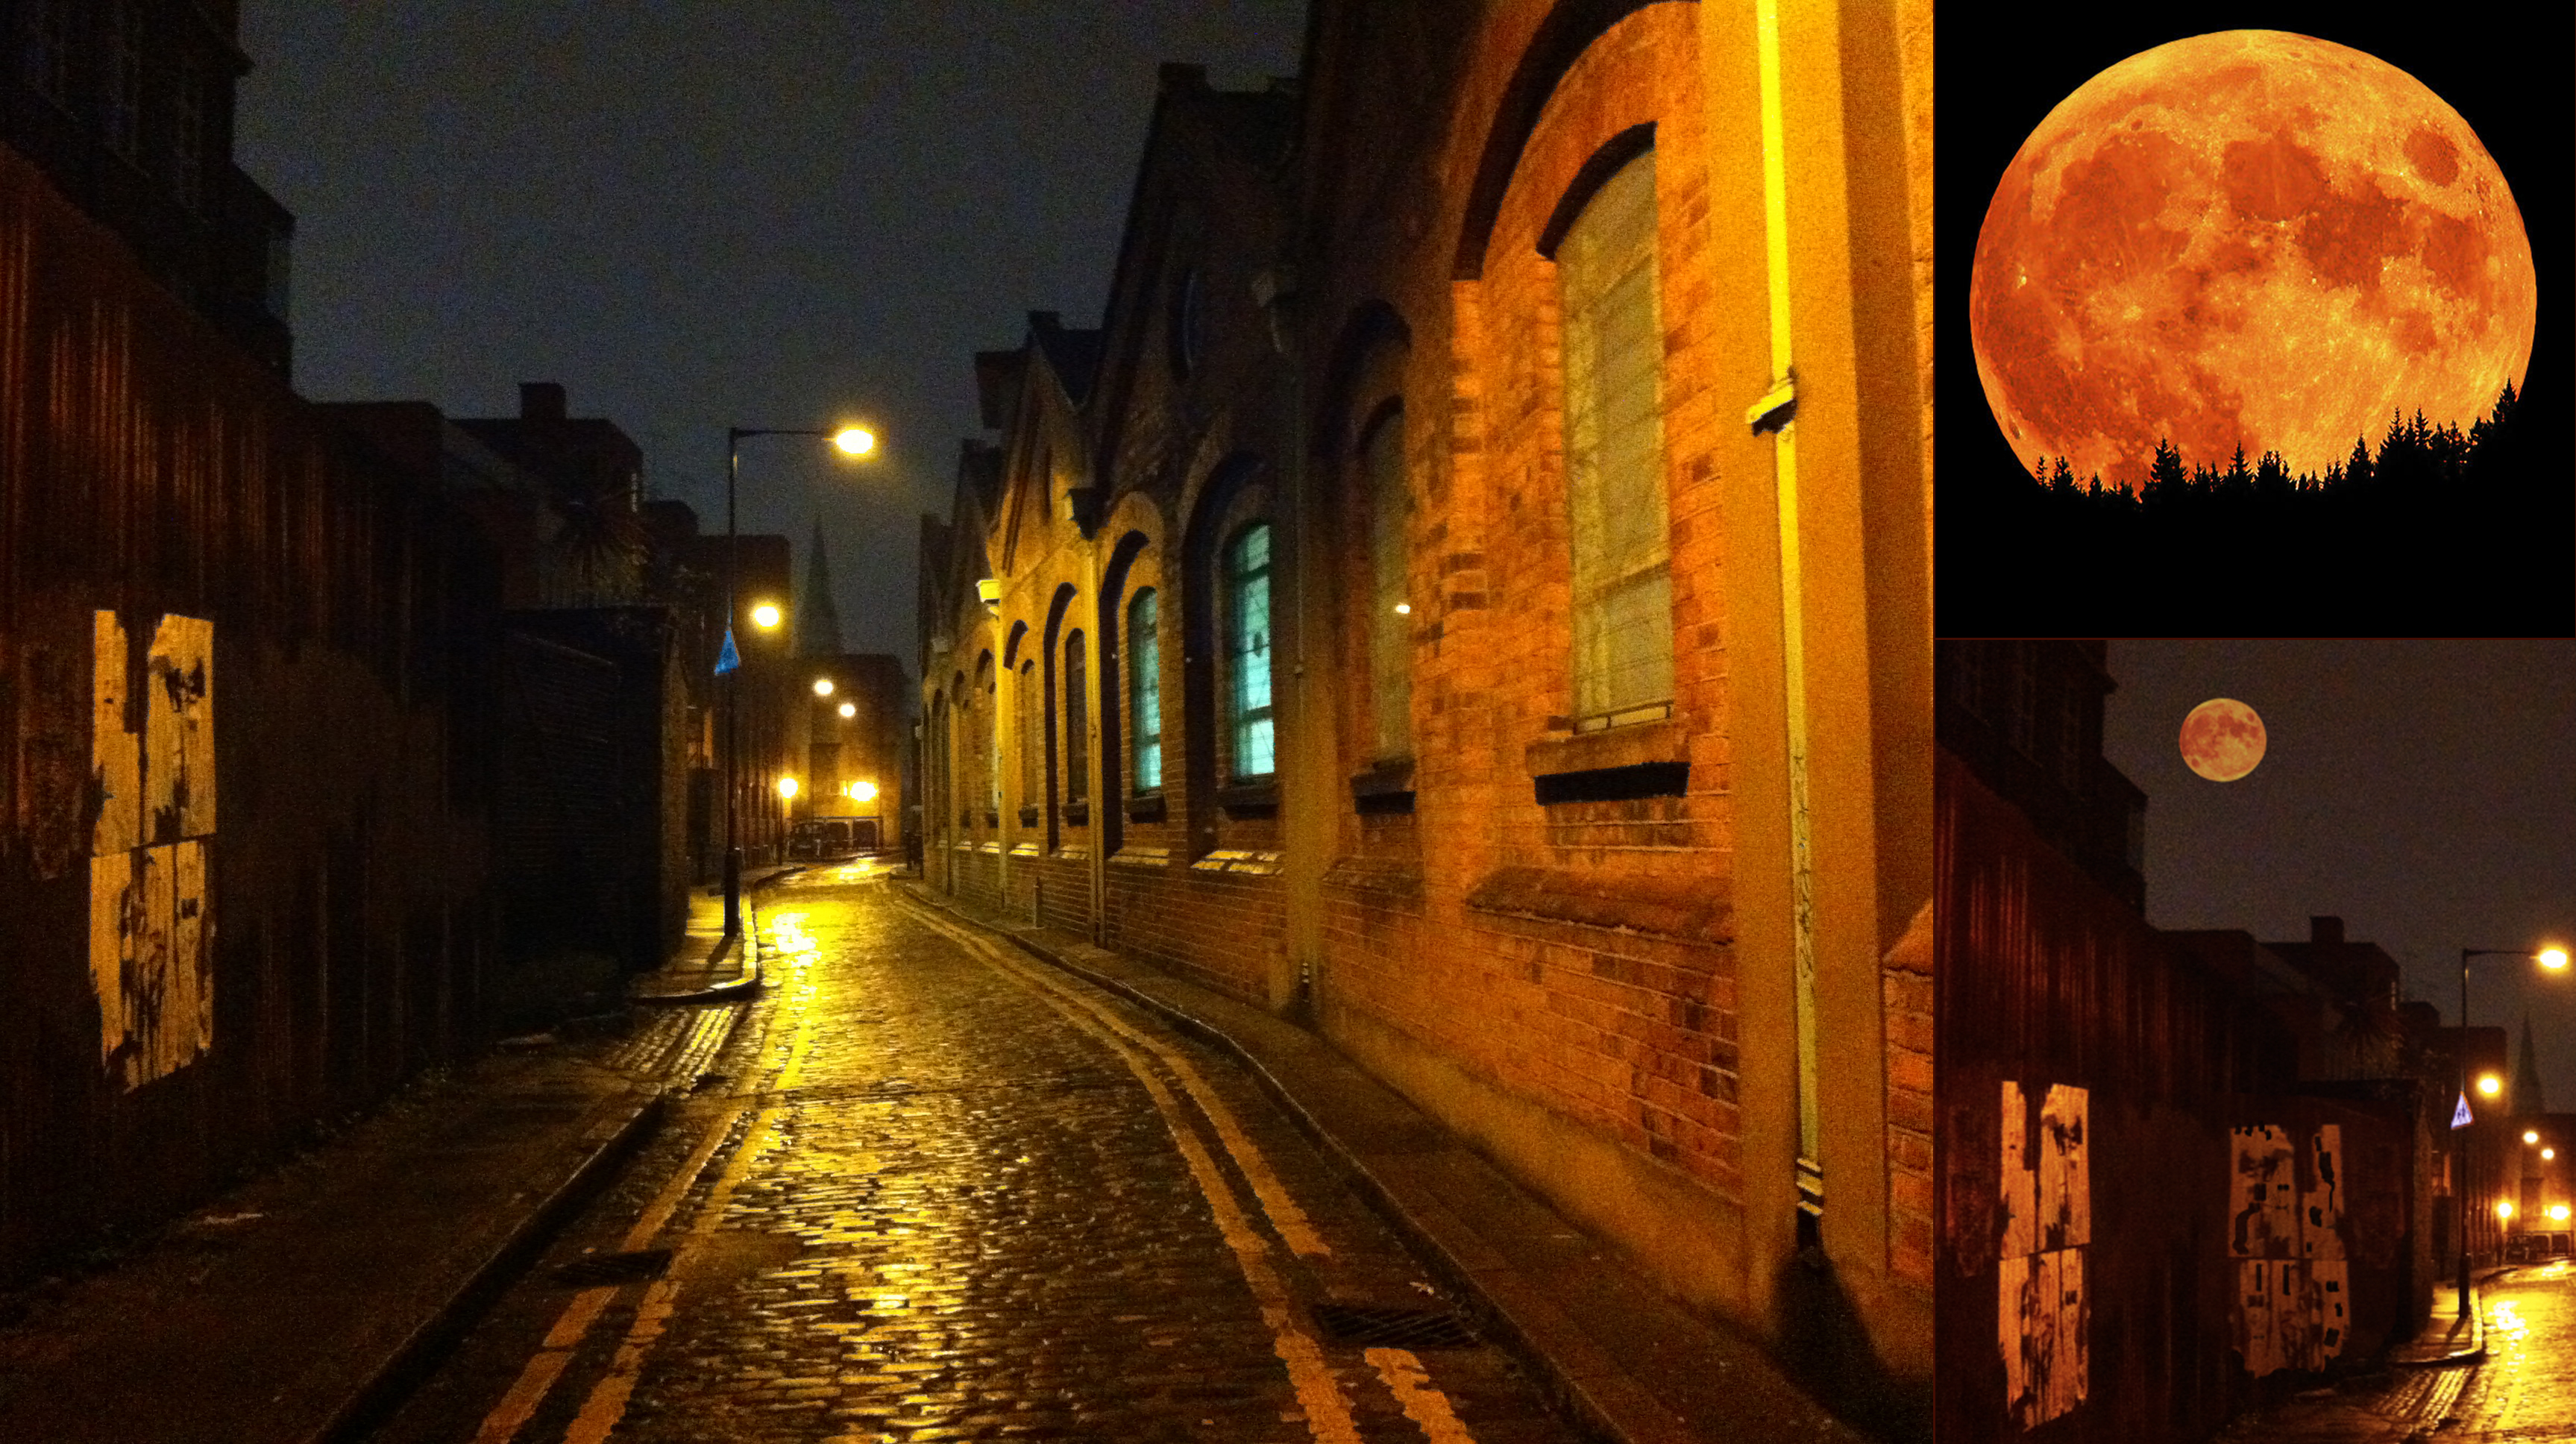
For October is “Jack Moon Fever” taken on a Jack The Ripper tour from a trip to London, England.
Here are some of the steps used to convert the original photo to meet more the expectations of a Jack The Ripper street at night:
Rectangular marguee tool to copy, cut and past the posters on the left side of the street, which will add a new layer that could be renamed as “additional posters”.
“Additional Posters” layer:
Use the Move tool, to move this layer, and place in the dark uninteresting area of the photo.
On the bottom of the Layer's Tab, click “Add a Layer Mask”, click on the mask - using the Brush Tool (black conceal, white reveal) to non-destructively add or remove part of the posters.
Additionally use Edit / Transform and Scew or Distort to fit this layer into the dark area portionally. (Short Cut: command "T" Mac, control "T" PC and right click for transform options)
Next, we need a full moon, after all the title is “Jack Moon Fever”, and every October image needs a full moon.
Using a harvest full moon from StarGazing, take the Pen Tool or Quick Selection Tool, select the moon into a new layer, rotating the layer until there is an orange harvest moon by using the same technique as with the “additional posters” move and place into a proper position and size.
“Color Adjustments:”
On the bottom of the Layer's Tab, click “ is a non-destructive adjustment layer button, in this photo used were "Photo Filter", "Curves", "Brightness/Contrast" and "Color Contrast" - note if you are a professional photographer, you won't need these adjustments.
But for me, the non-destructive adjustments are my friend, and can be revisited to make fine adjustments without destoying the original layer.
More Photos:
Read Article Non-destructive adjustments in Photoshop - Youtube Tutorials
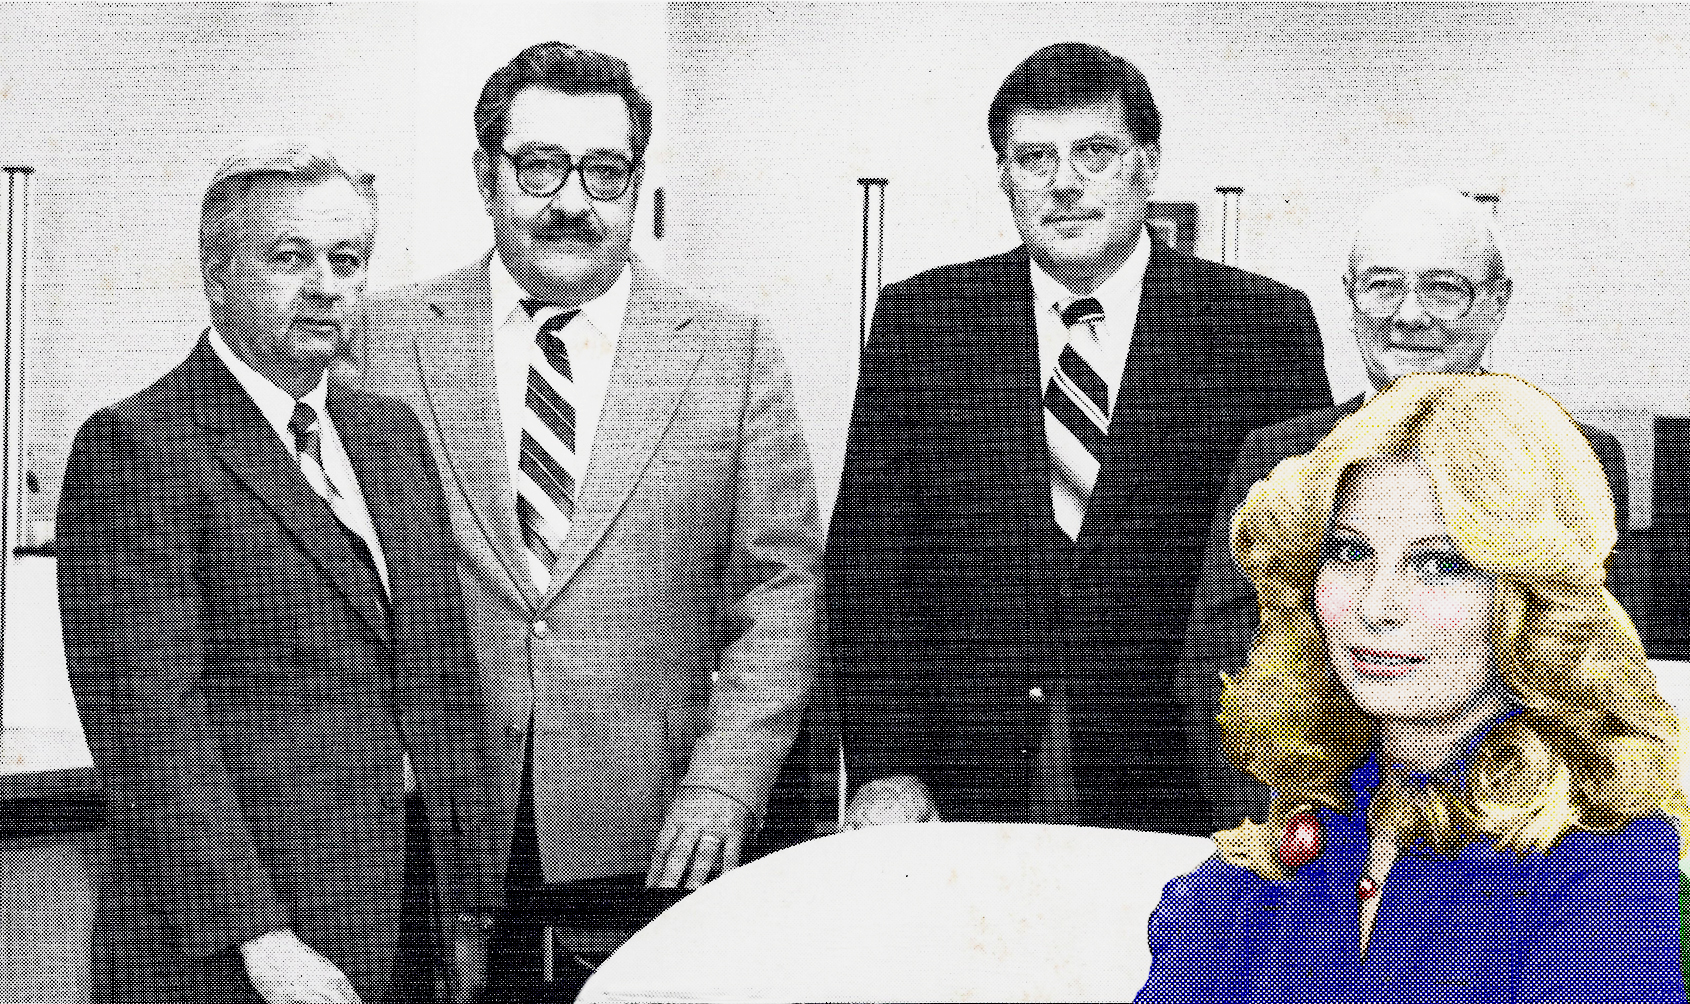
It came to the attention of yours truly, that when Judy was 22 she was the top sales person for this photo. However when the photographer came out, he made her sit for the pose when taking the picture. Later it was noted, this made her look more like a secretary to the other salemen rather than an equal. Therefore, it is deemed by me “Judy Justice After Many Years” (Justice on the Web) - as the title for this revised photo. Not to be confused with Judge Judy (Justice in the Court).
In photoshop, first thing to do - nondestructively adjust the contrast of the image photo by using the three adjustment layers: Exposure, Curves and Brightness/Contrast to obtain a deeper less washed out image (hover over the image to view the original scan and photoshop layers).
Masking layer:
Next duplicate the original image layer, and mask out Judy on the duplicate layer above the original. Masks allow you to hide or reveal portions of a layer (remember the rhyme: “black conceals” / “white reveals” - when looking at the mask or using the brush tool to modify the mask).
After the masked Judy is completed, time to put her in her proper revenged proportion. Control “T” (PC) / Command “T” (Mac) to transform (Menu: Edit, Transform and Scale) - hold down the shift keep to keep proportions and take the corner of the framed box and make the layer larger.
Next add a new layer above the transformed layer, set the layer to “Color” and “Opacity” to 50%. Using the “Brush tool”, color in desired colors. Note: the grains show through and with the opacity seting turned down to make the image look more natural or rather believable.
Read Article Using the Color Replacement Tool (ADOBE TV)
Nondestructive editing: Working with Photoshop Masks - Nondestructive editing allows one to make changes to an image without overwriting or destroying the original image. Because nondestructive editing does not modify or remove data from the original image, the original image quality is not modified when making edits. Nondestructive editing in Photoshop can be performed in several ways - see: Techniques for nondestructive editing.
Masks allow you to hide or reveal portions of a layer (remember the rhyme: “black conceals” / “white reveals” - when looking at the mask or using the brush tool to modify the mask).
There are many ways to make a mask on a layer; using the pen tool or quick selection tool are examples. There also is an easy way to modify the mask by using the brush tool to refine the selection of the image.
When clicking on the mask, the default Foreground and Background colors revert to black and white, the brush can be quickly sized using the brackets keys (“[” makes the brush size smaller, “]” makes the brush size larger). Then use the brush to quickly modify any selection corrections needed.
NOTE: to smooth selection - using the Refine Mask option (right click on the mask (PC) or control click (Mac), select "Refine Mask" (example right: check "Smart Radius", modify "Adjust Edge" to smooth selection as needed - remember the brush tool can be used to smooth your selection, and you can refine the mask again after modification until the selection is as you wish).
● Using Photoshop CS6 layer masks to remove parts of an image (Using Photoshop's layer masks to remove parts of an image. There are lots of ways to approach this type of selection - one is the brush and layer mask because it is a simple way to make selections.) cbtCafe, Youtube
The Divine Proportion, Golden Ration, Rule of Thirds; this is a mathematical concept dating to ancient times that is used as a principle in almost all types of design from architecture to art to websites.
Although the exact origins of the formula and shape are not known, examples of its use can be found through history – Egyptians used the shape in the design of the great pyramids and Greeks used it for the Parthenon.
Perhaps one of the most famous examples of the golden rectangle appears as a Leonardo Da Vinci’s “Vitruvian Man” drawing, which was first published in “De Divina Proportione”. Parts of the shape, in particular the spiral, can also be found in nature; this shape is exemplified by the shell of the nautilus.
Applying some math dividing the whole by 1.618 or 1.62 gives you the Golden Ratio.
The article's conclusion: Using the golden rectangle will not ensure that your site design works as there are a host of other factors that contribute to a successful design and presentation.
NOTES: More Sources used for this project -
● Rule of Thirds (The rule of thirds is an essential photography technique. It can be applied to any subject to improve the composition and balance of your images.) Photography Mad
An experiment gone unexpected: This picture was made by taking 5 pictures at a slow shutter speed with differing camera settings, and then combining as one in photoshop using photomerge. The photo was taken at night of the front window inside the house with overhead lights on.
The result, all appears in reverse. The slow shutter speed allows to click the camera and move out of the way - thus giving a rather erie and surreal effect.
Going with this effect, the following was added in photoshop:
The eye of Natelie (my granddaughter) transposed into the camera lens, then adding gold and dark brown lines in the form of a camera shutter (one warped, one not)
Next was to add a closeup of Natelie, with the opacity less than 25%, to make it appear she is a large version of herself peering through the window.
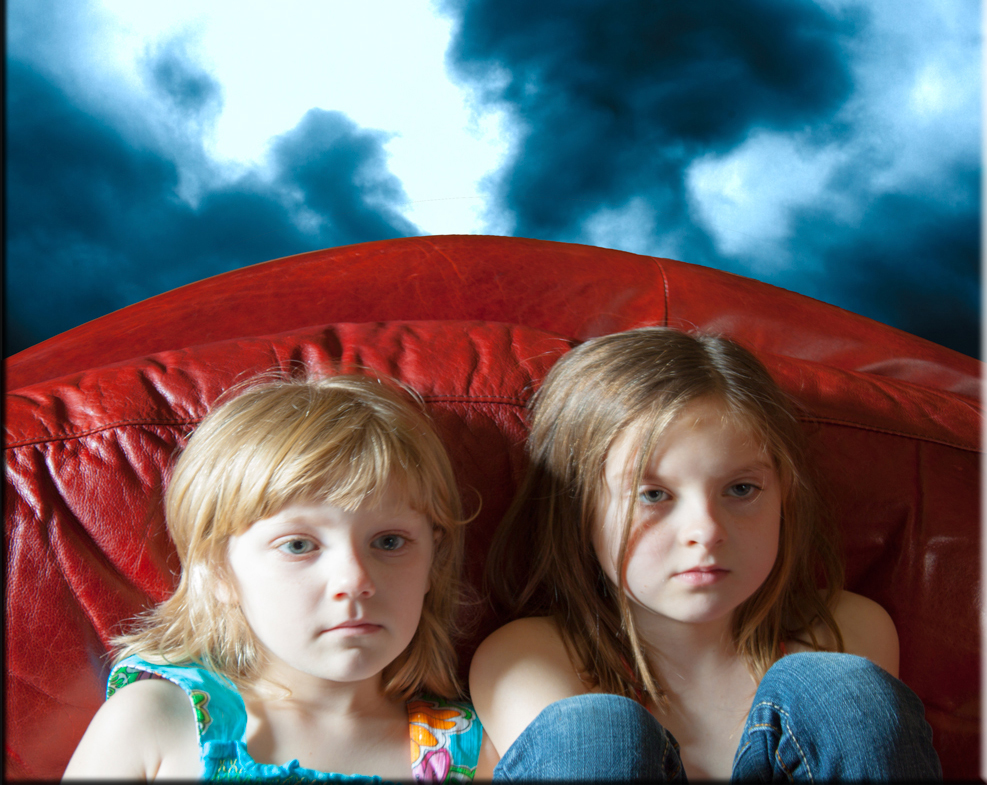
I took this picture of granddaughter Nate and next door neighbor Claire, while they were captivated watching a Disney move in the den.
Included in the composite, is a background photo I took while sirens were going off during one of out many tornado warnings in North Texas last year (a combination of five photos at different settings using photomerge built-in in Photoshop).
The blinds effect was used to give a darker version of the photo. NOTE: Always keep those cloud photos for backgrounds - this year we have had no tornado warnings because of the mild spring - therefore no good new material - we don't miss the warnings.
Read Article Casting Light Through Window Blinds In Photoshop
Convert a color photo to black and white, then selectively add back color: (remember those old yellowing (sepia) black and white photos - we don't want that).
This is a picture I took of the beautiful wife Judy. The project required a black and white shot (NOTE: always shoot your pictures in color, then convert to black and white - you will always wish you had the color, and it is much simpler to convert color to black and white than manually to color a black and white photo).
This photo is the reverse of combining several pictures into one - accomplished by taking one picture and non-destructively cutting sections out as layers and masks, and applying adjustments to each layer to give a new image.
Tools Used: a black and white adjustment layer, a color balance layer (in this case adding blue and cyan as a color tint to more match the blue shirt).
Making the new background - Cut out the rock column (using the rectangle marquee, eraser tool and move tools) to place things into position.
Puppet Warp (under the Edit Menu) was used to push in the back so Judy was slightly less humped over then in the original picture.
Right click on the layer mask separating Judy from the background, select the Refine Mask option (use the feather slide bar to approximately 8 pixels, to blend the hair into the new background).
Roughly select pieces of hair (duplicating about a half dozen layers, then warping (transform/warp) the pices into position to give a fuller look along the cut out edges).
Clone Stamp and Healing Brush Tools to remove fly away hair (making sure to select from different areas when using the stamp tool to prevent "railroad tracking" effect.
It is always best practice to take the picture right, however when you've messed up, it is always good to have the fall back “how to fix a blown out highlight and add realistic texture - grain and match color”.
The first thing you notice about the photograph is the astonishing beauty of the woman posing naked in the bathtub, then your eye is drawn to a far more sinister detail. Next to the soap dish is a portrait of the man whose bathroom she has appropriated: Adolf Hitler.
Snapped at the Fuhrer’s abandoned apartment in Munich on April 30, 1945, the day he committed suicide in Berlin, this photographic scoop was every bit as daring and unconventional as the woman in the tub herself - fashion model turned war correspondent Lee Miller.
Described by one colleague as “an American free spirit wrapped in the body of a Greek goddess”, the legendary beauty once had the mould for a new design of champagne glass taken from her breast.
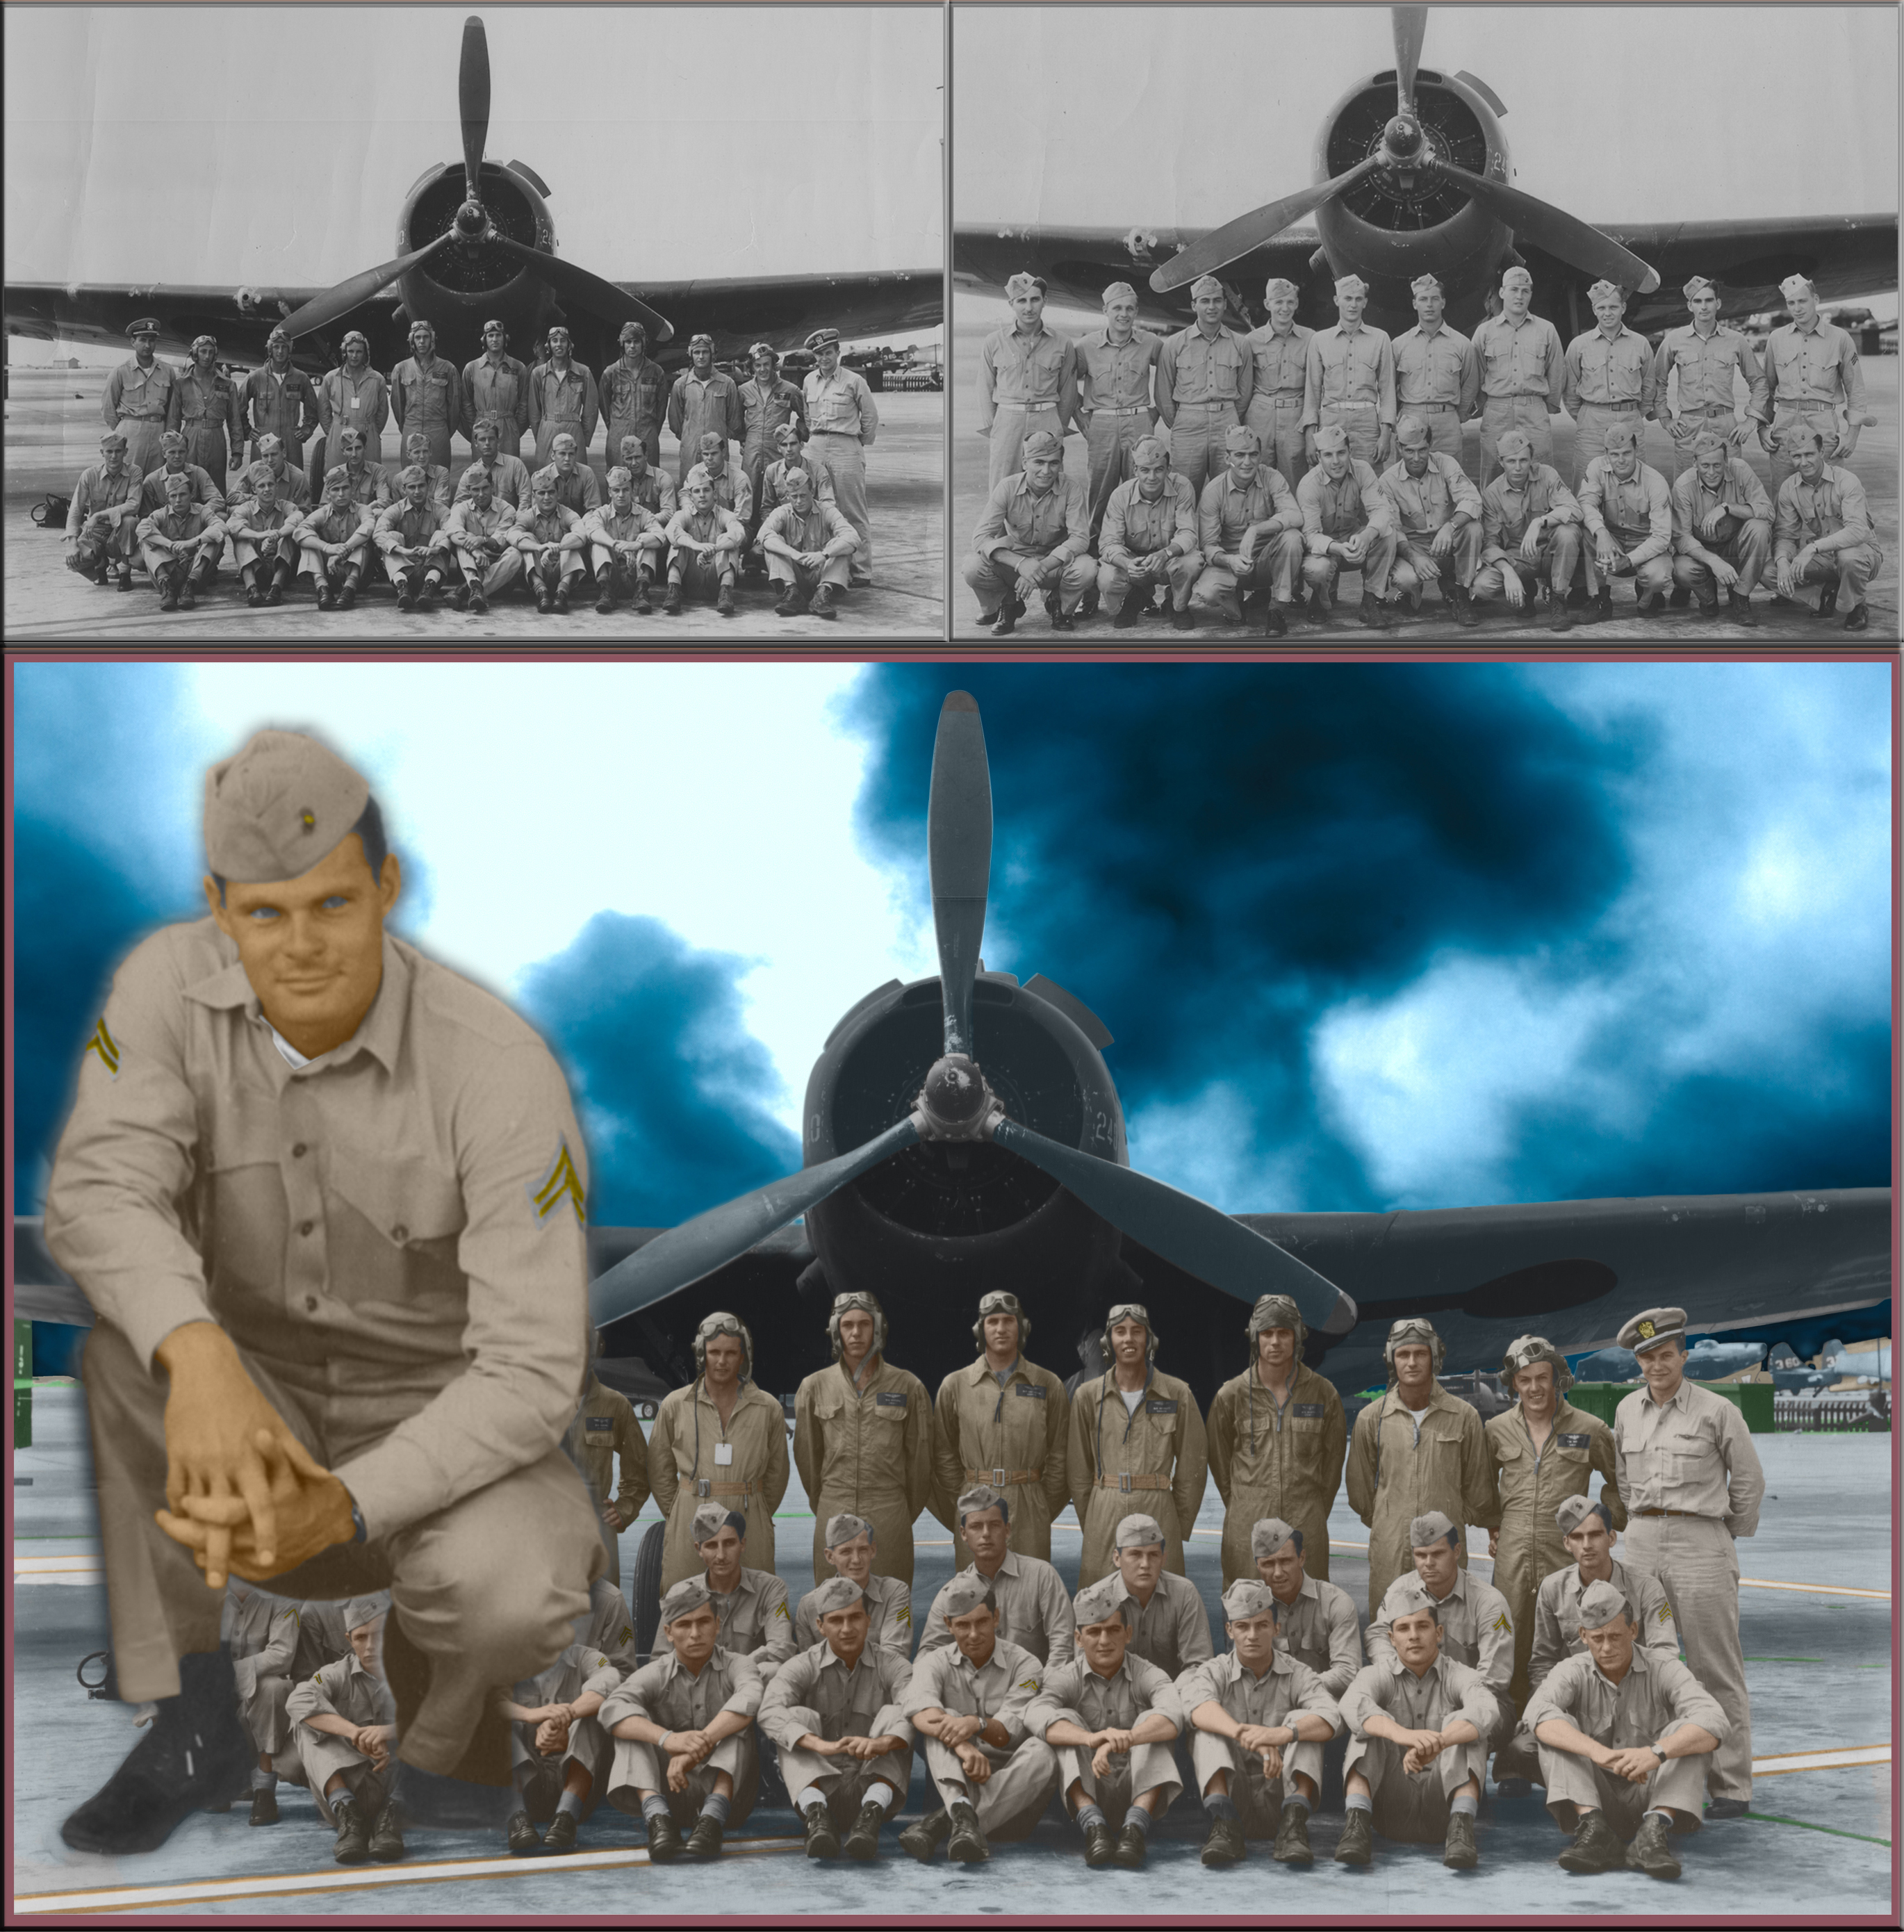
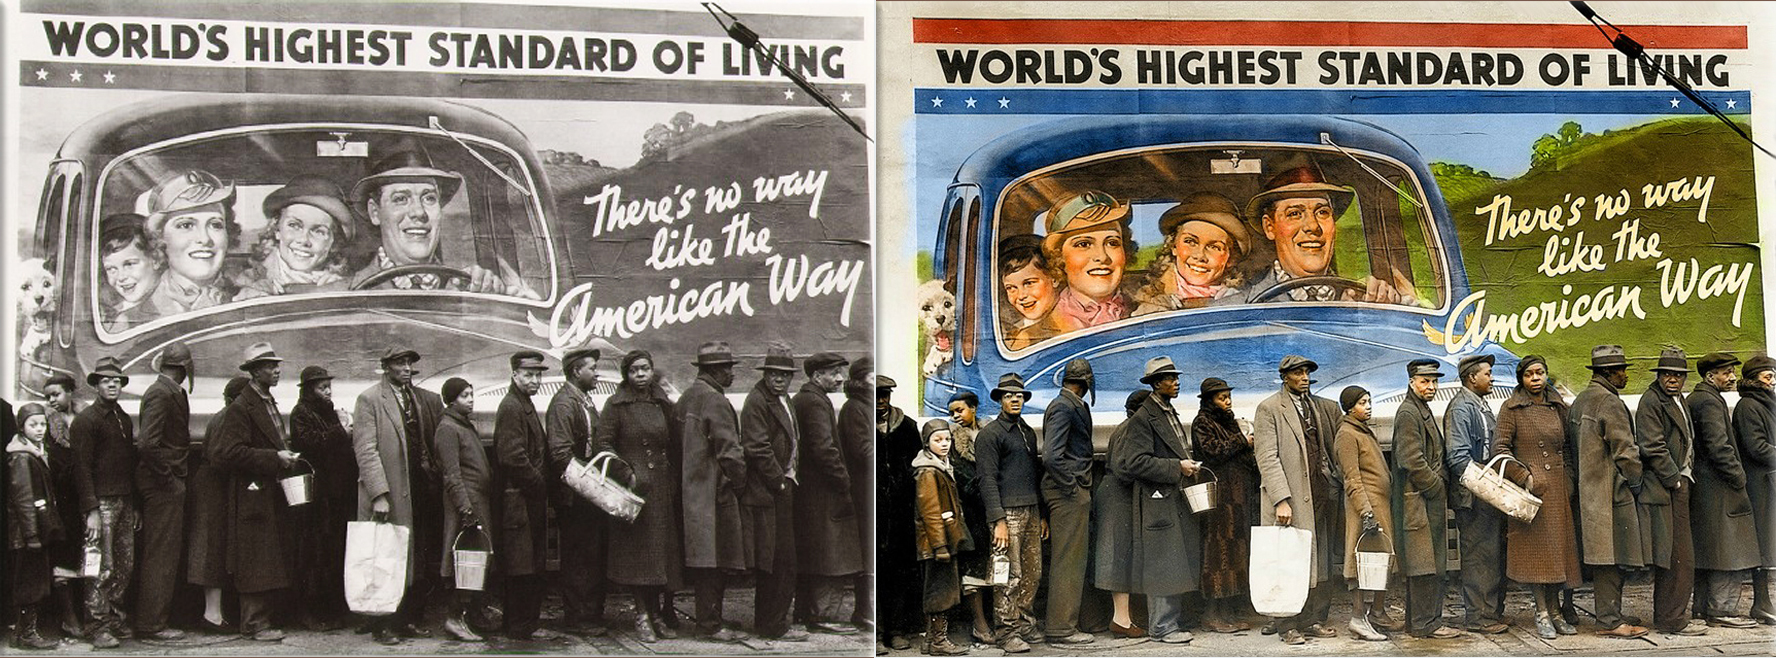
“Research, Repair and Restore - The Three R's of Photography” for this project (Photoshop Tutorial - How to Repair and Restore Old Photos): Titled “Restored to Colorized Memories” The first two pictures were scanned at the highest density quality, then brought into Photoshop (these are the restored versions). The clouds in the background where from one of several photos taken in HDR (a merged set of five photos during a tornado alert in North Texas).
Techniques in the tutorial “How to Repair and Restore Old Photos” help to understand the process of restoration.
For historical purposes, before starting colorizations, find pictures of the time period to match colors (examples: uniforms, skin tones, buildings and objects).
The research into World War II was the most intersting part, especially for this project, military uiniforms down to the strips and emblems, fighter aircraft names, numbering and color.
Above: The Person in the picture is Thomas Mitchell with his Marine Fighter Squadron 232 during World War II (Restored to Colorized Memories).
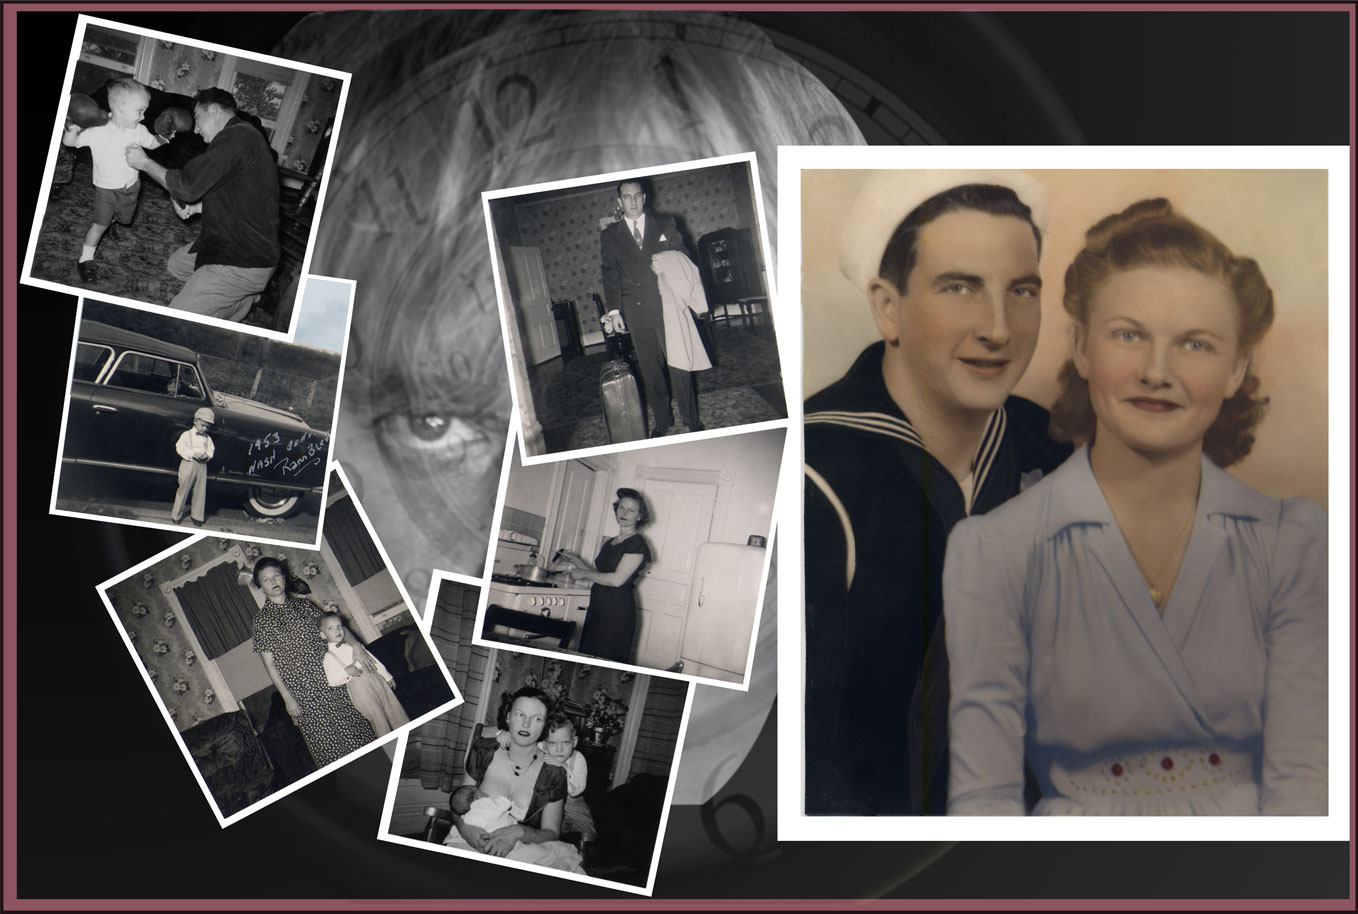
Below: my Dad with my Mom during World War II (on four different PT boats - of which three sank in the Pacific), and family growing up in Chicago (Boxing with Time).
Read Article Photoshop Tutorial - Colorize a Black and White Photo (Youtube)
Photoshop CS6: Pen Tool Tutorial (“The Pen is Mightier than the Wand”): Often pictures are taken where you want to extract the subject matter from the background, and the colors blend so close to where you have to manually separate the pieces to achieve the result.
In the original picture, we have Em (my granddaughter) posing with chop sticks for lunch at a restaurant - obviously this picture begs for drums.
The quick selection tool / magic wand will not work here because the colors are so close, therefore we need to use the pen tool to manually cut out Em.
After the outline was made (paying attention to stay just inside the subject with the pen connectors), I right clicked on the path (path tab) and selected - make selection / feather radius of 4, to softly blend the selection. On some of the downloaded pieces, I used Blending Options (Bevel & Emboss / Inner Bevel; Depth 32, Size 8, Soften 4).
Using photos you may have or Internet images (which they will have to be extracted before placing into the new image), the photo can be changed into a new theme as here “Em at lunch” to “Em the Gene Krupa of Drums”.
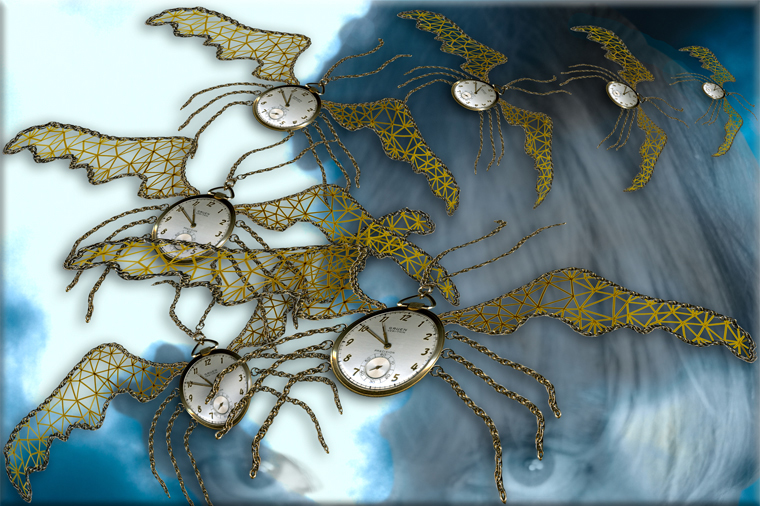
Photoshop Tutorial (Puppet Warp Tool) - “Time Storming”: This image was made taking a photo of myself, an HDR merged set of five photos during a tornado alert of clouds (while sirens were blaring), and a photo of my farthers pocket watch (using puppet warp in photoshop to turn the watch chain into wings and then into multiple butterflies).
Read Article Puppet Warp Tool basics in Photoshop (Adobe TV / Smashing Magazine)
“Pirates of the Buckaroos” As long as you have beautiful children or grandchildren, you will always have a willing subject and lots of material. Imagination is key (cut, warp and research).
This picture was taken of Em (my granddaughter), at a rather bland breakfast visit - inspiration was the pirate outfit (the setting just had to be in the Caribbean rather a breakfast table).
NOTE: Always take several pictures of your subject matter, you never know when you may use one to sit on a pirate ship.
Read Article 30 Photo Effect Photoshop Tutorials Every Designer Will Love (1st Web Designer)
Age Old Camera Picture Effect (Dramatic Gritty Effect) - Image your picture was taken 100 years ago when the camera used to be a very big one and the cameraman used to insert his head within a black curtain behind the camera.
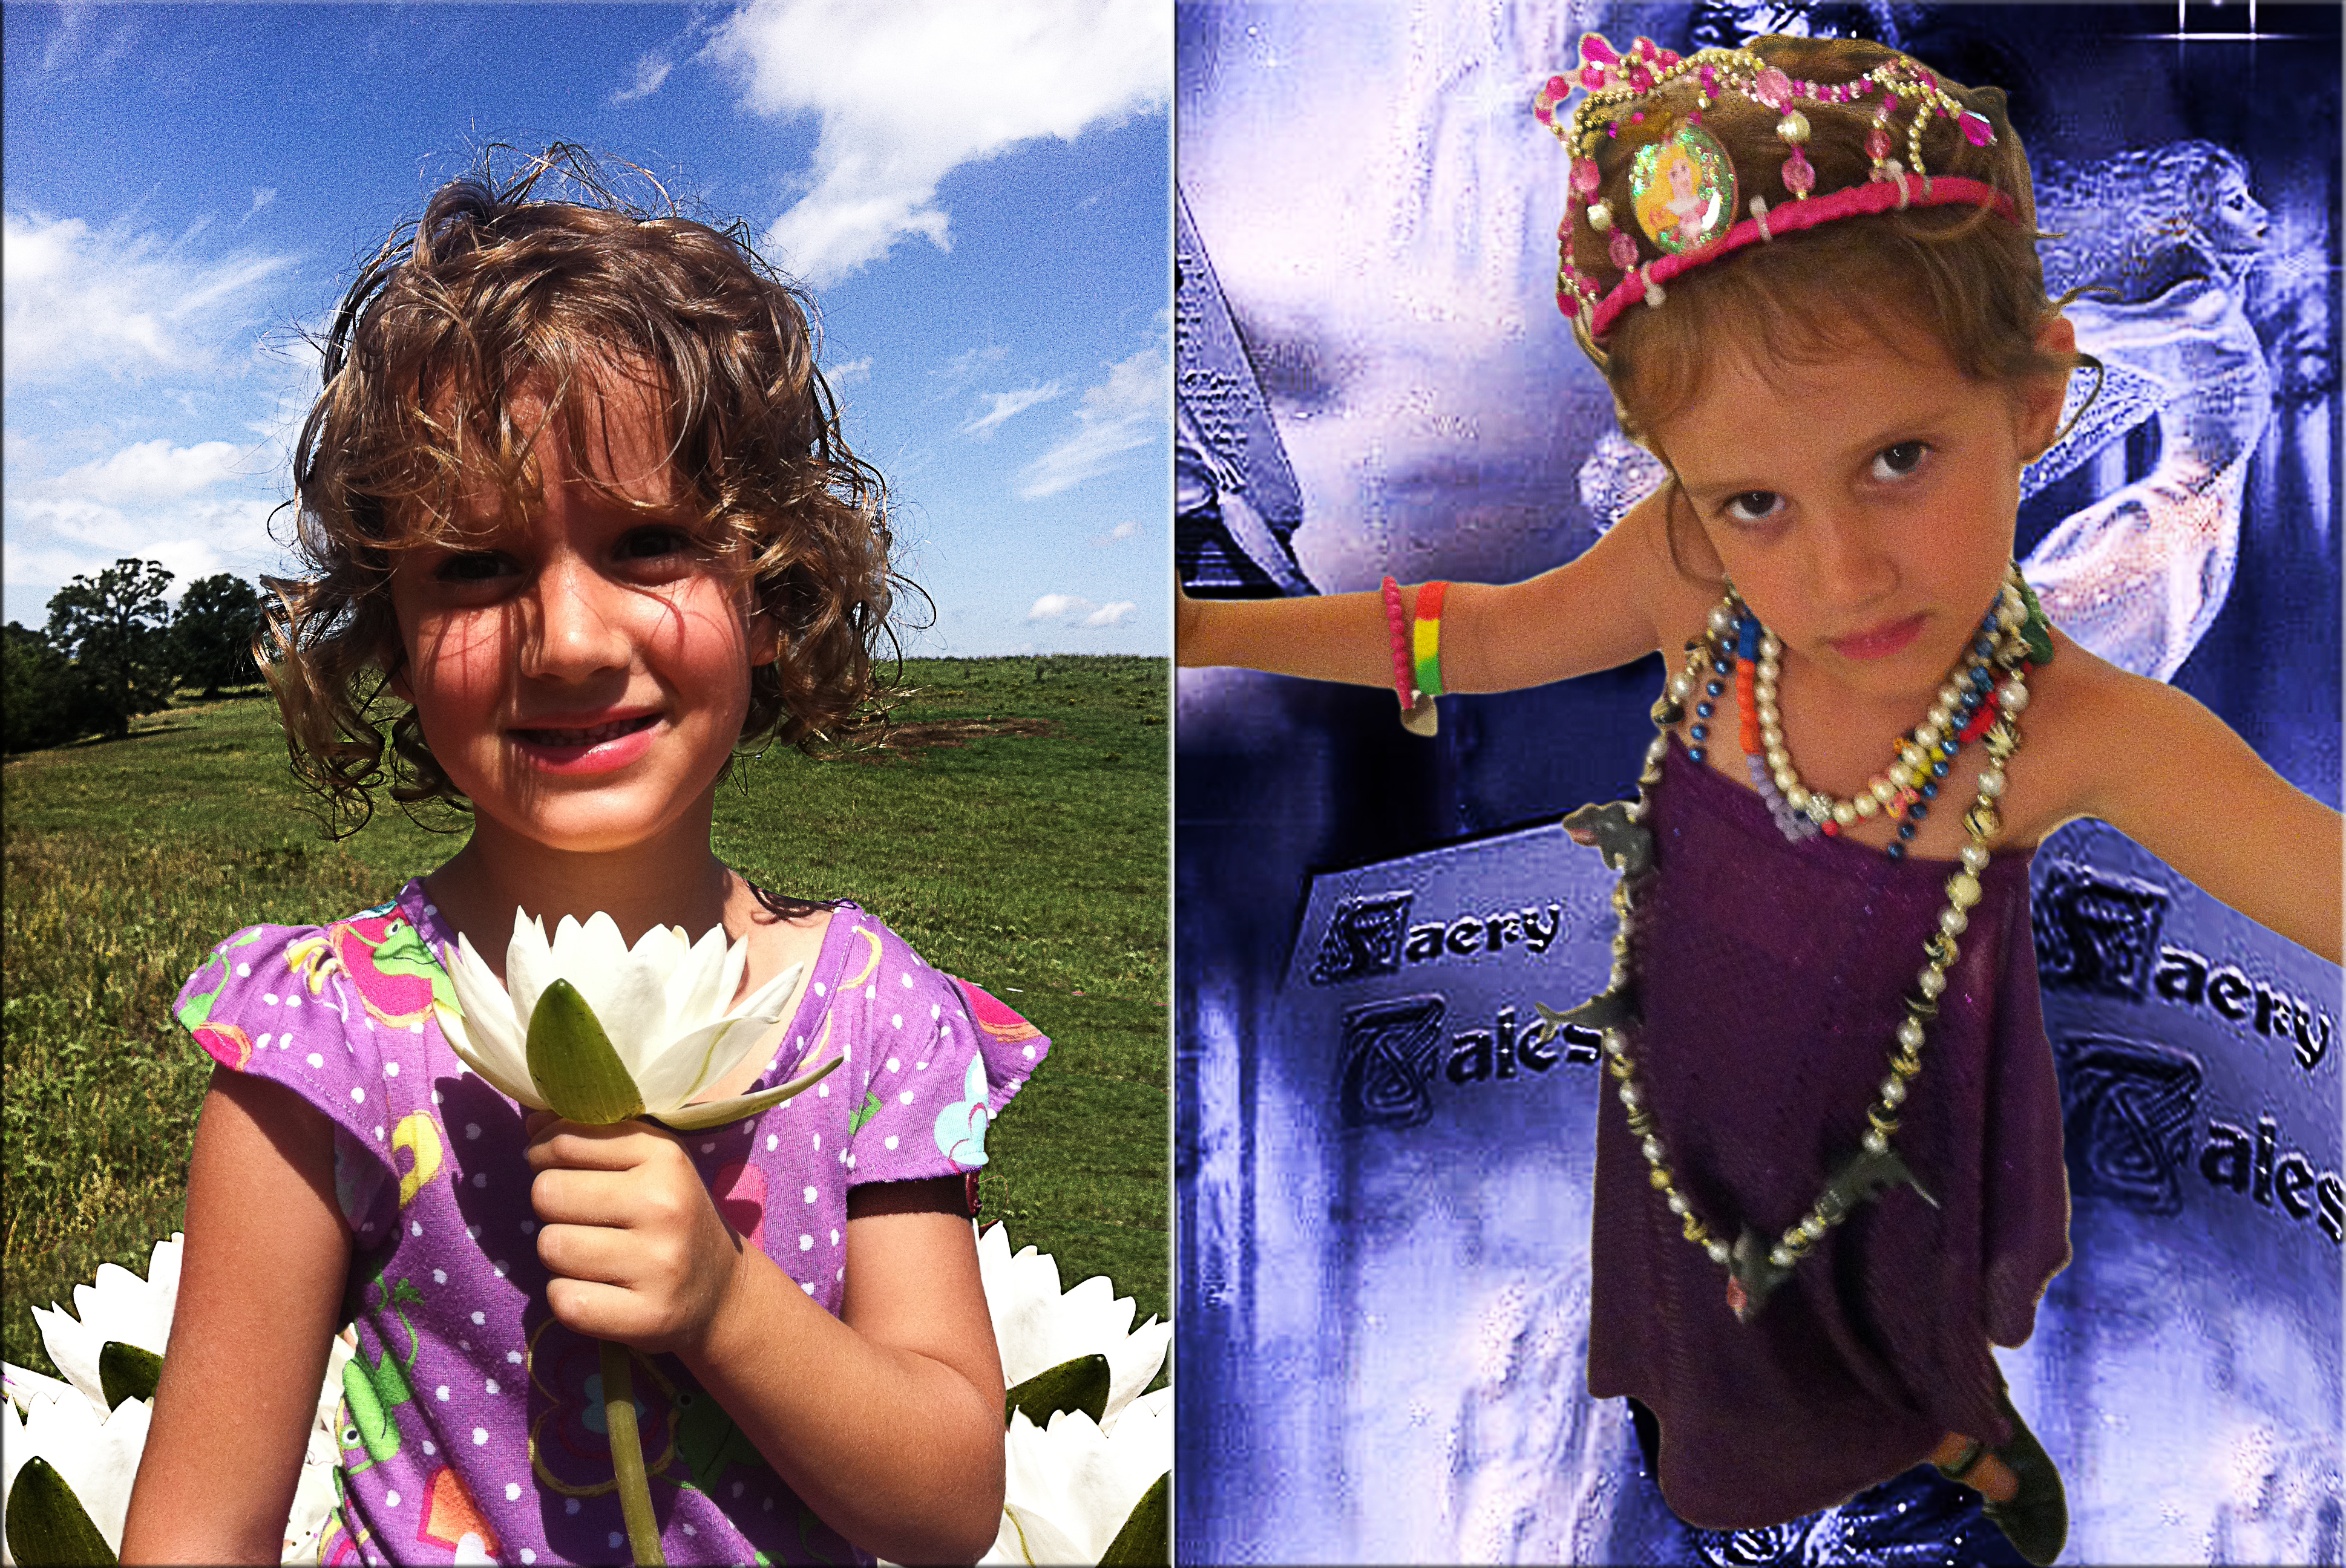
● “Field of Flowers”: Using the tutorial and applying to Em (my granddaughter), taking the one flower she was holding, duplicating and replacing a wagon in the original picture, and making a layer mask to keep Em from being aged, this made the image surreal.
● “Faery Tales”: Again using the tutorial, and the Quick Selection Tool with refinements to extract Em from the original picture, and modifying and warping “Faery Tales” (photobucket) as the background.
Read Article 17 Most Stunning Photoshop Face Effects (Geeks Desk)
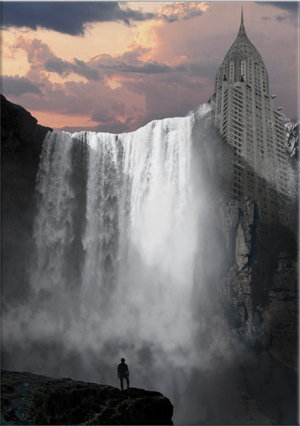
Inspired tutorial - The poster has a post-apocalyptical composition of a waterfall with some ruins of old buildings including the iconic Chrysler building in NYC. Of course we loved the poster and we decided to create something similar in Photoshop.
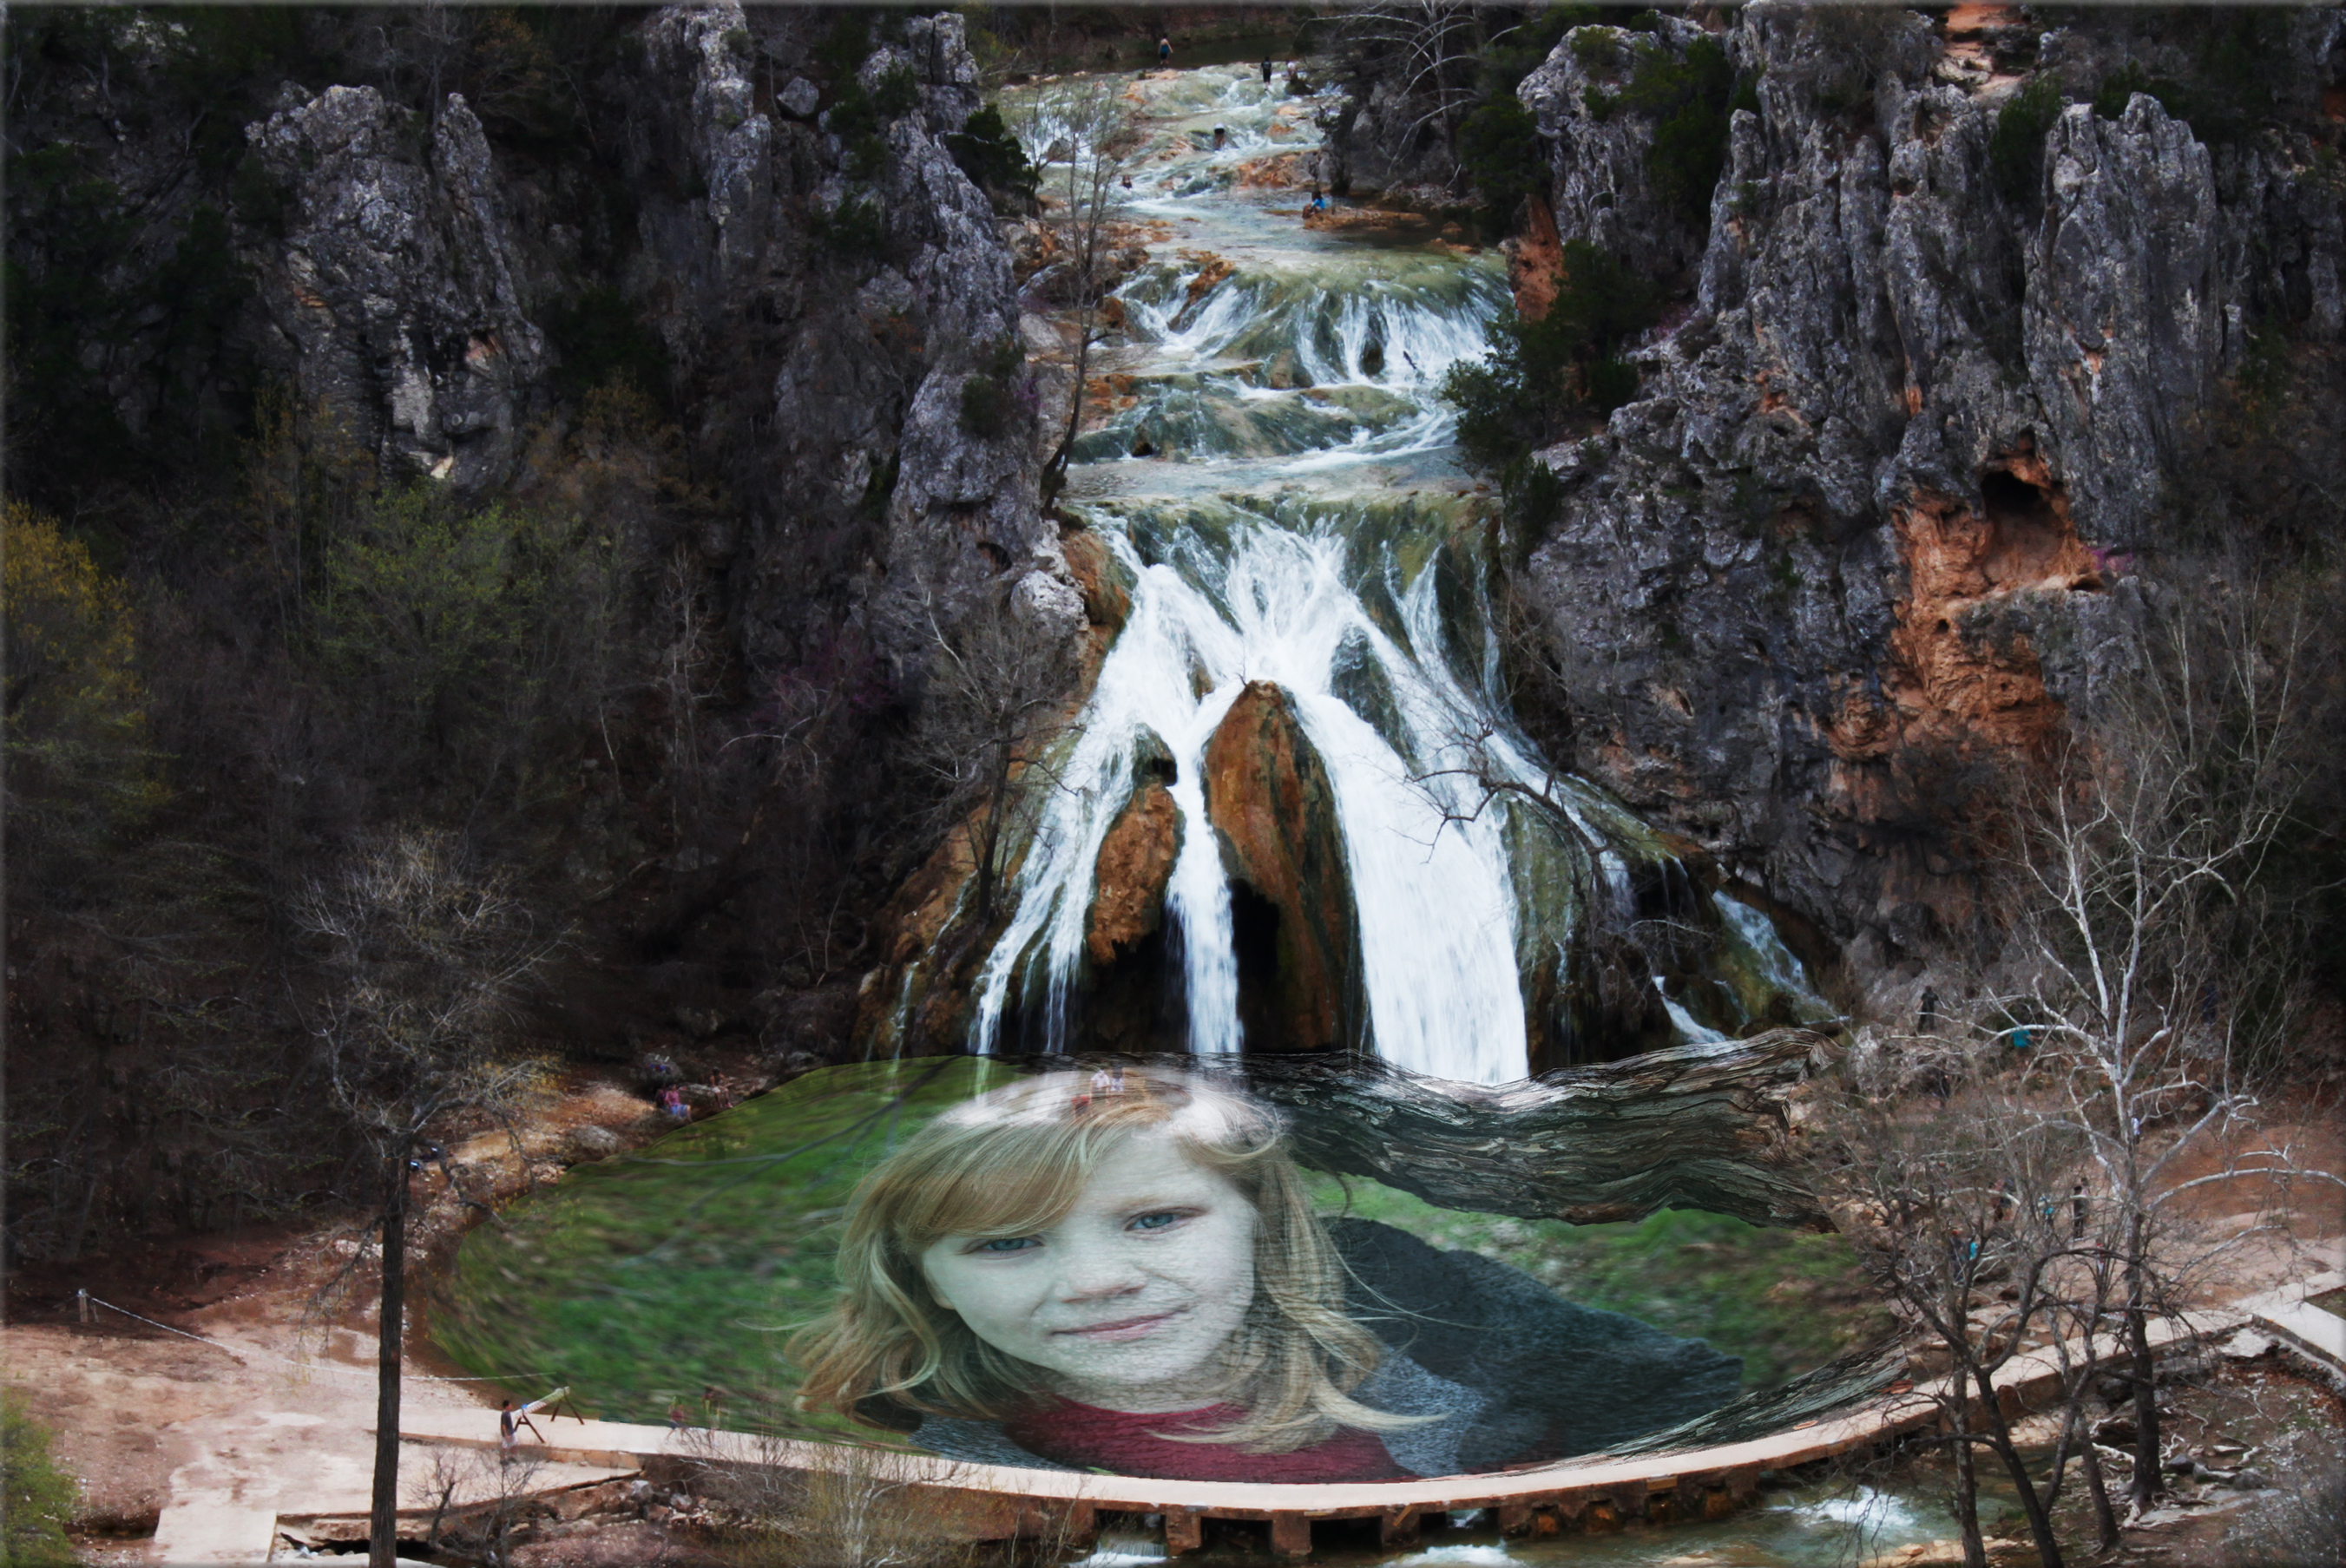
● “Urchin Lost in Paradise”: Using the tutorial and applying to Nate (my granddaughter), taking an HDR (five camera settings using a tripod, merged in Photoshop) at Turner Falls Oklahoma (removing buildings at the base of the falls) and warping Nate into the water, gives the effect she is about to appear from the depths of the pond.
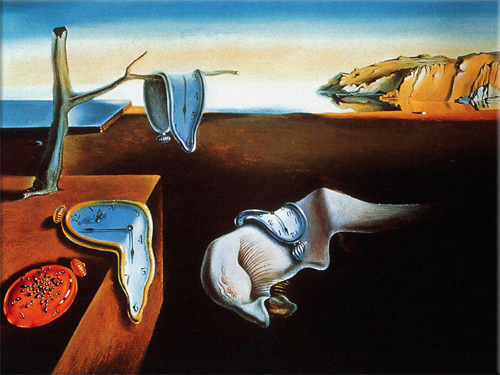
OK not exactly a match for this picture, however the silver flowing paint in this quick tutorial, and Salvador Dali more of a match, started this idea.
● “Man With Too Much Coffee on His Time”: I remember asking permission to take this picture - it is of an interesting man at breakfast a month before he died. He was always unmistakably with his cup of coffee. This image is a combination of three photos: The “interesting man” at the assisted living and memory care community, my dad's pocket watch, and sunset in the backyard taken from the roof of the house - HDR (five camera settings hand held, merged in Photoshop).
Additionally, I remember not seeing him for a few weeks, then asking one of the men at the table where they always sat together, “where was he?” A strange answer; They never tell us anything, he's gone, not to come back. I thought such a strange response, until I asked at the desk (he had no family, he has died).
But he is here in this picture, always to be remembered.
Read Article A Comprehensive Guide to Photoshop’s Liquify Tool (psd.TutsPlus)
Here we took a Photo of Ethan (my grandson) before a soccer game in font of the garrage early morning. I asked him to make this pose, my thought was specifically to revisit the Norwegian painter Edvard Munch and “The Scream”. I showed Ehan a print of this painting, and he was fully cooporative in this fun pose.
Next was to take a high quality print or picture and add as a layer to the image being created. Always name your layers and keep them seperated incase later you decide to change some detail.
Using puppet warp (Edit / Puppet Warp), place the object (Ethan) into the swirling background of the painting to match the effect.
Result, Ethan walking in Edvard Munch's “The Scream”.
My first job out of college was in computer operations and programming at Pangburn's Chocalates in Fort Worth, Texas. How “sweet” was that (pun intended), at Christmas we could volunteer to work the lines at night for a week or two - it literally was a “kid in a candy factory” only better - it was a chocolate factory, and we got paid for it too! You could eat all the chocolate you wanted (and I did). To this day, I can still pick what cream, hard candy or nut is in a chocolate piece, and have always wondered who and why cream filling was invented.
Taking same picture, Ethan was instantly placed into “Chocolate Factory Disaster” as how I envisioned my first job. (Well, all the ideas can't be good!) SEE: Melting Girl In Photoshop and Great Gooey Photoshop Text Tutorial for melting chocolate ideas Abduzeedo / You the Designer
This wasn't the original idea when taking the pictures, however it was just the more obvious when reviewing the pictures.
The quick selection tool was used to cut Ethan from his surroundings, and for the dogs they had to be separated individually using the pen tool.
There is always that messy - pesky fly-away hair when you take people (in this case more the dogs) out of their environment.
Techniques in this tutorial are great for extracting (additional tools if necessary are burn and dodge, and/or the eraser tool (with varied settings from 15% to 100% in opacity and size of the eraser) to remove objects from the original background).
Move the dogs in place with background replacement a dog group picture of high resolution found on the internet.
Read Article Photoshop Tutorial: Make Advanced Hair Selections with Masks -HD- (Youtube)
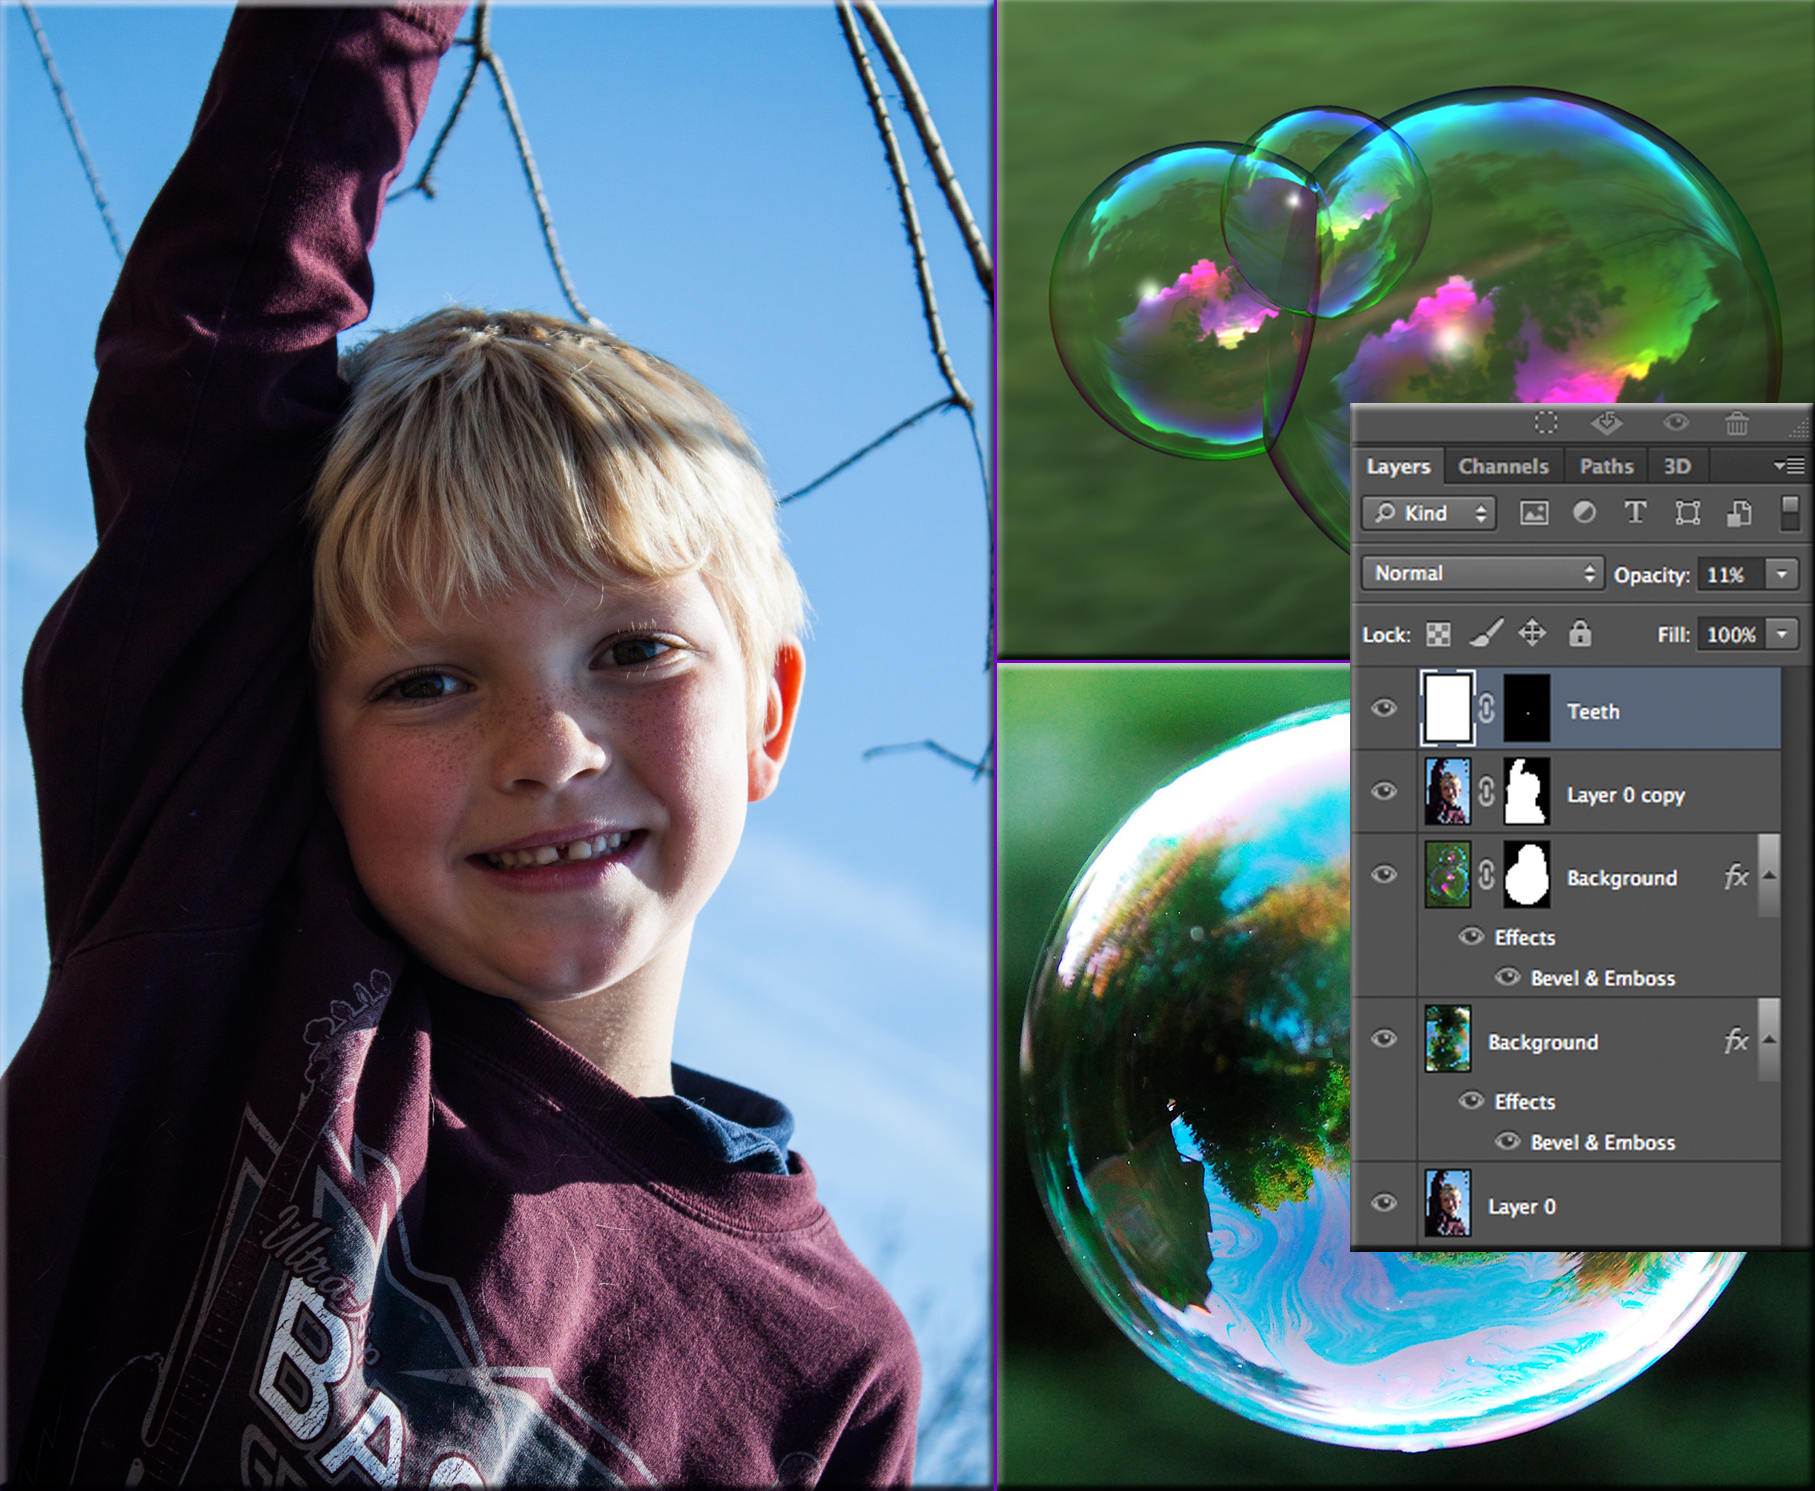
This is a picture I took of grandson Ethan an a trampoline from below. The photo itself looked uncanny spherical like a bubble, so bubbles downloaded from the Internet were added between duplicated layers of the original.
A mask was made using the "quick selection tool" on duplicated layer of the original photo:
(right click (control/click on the Mac) while the selection "marching ants" is active and select "make work path", tolerance between 2 and 4 pixels to feather or smooth the selection) this makes a path / go to the path tab, rename "work path" to a meaningful name and make a permanent path. Right click "make selection", the "feather radius" should be set at the tolerance set previously. This which makes the selection as a path - go to the layers tab, delete the layer mask and click "add vecor mask" button at the bottom of the layers menu.
This is one way to make a selection, there are many - hair is always a problem (another quick way to fix hair, is set the eraser tool to a very low percentage and lightly erase edges (this is destructive to the layer) always have the original layer in reserve).
Bubbles were added at a 5% to 10% opacity. To make the teeth show up better make a mask, fill with white, then drop the opacity to 10% or less - remember it must look natural.
In this tutorial A.J. Wood demonstrates how to use layer styles to create a cool drop shadow effect for your photos.
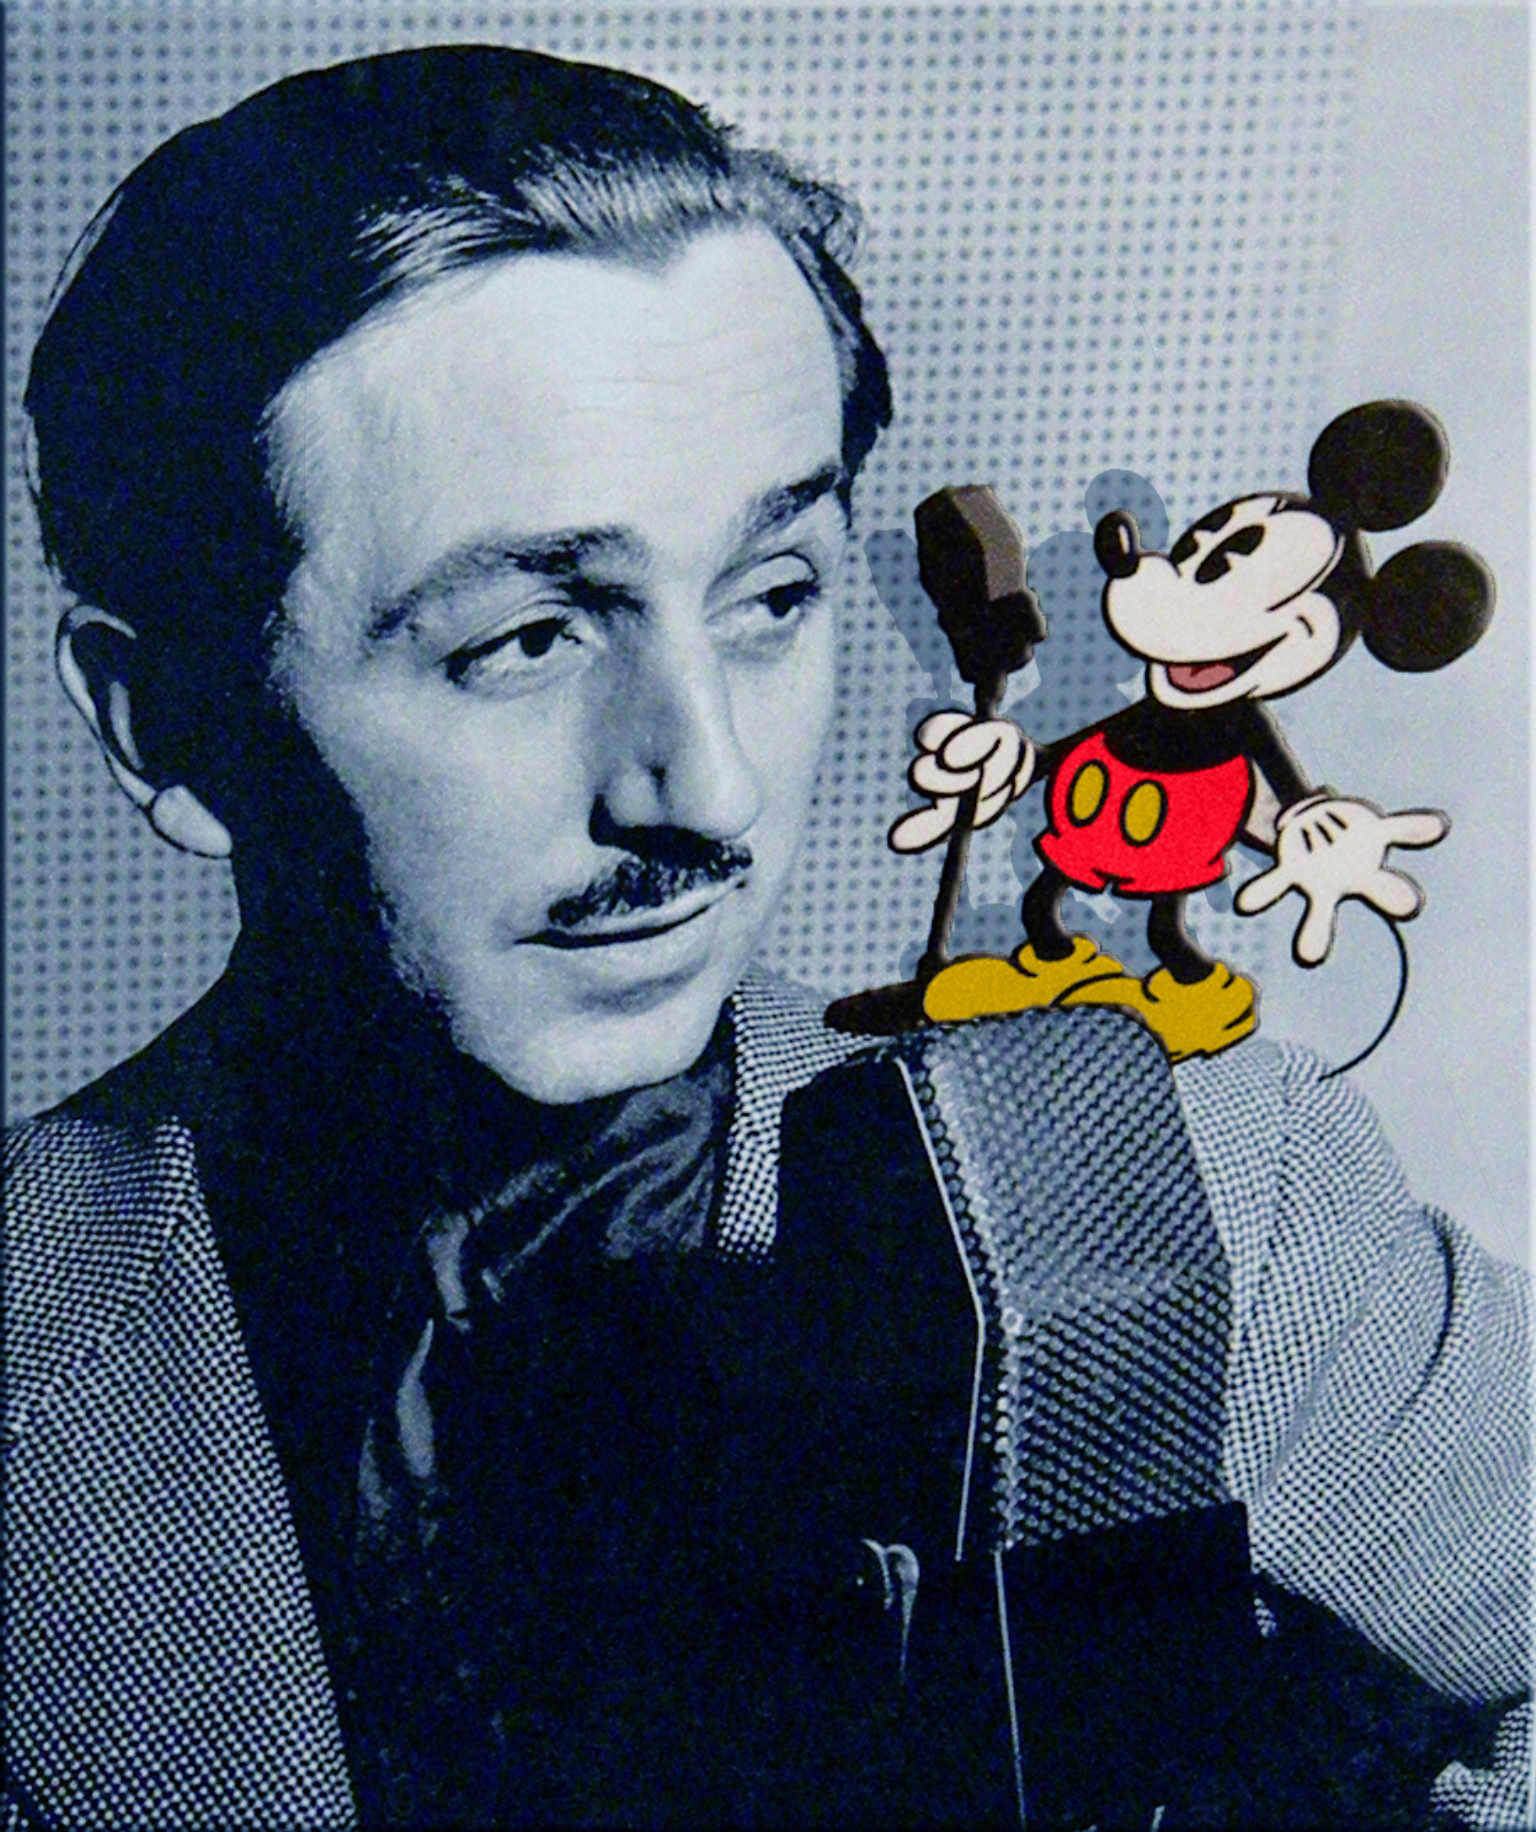
~ Walt Disney and Mickey Mouse - adding a realistic shadow to the mouse - Quick exercise to dramatically change an iconic picture ~
Colors were modified with a non-destructive adjustment layer (color balance - Blue 50 and Cyan -50) with additional layers for red and yellow brushed in using the blending mode Color.
This image was used for the quote section in THIS DAY IN HISTORY - DECEMBER 5th: “If you can dream it, you can do it. Always remember that this whole thing was started with a dream and a mouse.” Walt Disney (December 5, 1901 – December 15, 1966)
Read Article Photoshop Tutorial: How to Create a Real Drop Shadow in Photoshop with Layer Styles (Youtube)
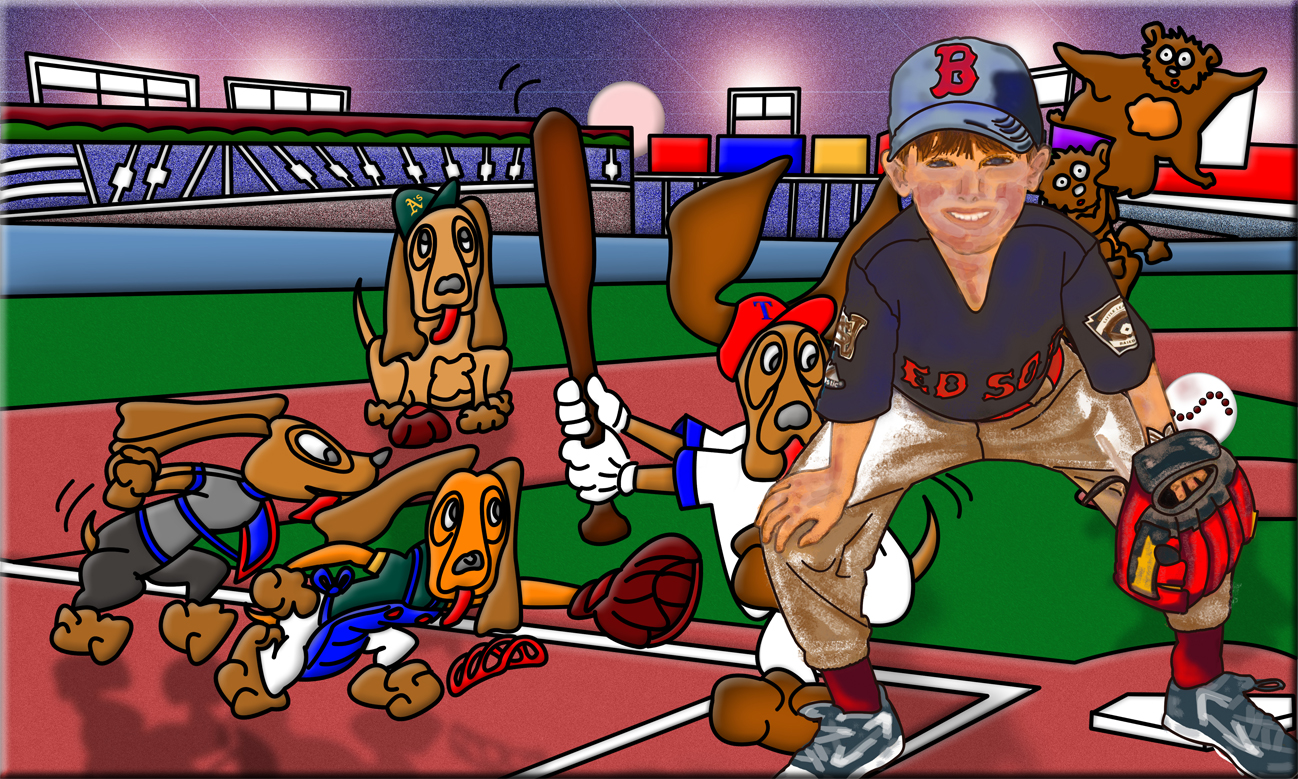
First I pencelled a drawing of dogs (nephews), squirrels and the Ballpark in Arlington on paper, then scanned the sketh and copied into photoshop.
Next was to create a layer to retrace the sketch with the pen tool creating a path, then right click on the path and select stroke path at 4 pixels to make an outline of the objects.
Then creating varing layers in Photoshop, either selecting out parts of the path and/or sometime redrawing the path - applying the new path to the new layer for colorization of the varying colors. (It is vary important to name your paths and layers while making them similar names for matching later.)
Note: I found it easier to have many layers for specific colors, therefore making it easy to change a color you may not like “on the fly”.
Warning: This tutorial is NOT FOR BEGINNERS, it’s for people who know their way around Photoshop and are looking to further their design knowledge/skills.
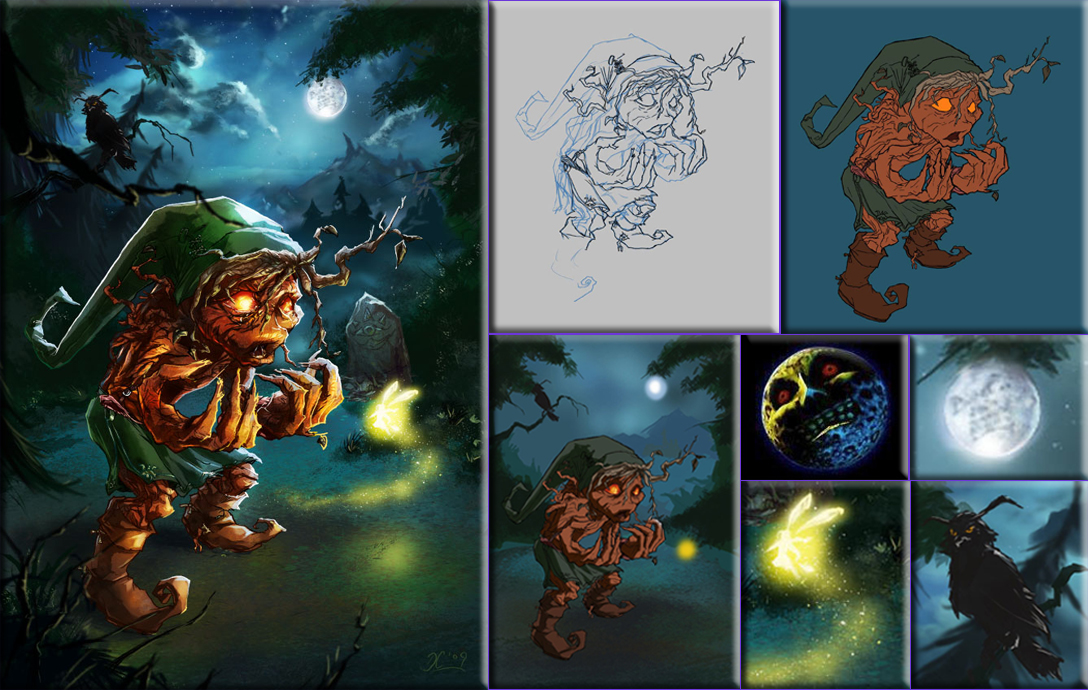
Inspiring (Let There Be Light by Rodelicious) - “Nature is very beautiful, and if caught by a talented photographer in photographs is worth watching and incomparable to any other form of beauty!”.
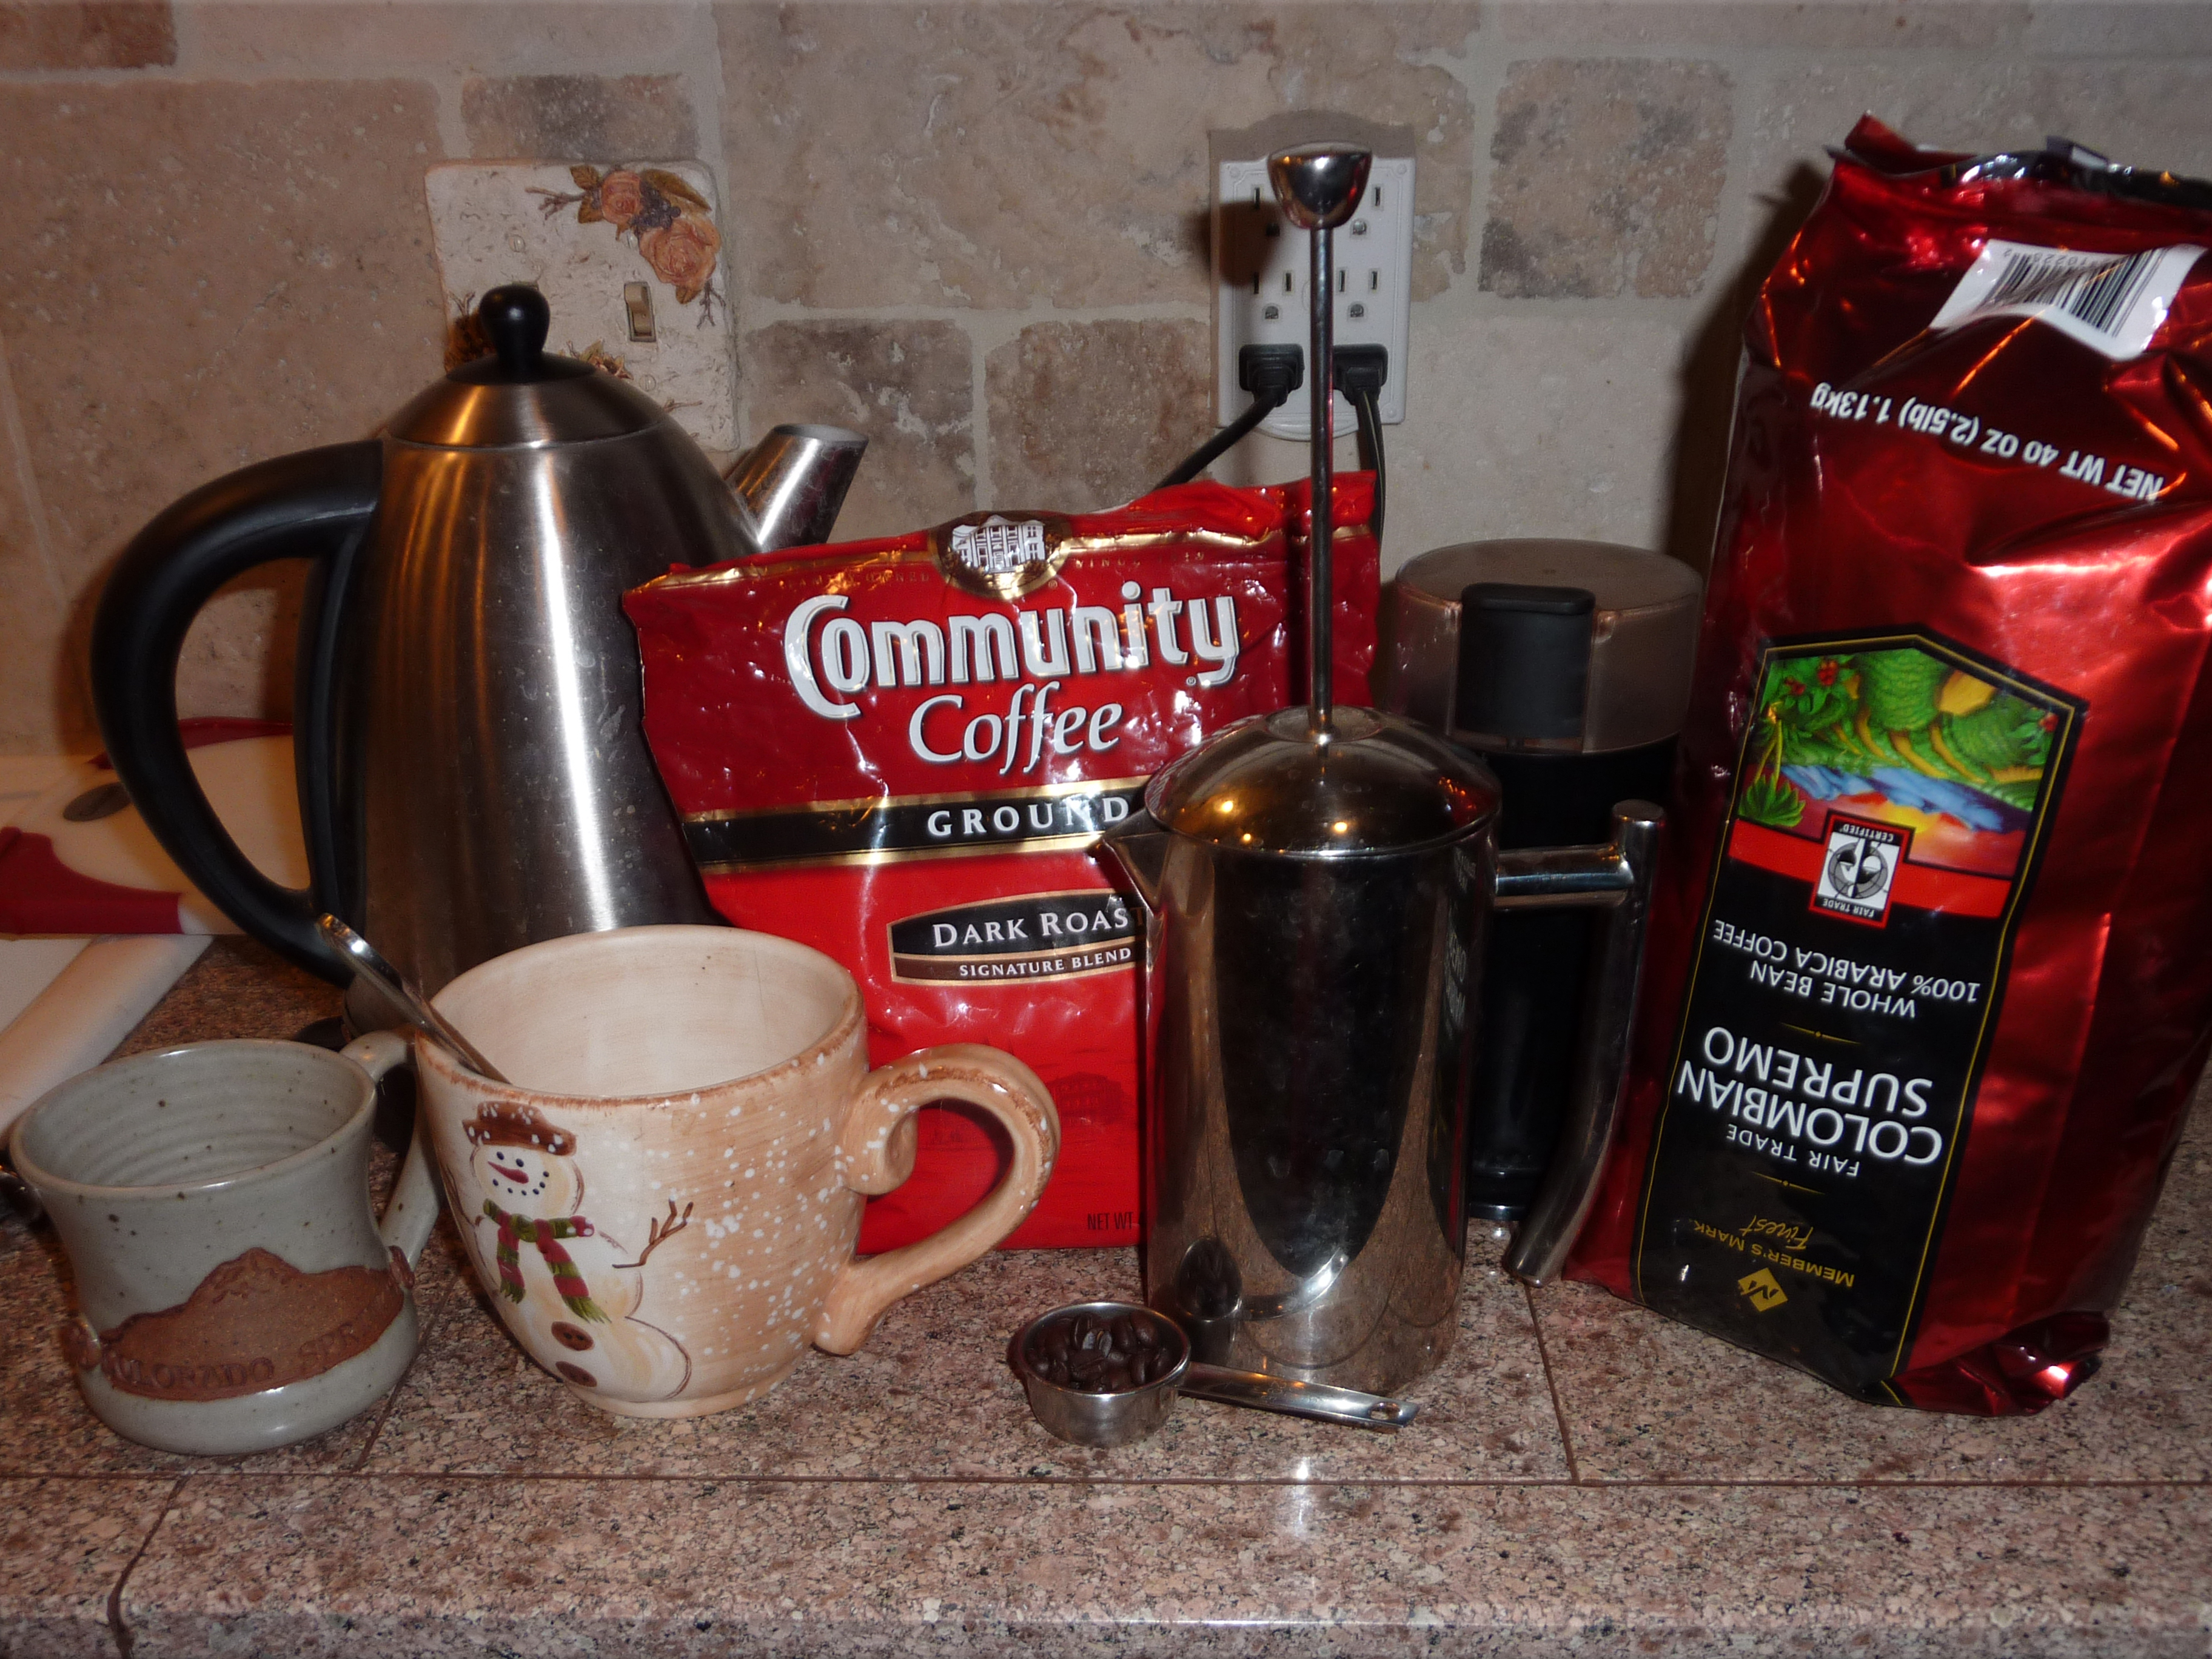
Daylight Savings Time (study: Change to daylight saving time takes a big health toll, but for me this means changing many clocks and usually being an hour late for one thing this first couple of weeks after the change). However, inspired by the hour change and not so much the “spring forward fall back“ saying - Being a morning person / designated coffee maker of the house, I found a consistently great way to make coffee every morning economically and at your home.
Let's break this down into two components, hardware and software.
- Fill the kettle with the amount of water you will need and start the water boiling
- Grinding the coffee (3 to 1 ration beans to Community Coffee) - important to grind the coffee even if it is not whole beans (15 - 20 seconds)
- When putting the ground coffee into the coffee maker, tilt the coffee maker and lightly tap so the ground coffee won't spill all over the counter (promise this a very good tip)
- When the water is boiled, pour into the coffee maker, stir and put the press on top to let steep 5 to 15 minutes
- I use honey and milk. There is a start-up cost, however you quickly get your money back plus convenience.
- 5 minutes to prepare and 5 minutes to steep - I used Amazon to show and compare prices.

")


")
")
")
")
")
")
")
")
")
")
")
")
")
")


”")
” - composite")


 The Scream”")
")
")


")
")