Bokeh: “An image that portraying the beauty of the out of focus area of the photograph as the perfect backdrop to the central subject” Photoshop bokeh effect tutorial - YouTube
Bokeh: An image that portraying the beauty of the out of focus area of the photograph as the perfect backdrop to the central subject.
A pretty granddaughter, light (open up the curtains and door), a fan,imagination and the project - Bokeh effect.
Using Photoshop, always first set-up a save folder to keep the original image and important srteps if needed. Always use non-destructive methods of modification to the image whenever possible.
Masking photoshop layers are one of the best methods of non-destructive modification.
A nondestructive Adjustment Layer is used to change the color image to black and white.
Using the Quick Selection Tool, Layer Masks can be quickly built to seperate black and white from color selections, or the subject of interest from the background.
Finally, using the brush tool, a Bokeh effect is created for the background to the spiral stairs.
Having Fun with Shadows: To the right are grandkids “E” and “EM” (my nicknames). This was a bit of “horsing around” - instructions to the kids, act like you are picking up one or the other, then let them use their imagination. The picture was taken in front of the garage on a very windy day. In Photoshop, the Quick selection tool, Drop Shadow in Layer Style and the Warp Tool lowering the opacity of the created shadow layer.
HDR (High-dynamic-range imaging): Images can represent a greater range of luminance levels found in real-world scenes, from direct sunlight to faint nebula. HDR can be achieved by capturing and then combining different exposures of the same subject matter.
On the right is a photo taken while in Venice, of blue boats in dock. On that day the sky was blown out and uninteresting. In this situation, a photo of cirrus clouds taken on a different day and diffent place than the day of this photo of boats, was used to add to the intest of the pcture. (Always keep a store of your photos which should always include intesting cloud formations, you never know when they may be used - this will be added to the background.)
In Photoshop, turn the photo into an HDR photo by using similar techniques as in the tutorials above using Image / Adjustments / HDR Toning.
Duplicate the resulting HDR photo layer. Next select out the sky portion of the photo using the Quick Selection Tool along with the Brush Tool in the layer mask to detail the background and seperate the buildings and horizon from the sky. (Remember black/conceal - white/reveal - sky needs to be concealed.)
Finally, add your cloud photo as a layer in between the mask layer and the HDR layer, and in the layers adjust the opacity down (in this case just under 50%) to make the clouds appear as they belong on the day the picture was taken. (NOTE: the cirrus clouds with a change in opacity, will bleed into the original blown out sky yet sill show nicely.)
Result is an HDR effect with a more interesting sky.
Photos taken while on our stay in Hungary, which included a tour made possible with our friends who live in Hungary Patrick and Olga, with trips in Austria, Northern Italy and Eastern Hungary.
There were easily two thousand images taken, these are a few with the topic of “shadows”.
The photos were brought into Photoshop for correction and enhancements. One of the tools used in Photoshop was Transform / Distort to correct perspective distortion (distortion will occur when taking a photo when you are not directly centered on the subject matter, and can easily be seen in verticle lines such as in buildings)
Before starting, always make a “save” folder to keep the original photo. And always make folders in larger Photoshop projects to save and mark critical steps.
On hand held shots or shots where the subject may move, use the High Pass (Blend Modes) technique to correct unwanted blur movement.
Here we isolated the finger to add a motion blur effect to the finger (similar to the tutorial on “Adding Motion Blur ” - to promote the title “Wag The Irish Tale in Dublin”
In the original photo, there were bright white objects on the wall, so parts of the wall were selected, copied and moved over the distracting objects (which added no value to the photo), and additionally drew our attention away from our subject.
As it was a long way back to Dublin, impossible to retake the photo, therefore it was most preferrable to use Photoshop to make improvements missed at the time the photo was taken - and done in minutes too.
Motion The below photos were shots with camera settings and/or panning - you can do the same with a camera, given time, the right circumstance and luck.
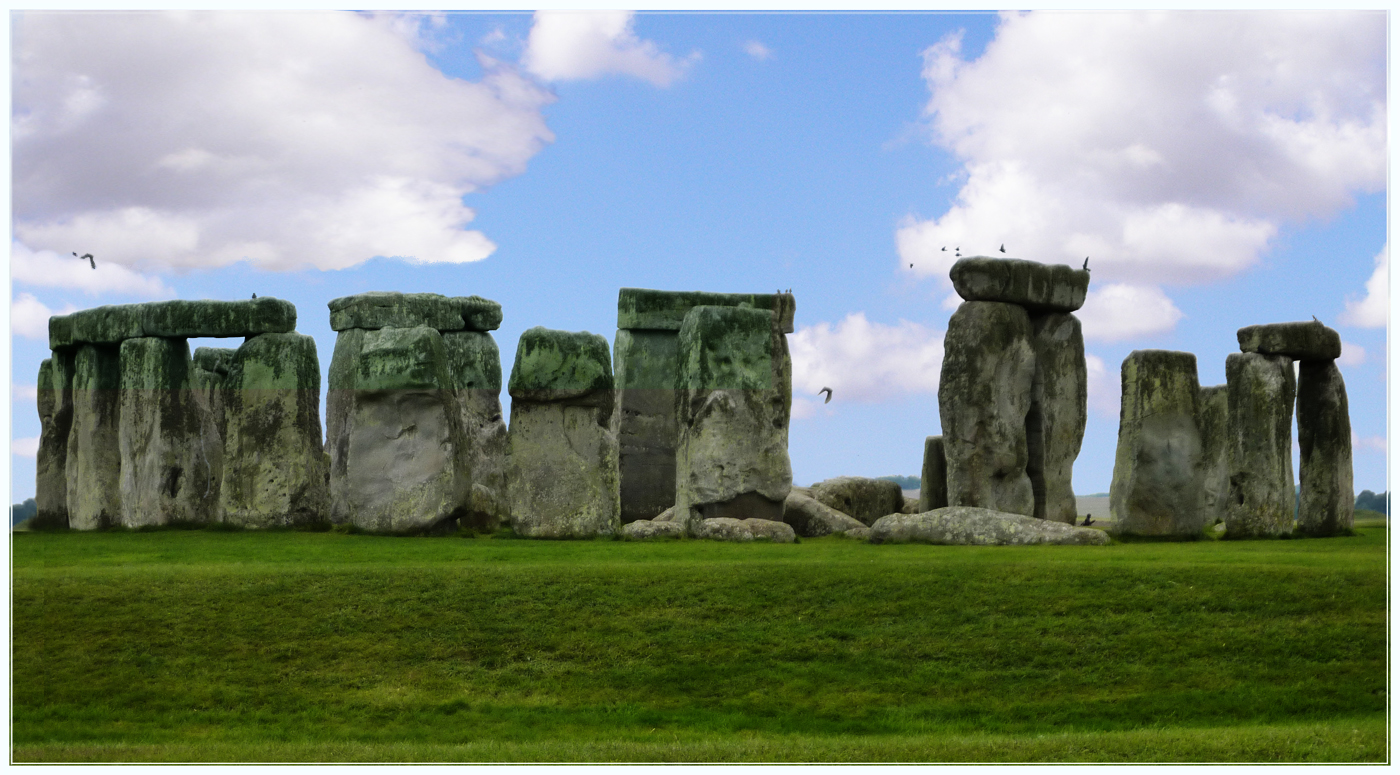
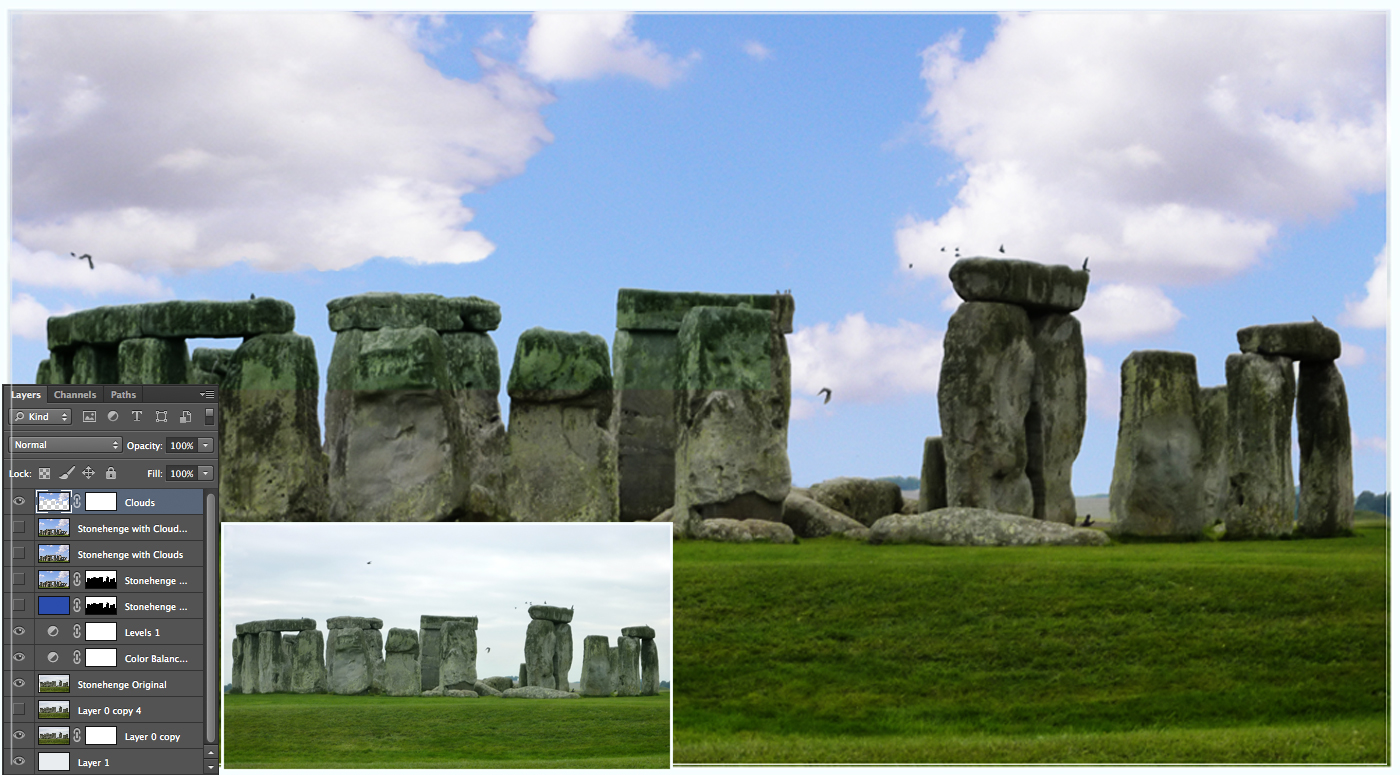
The Magic Wand Tool In Photoshop (for background selection to eliminate the original background - a hazy day at Stonehenge, and add a Clouds layer as a new background for Stonehenge.)
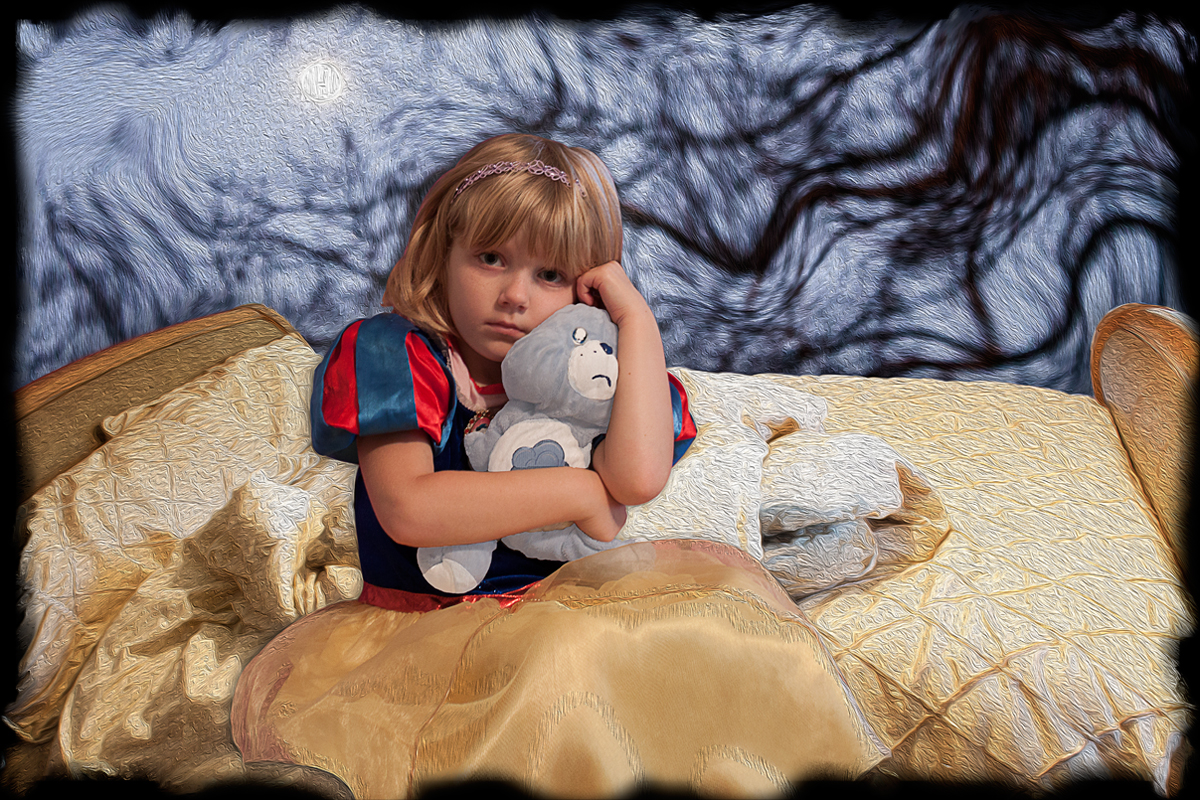
The story starts as a little girl's need for her blue bear. Whenever the bear cannot be found, it is terror!
Photos taken were of Natelie holding her bear, back of blue bear (isolating head and paws), a simi-made bed, and a picture of a full moon wintery night with tree taken from the front lawn (acting as hands grabbing the moon) - all on seperate days.
First Example: shows the original picture of Natelie taken in front of a pink tint, holding her blue bear. Instructions were: think of something taking your blue bear. I told Nate, I would place her on a bed with photoshop, and there would be a big blue bear crawling up from the floor. It would be fun, and she would love the result - imagine, make the face and pose.
Second Example: “Monsters Under the Bed” - The four photos (Natelie in front of the pink tint holding her blue bear, full moon tree, bed and blue bear) are merged in Photoshop.
The quick selection tool and pen tool were used to select parts from all the photos. For the tree background, liquify filter was used to liquify the tree limbs. Blue bear although clean, was several years old and some needed some brightning, a layer was addded for brushing blue and white colors, and the eyedropper for matching colors. (Opacity on the brushed layers were scaled to 40% to look realistic (Blending Modes: Normal is the default; experiment with Overlay, Soft Light, Hard Light and Color))
NOTE: Use folders to group layers in major steps (the folders leave a trail and visability can be easily turned off and on with the eye icon).
Here, two new folders were made. All layers are moved into an original folder, then that folder copied and all the layers merged into one layer. (we have two folder, one with detail layers and one with merged layers).
Taking the merged layers, select in this case Natelie with a layer mask. Duplicate that layer and invert the layer mask (command Mac or control PC “I”)
Always use non-destructive methods such as masks to modify layers. Note: It is always better to use the layer mask with brush (black conceal, white reveal), then the destructive eraser tool.
Third Example: is a modification of the second photo, eliminating the “Mama Blue Bear” from under the bed
Here another folder was created and merged from the previous steps
A Photoshop frame was added with a black background. This simplified the image and gave it a more realistic and starry effect.
Forth Example: is a composite of a few photos and photoshop steps used in making the final photo.
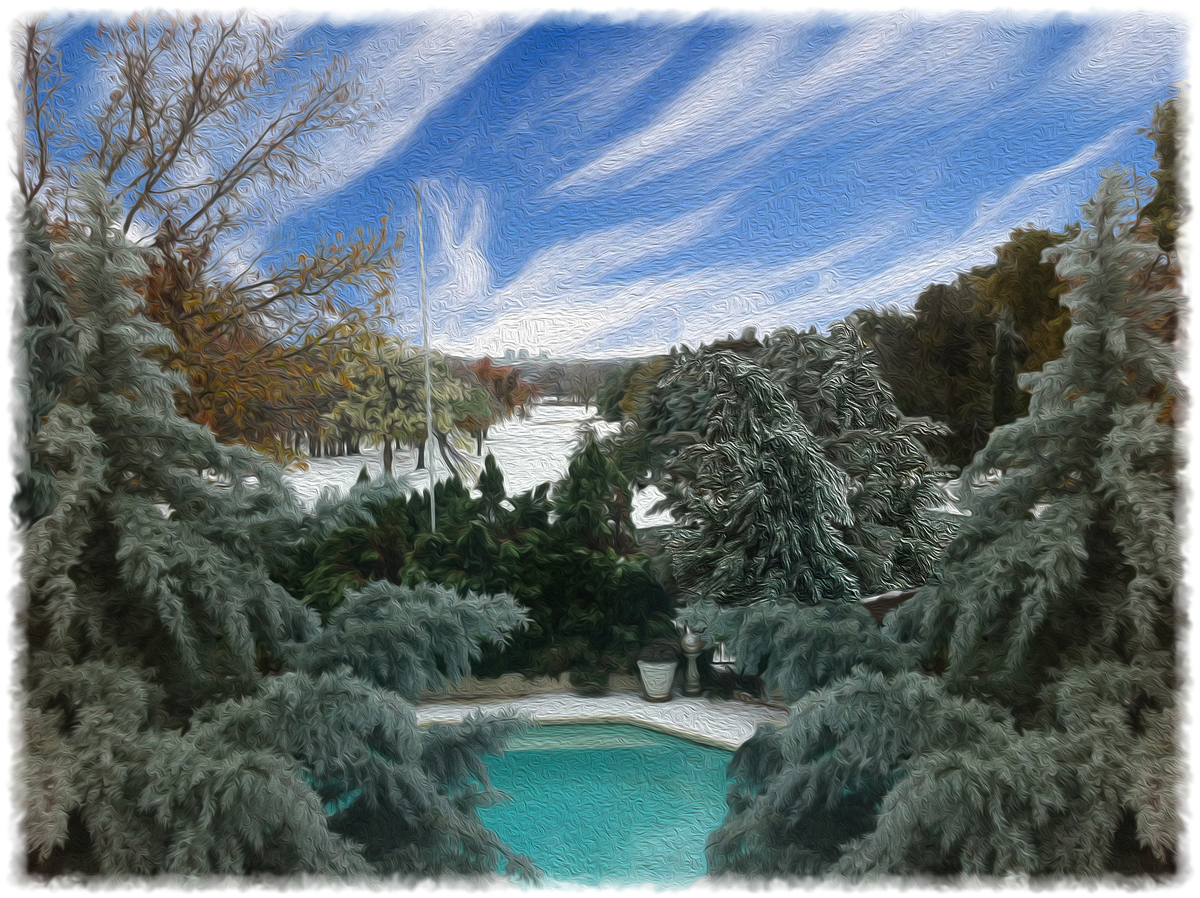
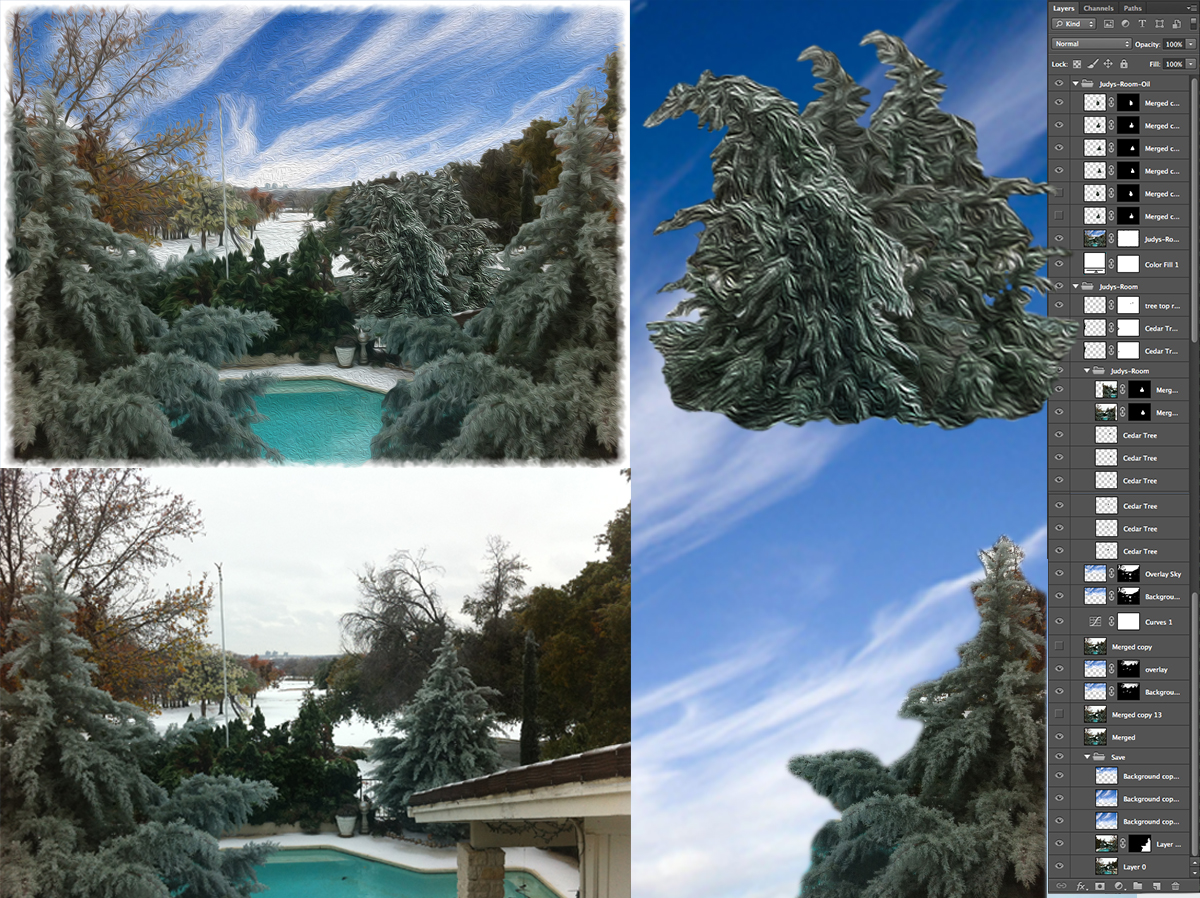
Using similar steps as above, photos of backyard from the second floor home office window, combined with a clouds photo taken seperately, change the drab cold wintery day to a look like oil painting made on a bright and cold winter day.
Dead trees were removed without chain saw, and cedar trees added without planting. Fleecy clouds were added appearing through a layer mask on the original photo.
Adding the oil paint filter to a merged final layer, gives the effect of an oil painting.
Read Article Non-destructive adjustments in Photoshop - Youtube Tutorials
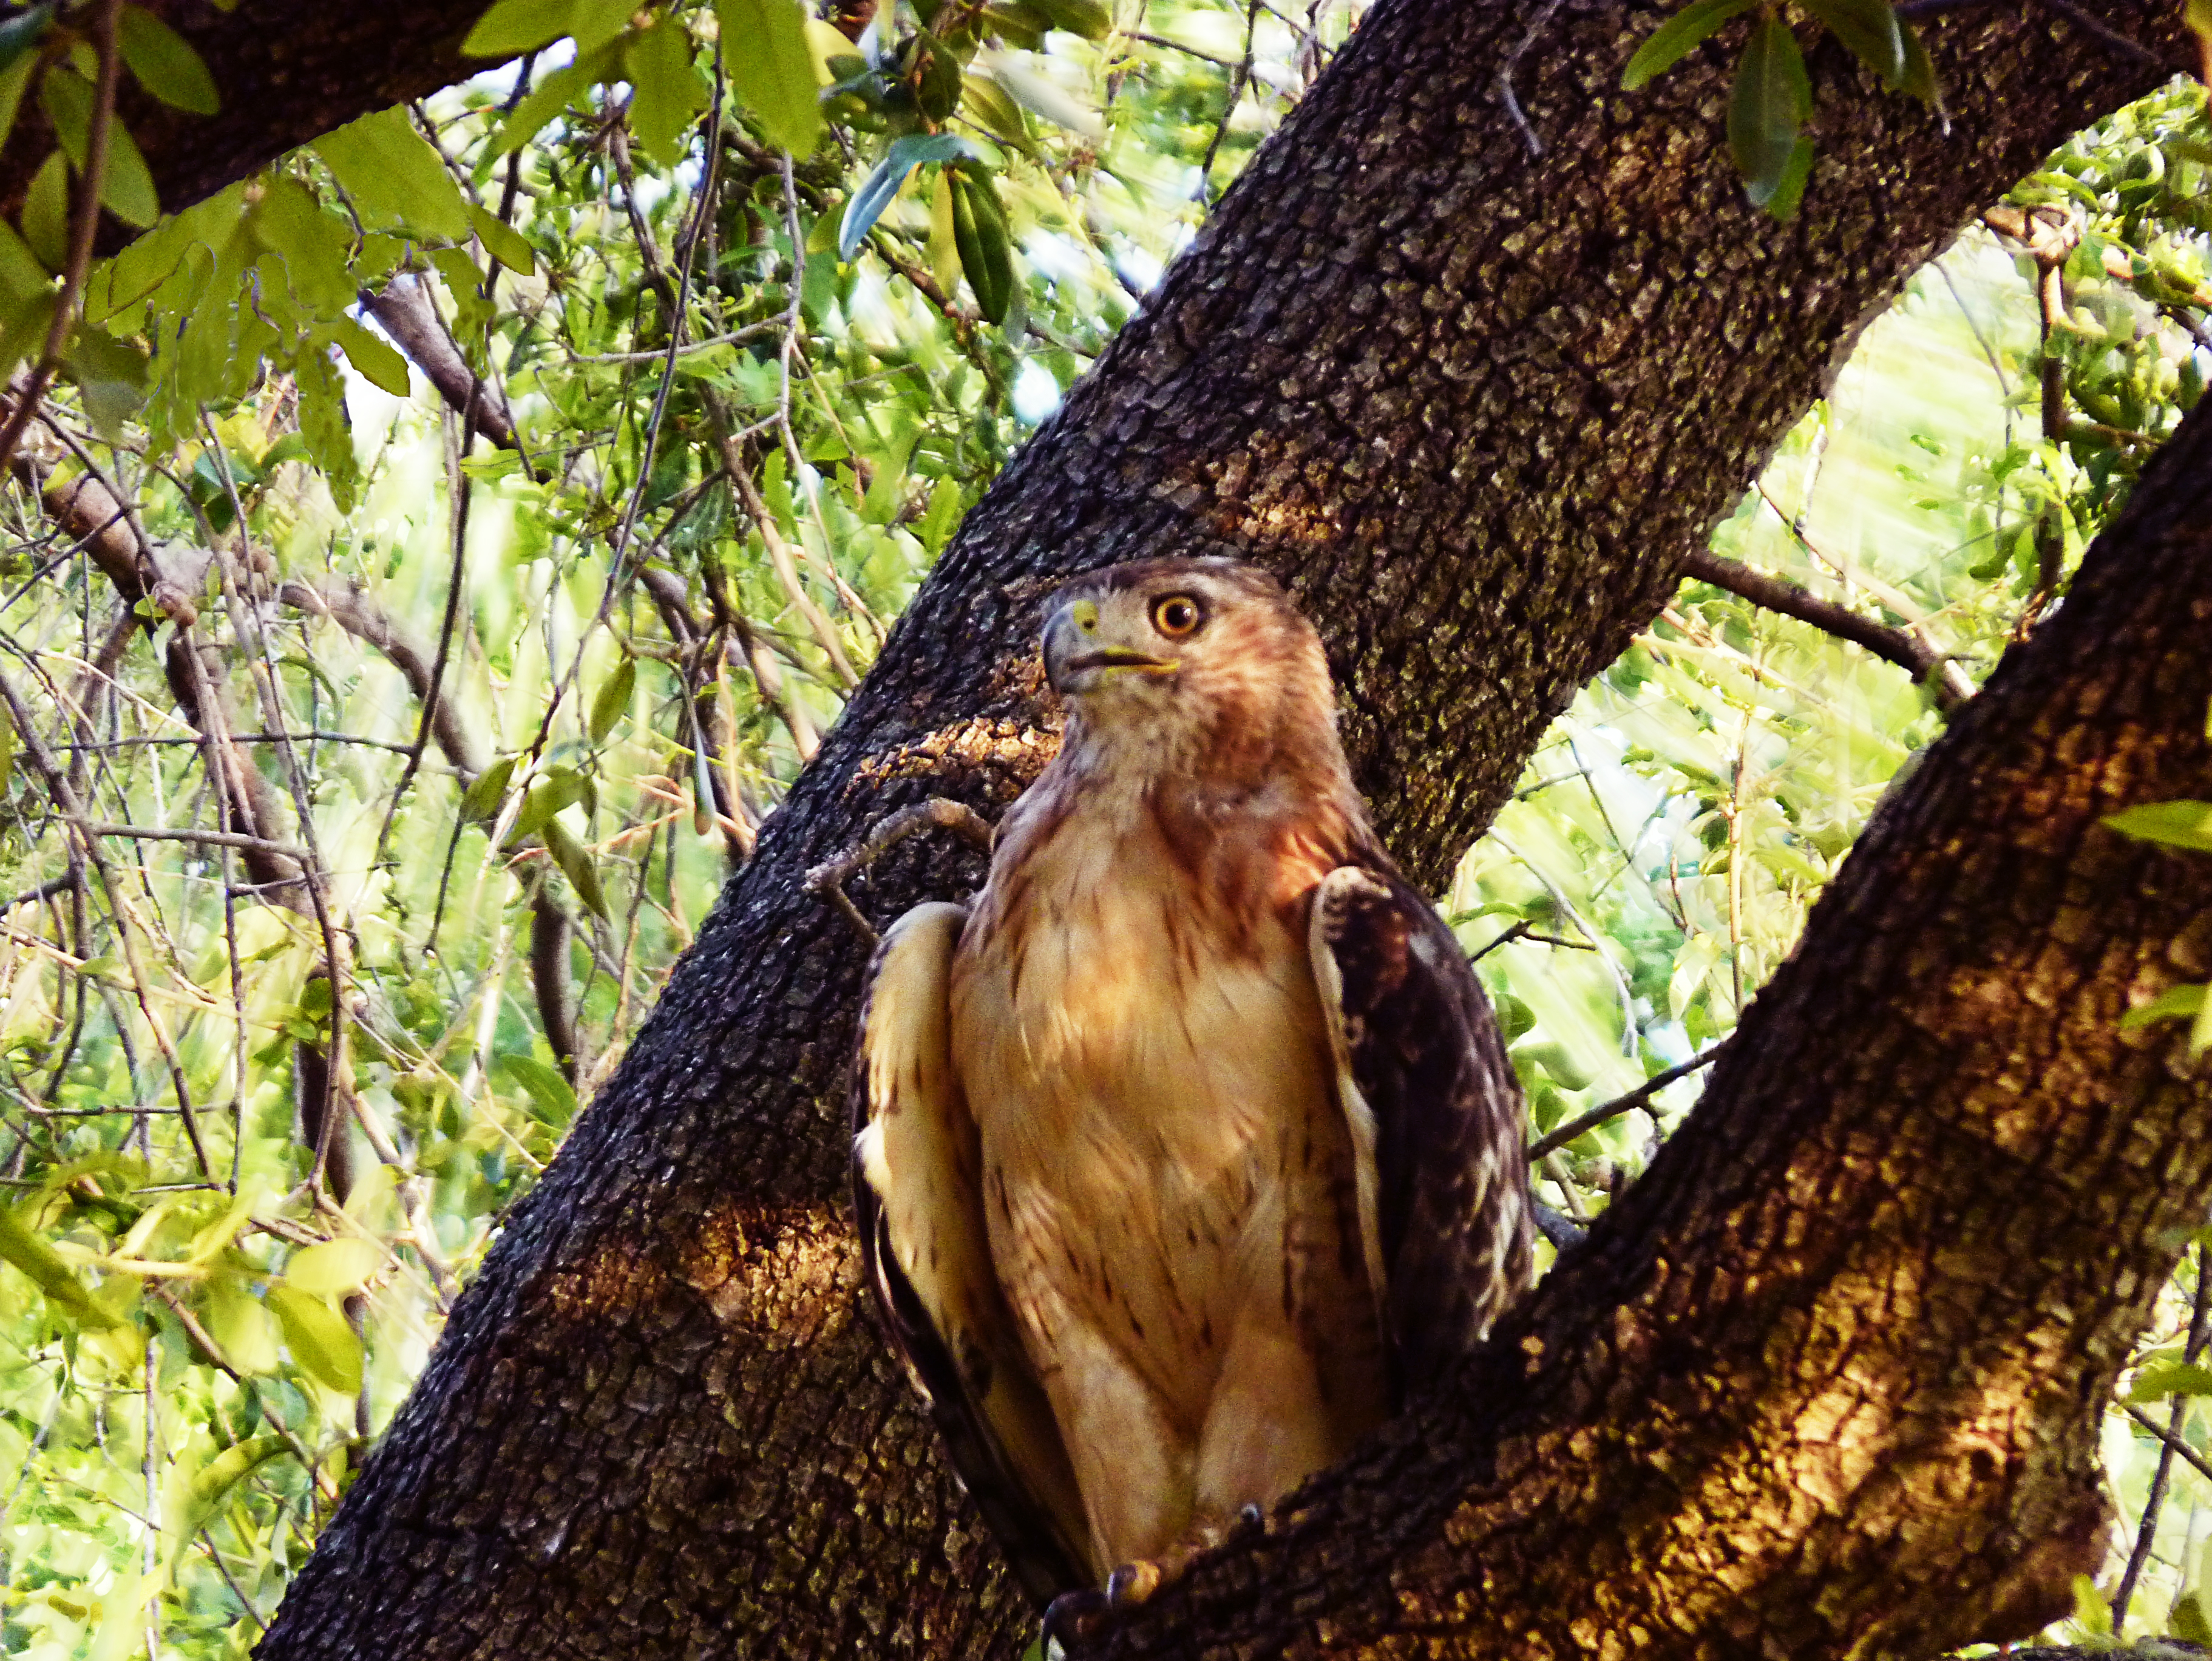
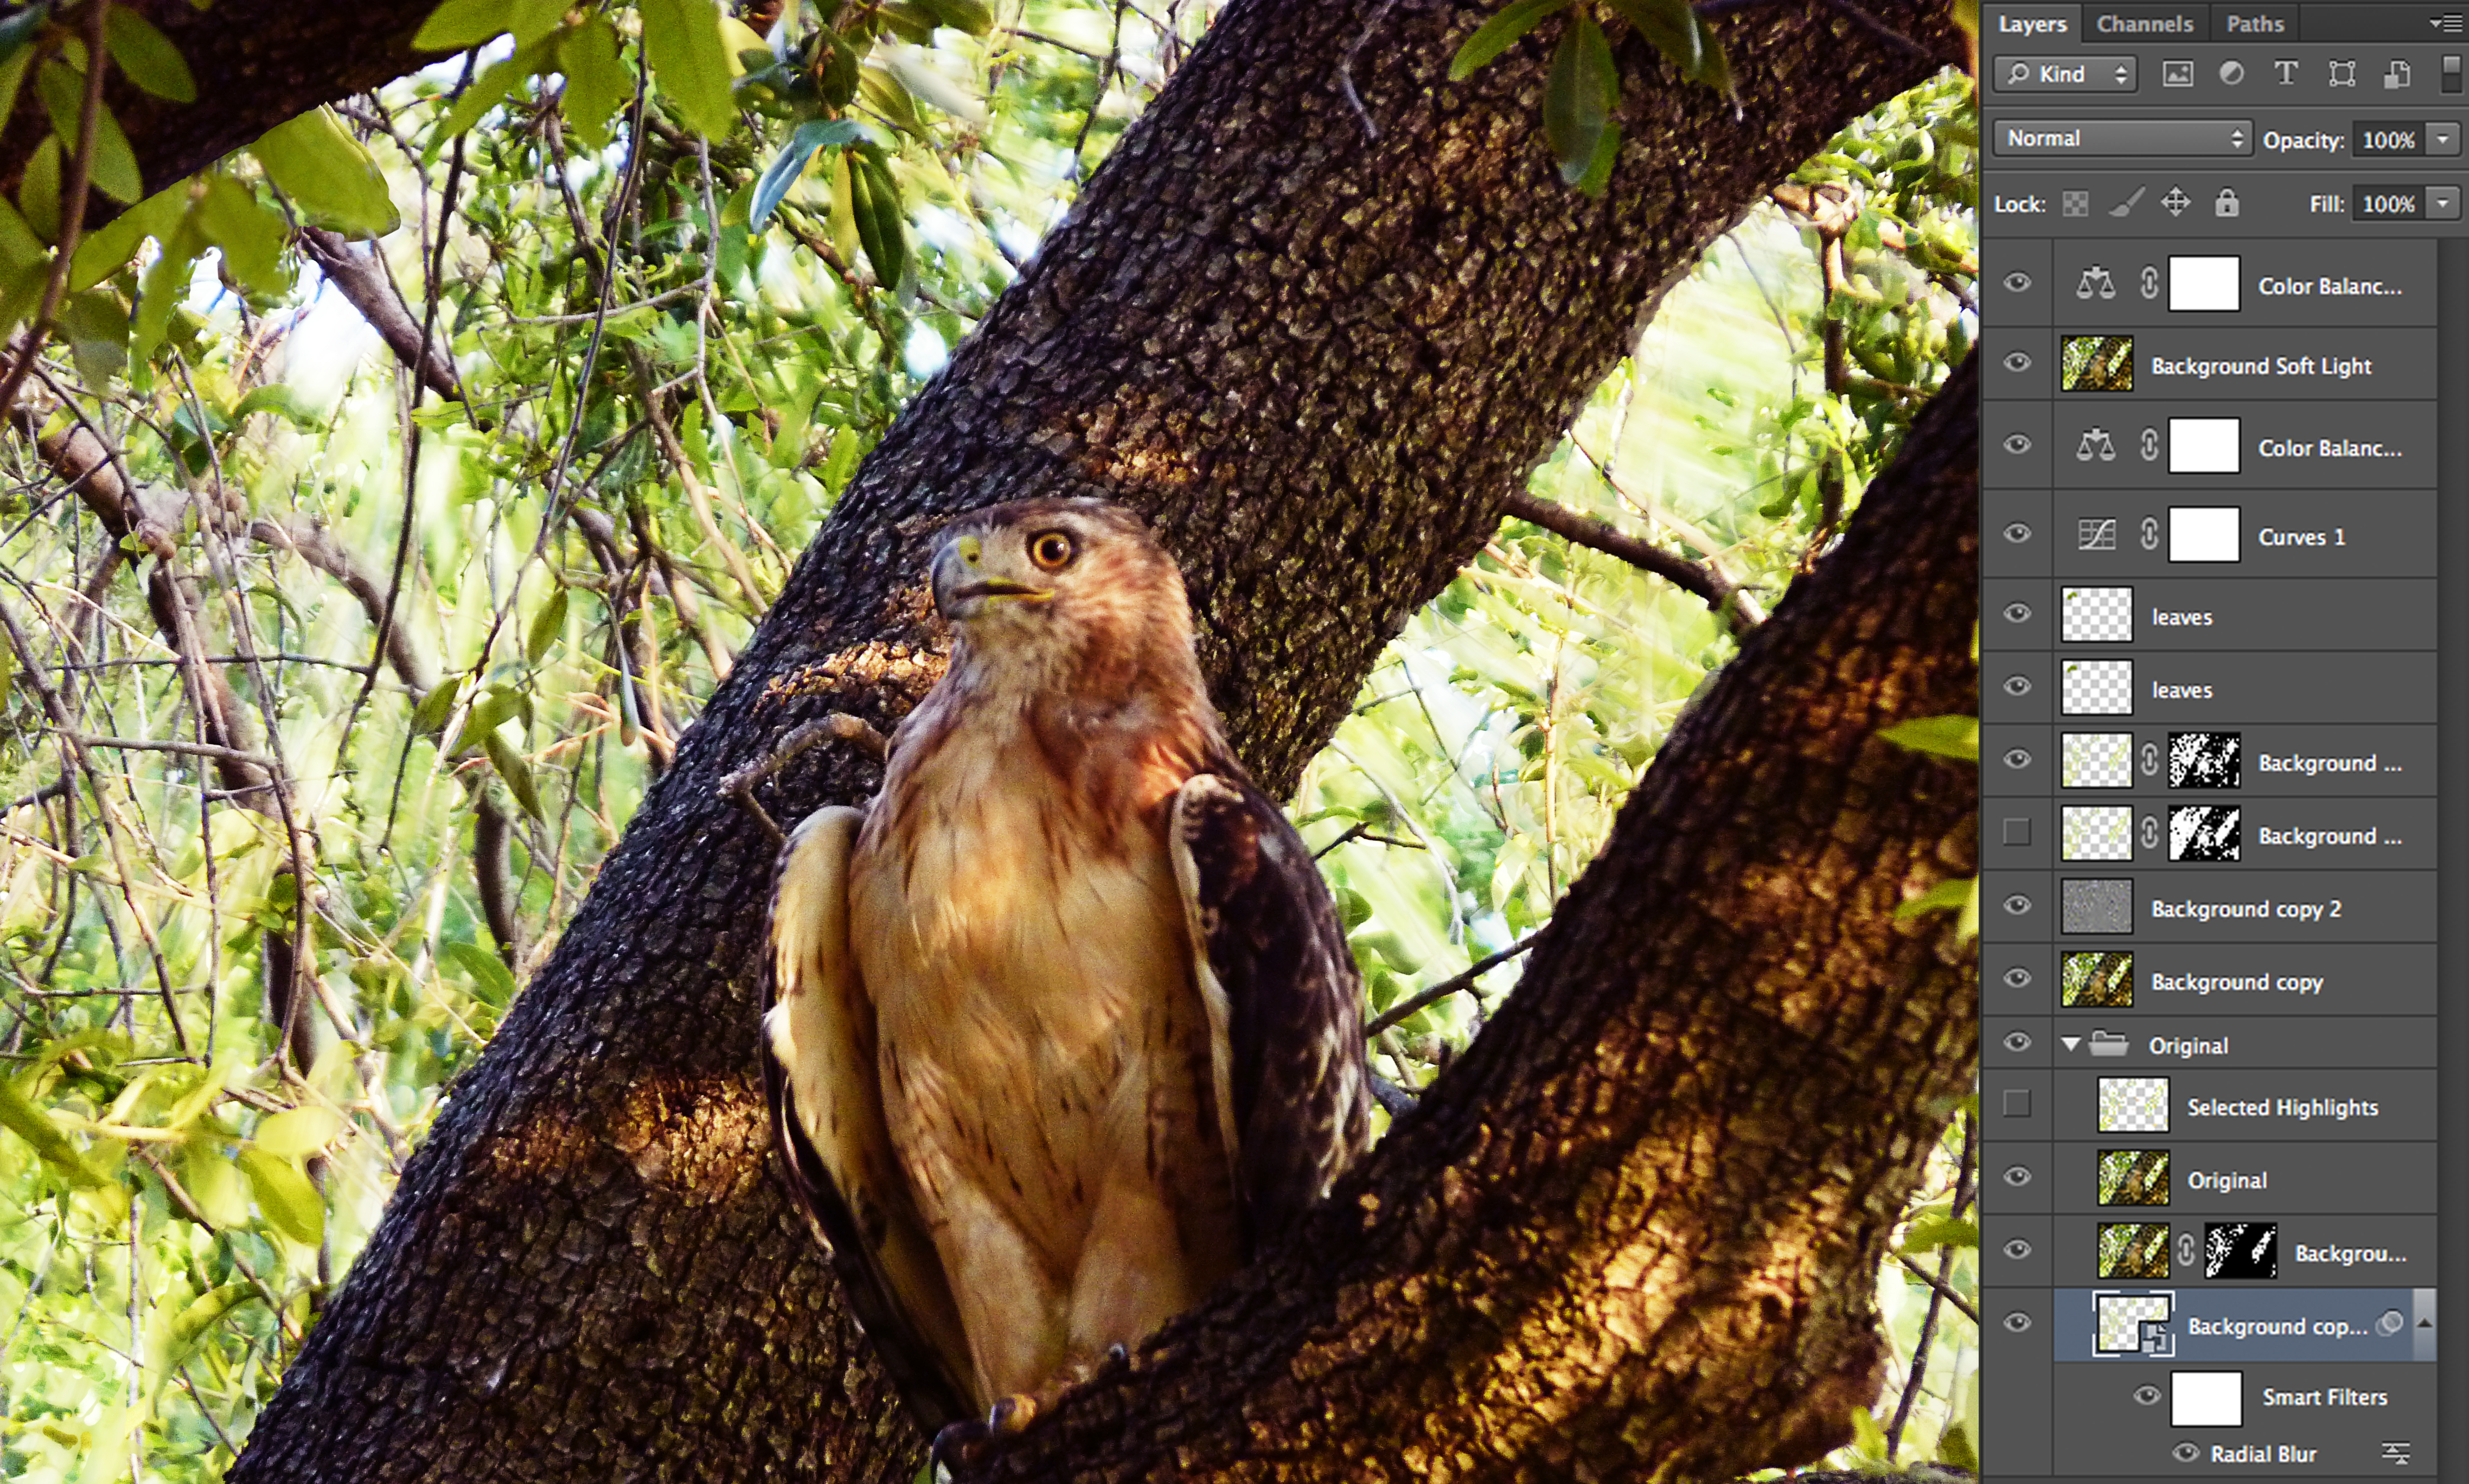
Photo hurridly taken in the backyard of our neighborhood hawk in the live oak with a point and shoot camera - a bit blurry and blownout - made to look unique.
Photoshop Non-destructive adjustment layers and tools to use for enhancement: (Correcting Blurry Photos, Adding Highlights and Modifying Color)
Learn Photoshop - How to Fix Blurry Photos
Learn how to fix a blurry photo due to camera shake, movement of your subject, or incorrect auto focus. We cover the use of the high pass command to a duplicate layer and adjust its blend mode to bring back focus to the image. (PhotoshopUniverse, Youtube)
The Magic Wand Tool In Photoshop (for background selection to eliminate the original background - a hazy day at Stonehenge, and add a Clouds layer as a new background for Stonehenge.)
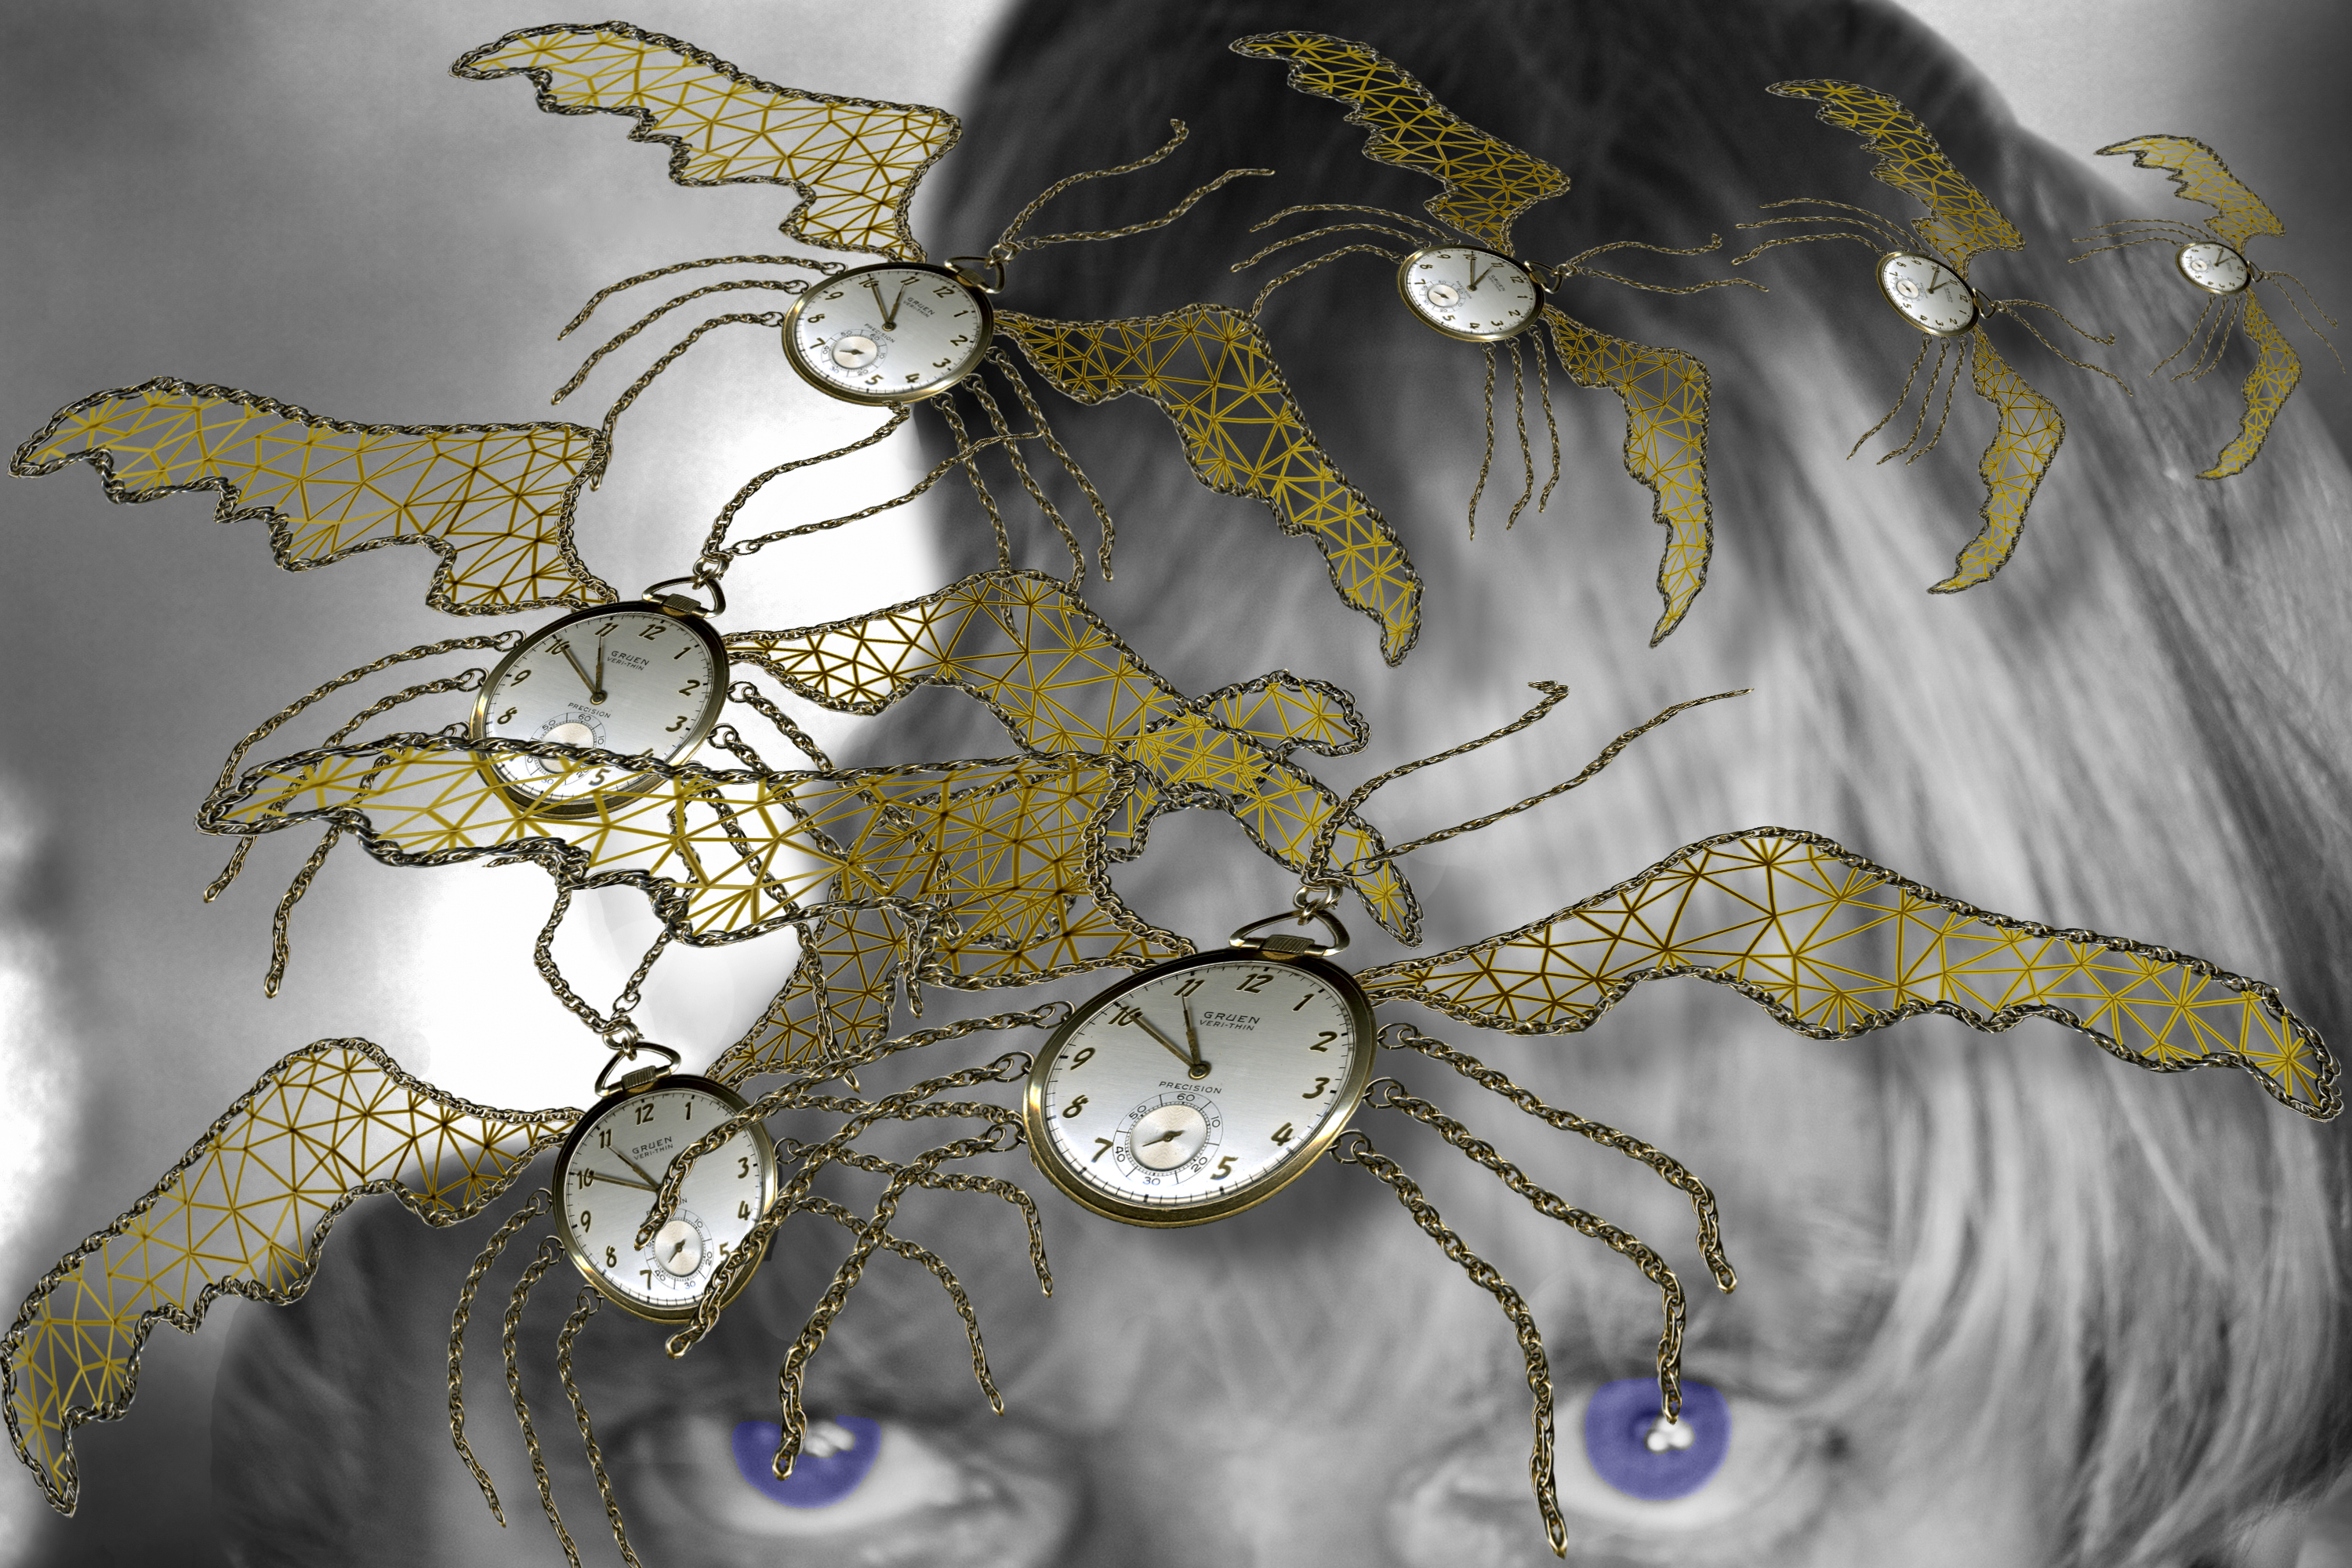
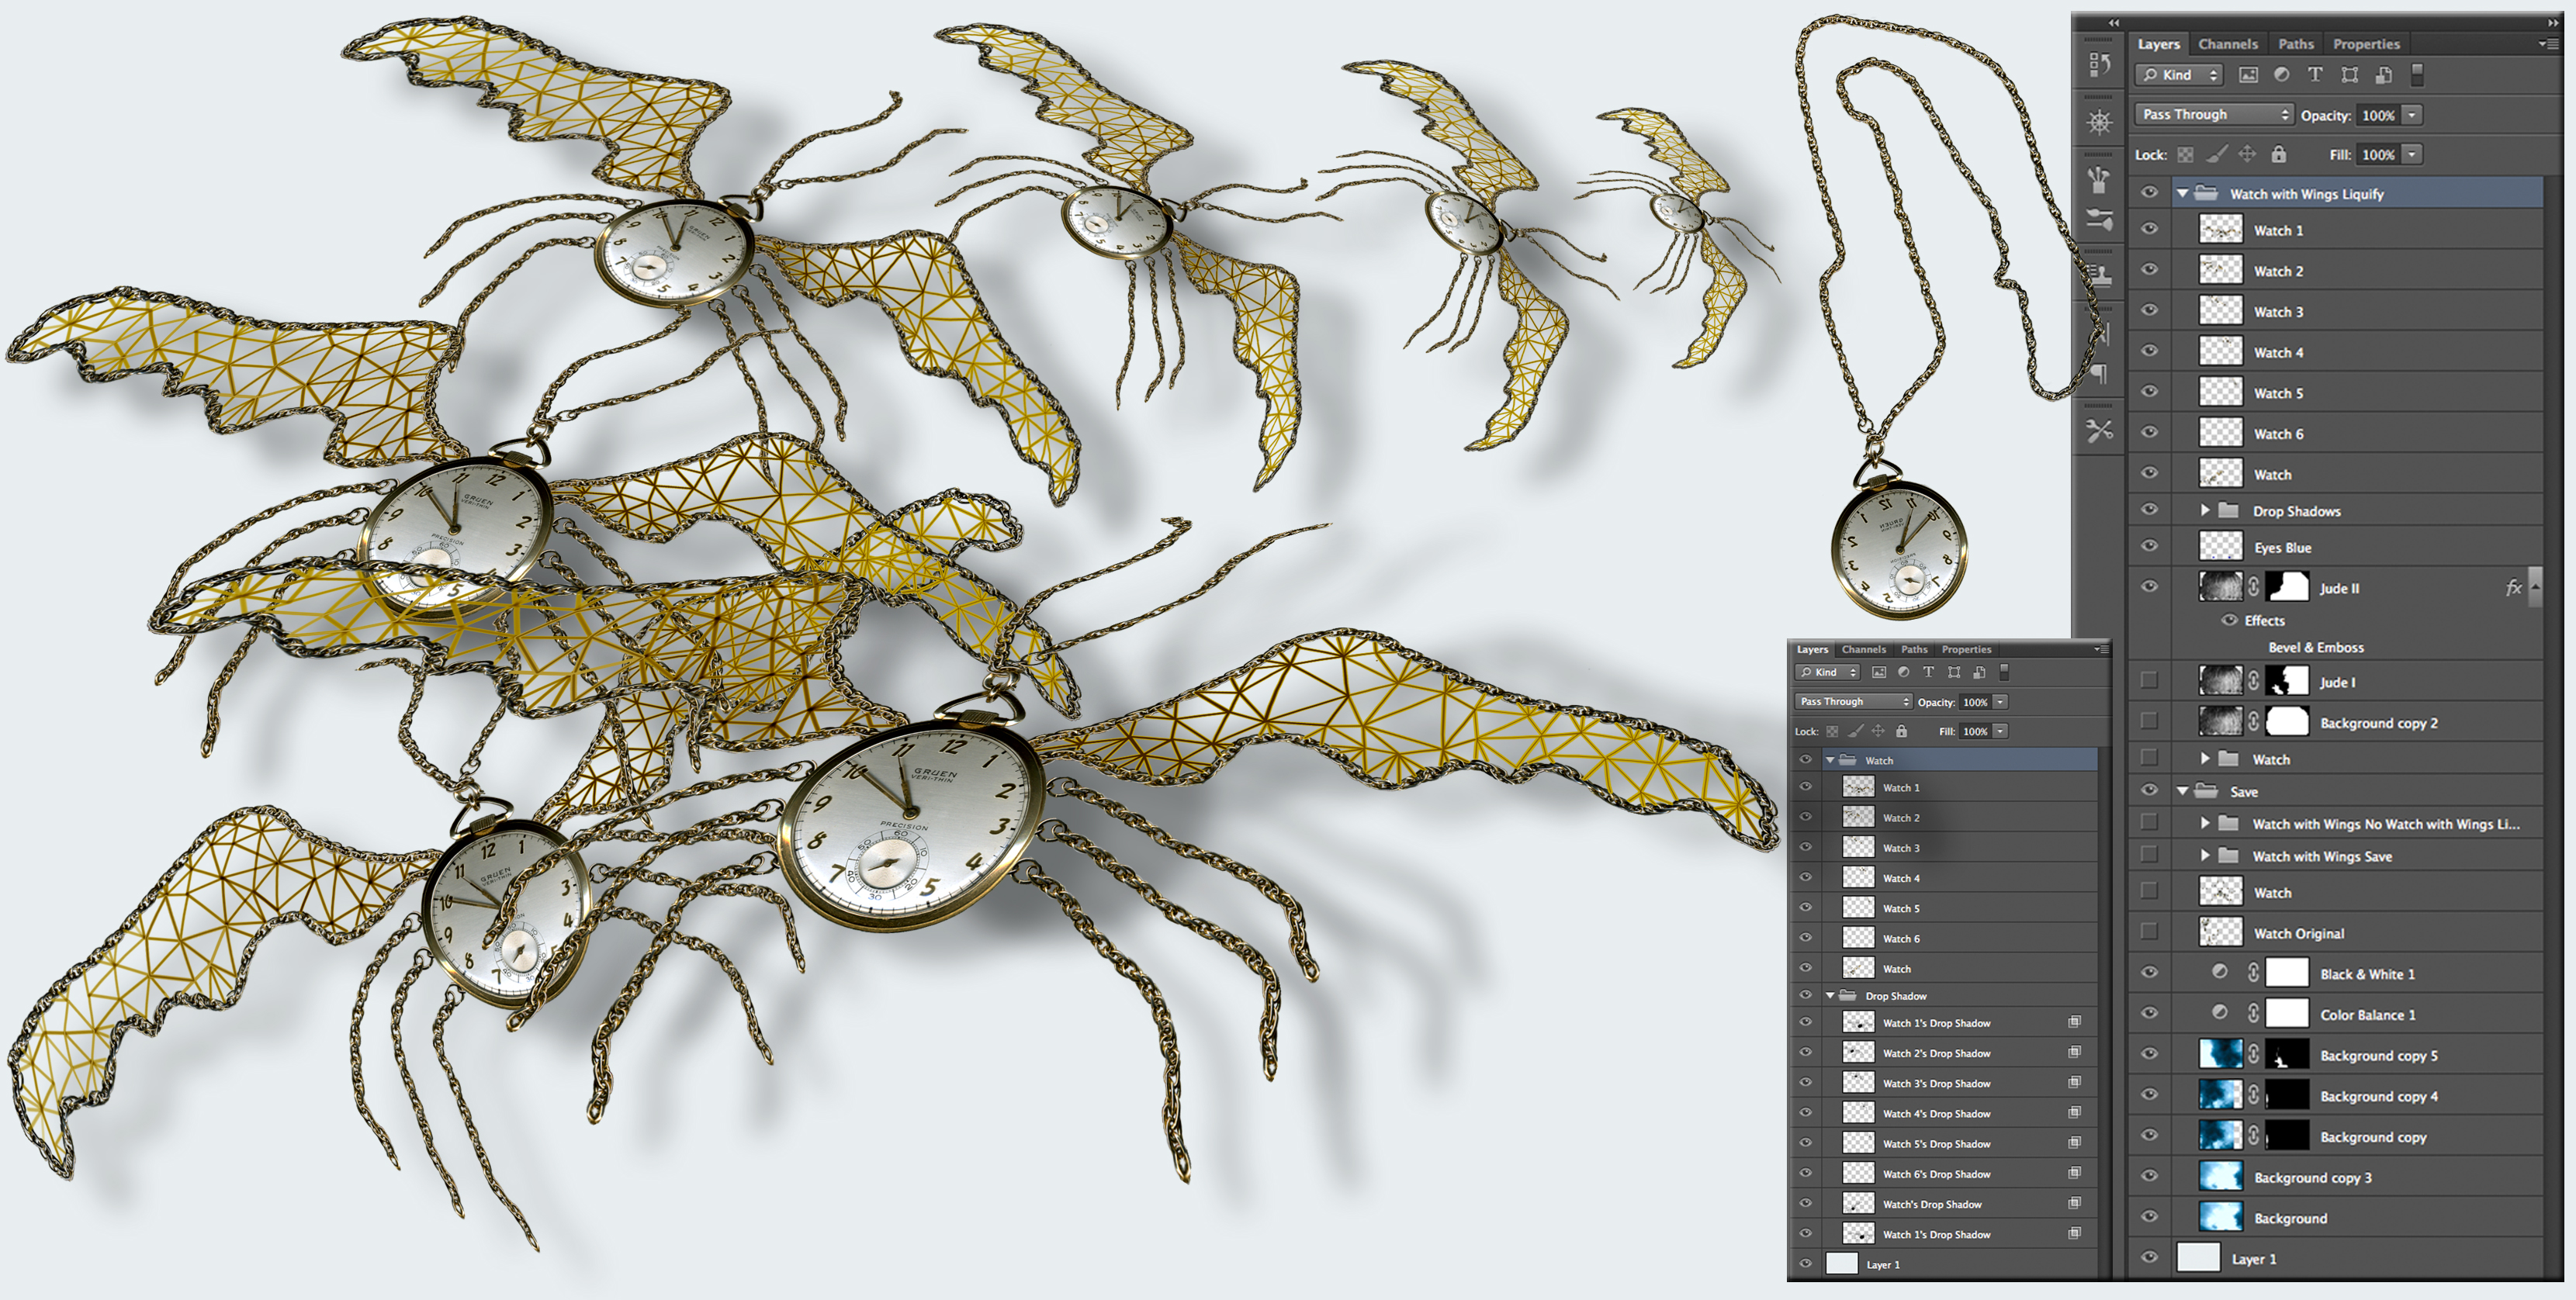
Time Storming (Watch to Insect): Composition of - self portrait + dad's old pocket watch scanned + an HDR photograph of a storm (always keep the cloud photos), then bring them altogether as a project in Photoshop.
Photoshop tools to use: (Remember - always either copy your layers or use layer maskes for non-destructive changes)
Set the new layer's layer style to “color”. Use the Brush Tool to color in the eyes (I used “3f3fd4” as the color setting), then take down the layer “opacity” of the brushed layer (I used 33%).
Watch to Insect: This is an experiment with Puppet Warp, basically taking the watch chain and forming it into wings.
Note: In the drop shadow layer, bring down the layer "opacity" or layer "fill" to look realistic. (I used between 15% and 50%). Also note: overlapping shadows where they intersect will be darker and need to be removed either destructively with eraser tool or non-destructively with a mask and the brush tool (white reveal, black conceal).
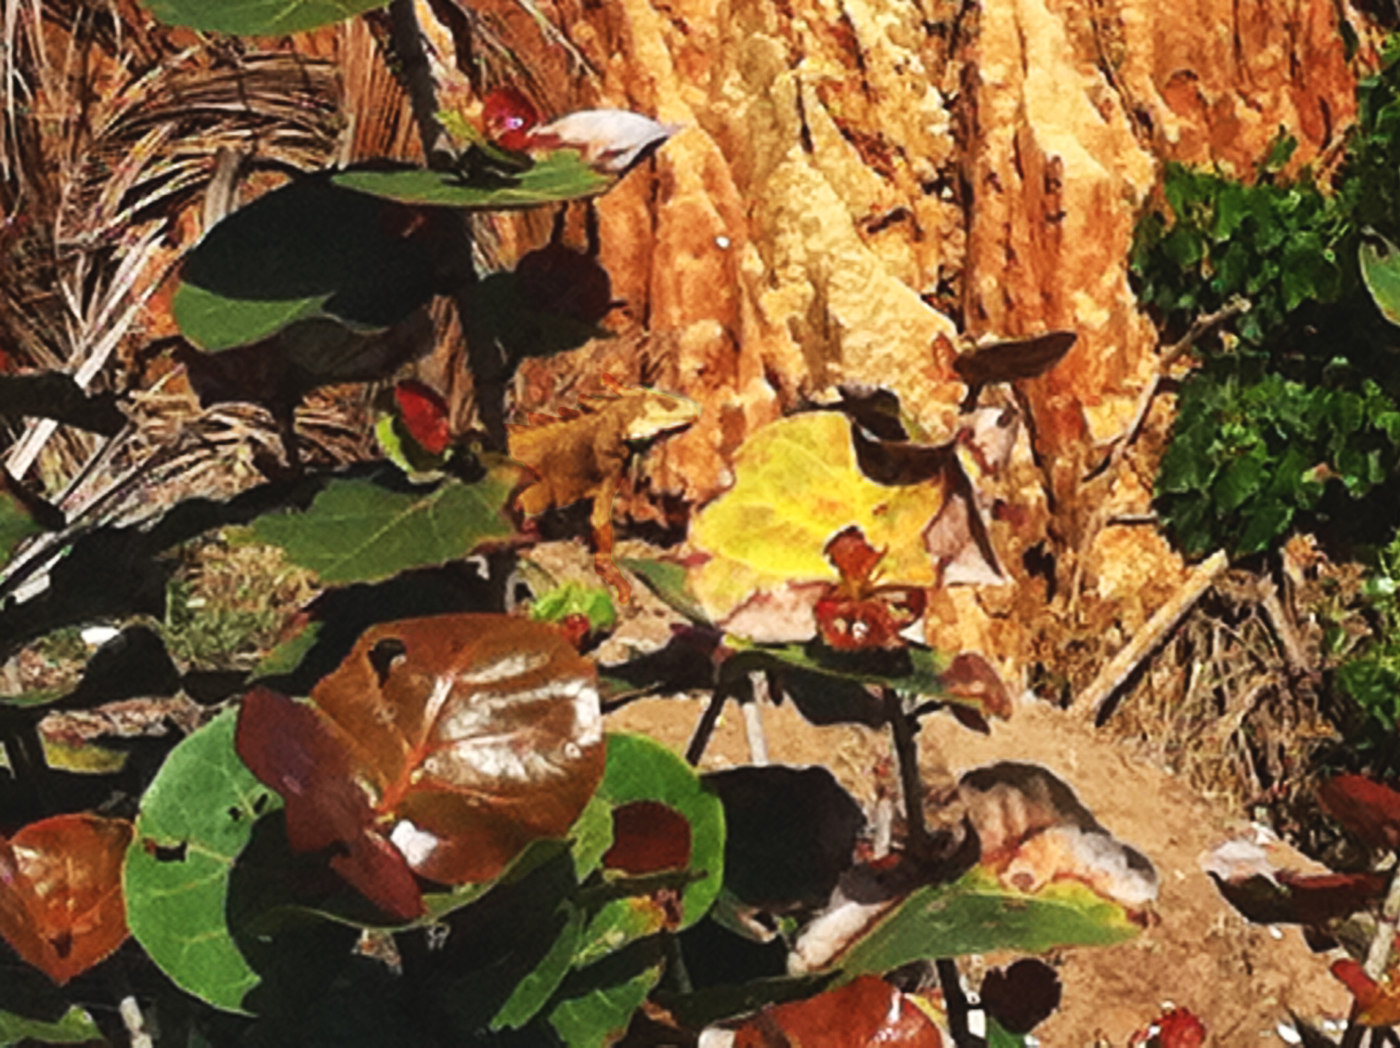
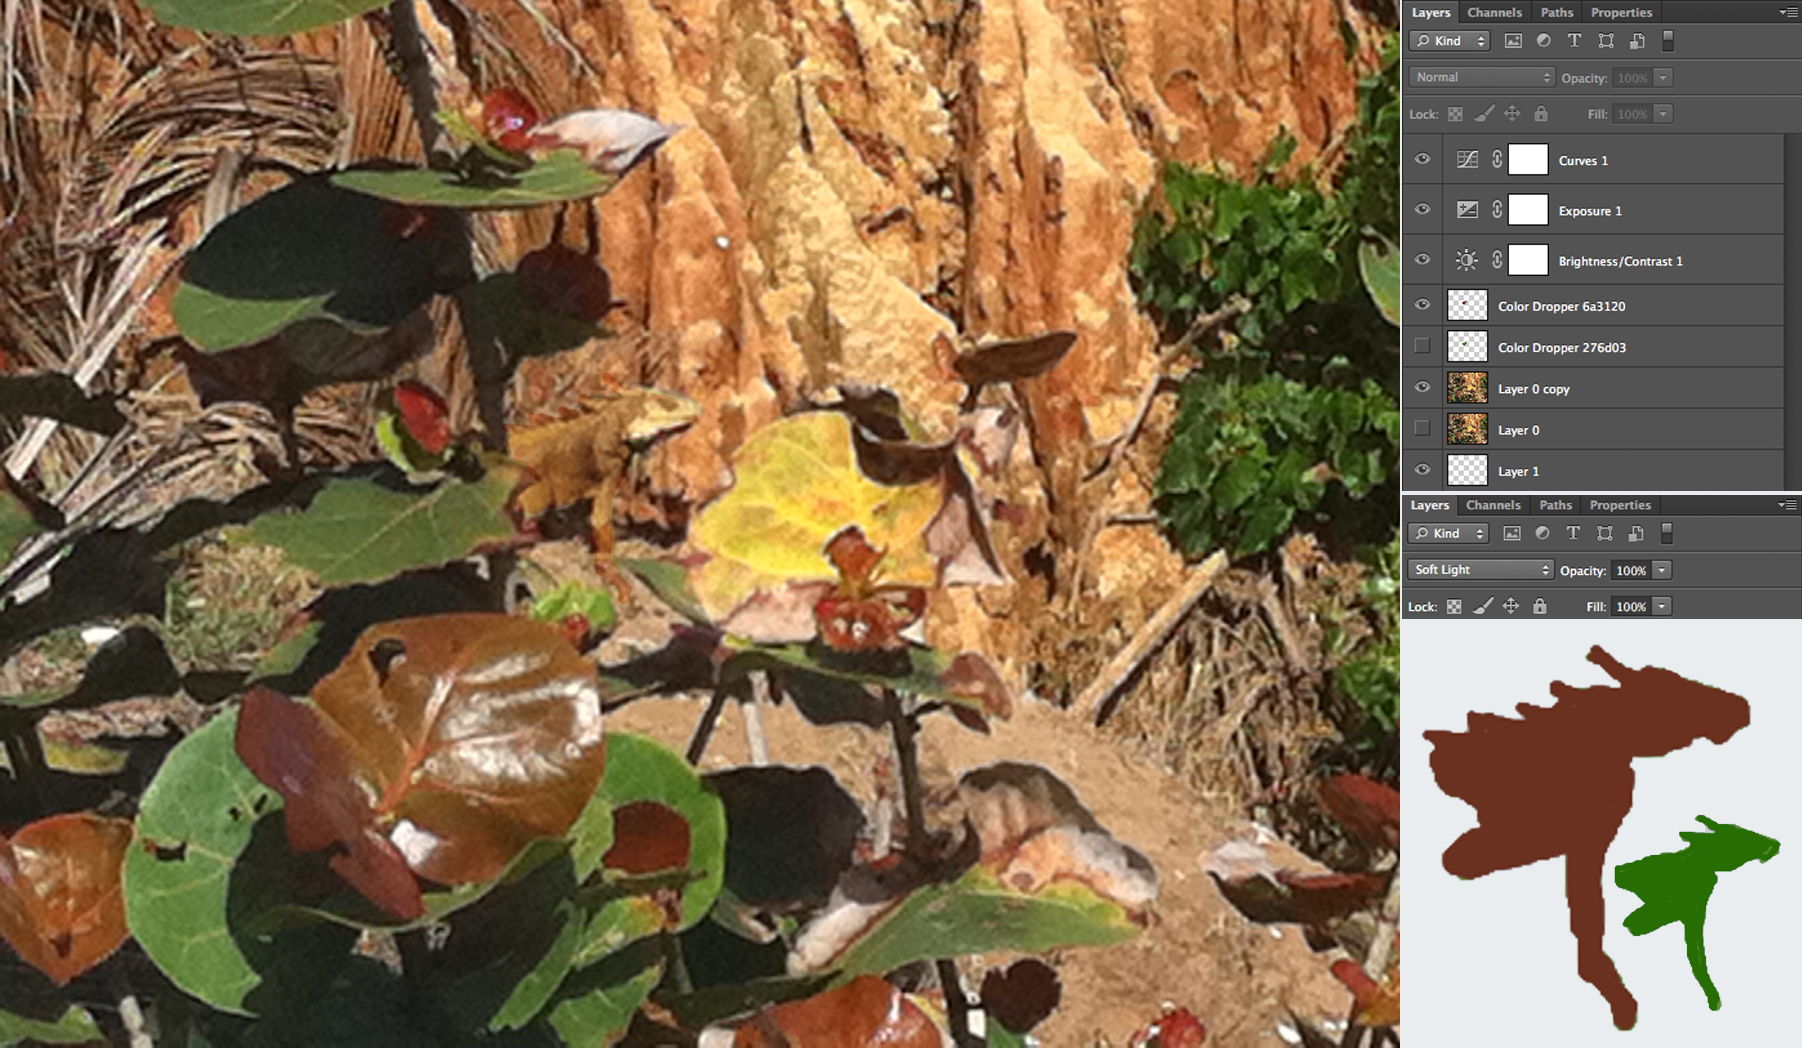
Using the Color Dropper to select from leaves in the photo, add experimental layers and brush in the outline of the Iguana.
The color "6a3120" to color in the lizard, change the Layer blending Mode to "Soft Light", which added enough definition to more easily spot the subject of interest. (Adobe / Yanik Photo School)

")
")
")
")


 - click to enlarge")
")
")

")
")
")
")
")


")
")
")
")
")
")
")
")
")
")
")


")
")
")
")
")
")
")
")